spring-boot -配置文件值注入
/**

 * 将配置文件中配置的每一个属性的值,映射到这个组件中

 * @ConfigurationProperties:告诉SpringBoot将本类中的所有属性和配置文件中相关的配置进行绑定;
  默认在全局配置文件中获取值的

 *      prefix = "person":配置文件中哪个下面的所有属性进行一一映射

 *

 * 只有这个组件是容器中的组件,才能容器提供的@ConfigurationProperties功能;
@Component
* */
配置文件内容:
person:

    lastName: hello

    age: 18

    boss: false

    birth: 2017/12/12

    maps: {k1: v1,k2: 12}

    lists:

      - lisi

      - zhaoliu

    dog:

      name: 小狗

      age: 12
映射:
@Component

@ConfigurationProperties(prefix = "person")

public class Person {

    private String lastName;

    private Integer age;

    private Boolean boss;

    private Date birth;

    private Map<String,Object> maps;

    private List<Object> lists;

    private Dog dog;
除了使用 @ConfigurationProperties进行配置值获取
之前使用bean标签添加到容器中的时候,对应现在的就是@Component
value标签对应的就是现在注解@Value
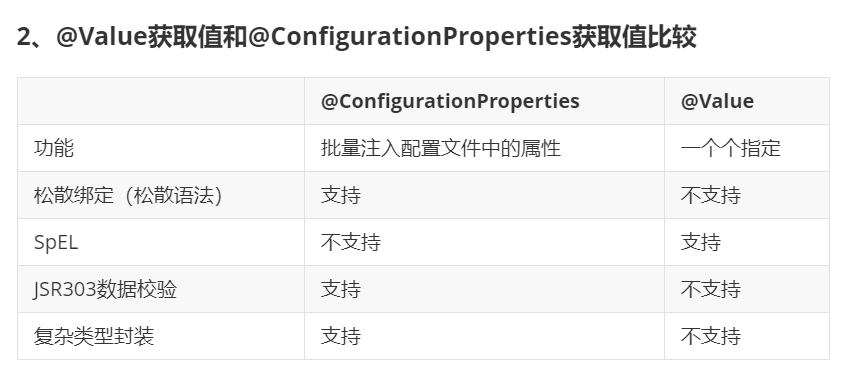
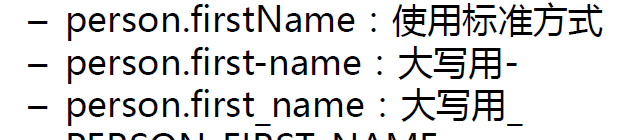
松散语法:
配置文件yml还是properties他们都能获取到值;

如果说,我们只是在某个业务逻辑中需要获取一下配置文件中的某项值,使用@Value;

如果说,我们专门编写了一个javaBean来和配置文件进行映射,我们就直接使用@ConfigurationProperties
@Component
@Validated//表示里面的value需要进行JSR303数据校验,就是下面的@Email
public class Person { /**
* <bean class="Person">
* <property name="lastName" value="字面量/${key}从环境变量、配置文件中获取值/#{SpEL}"></property>
* <bean/>
*/ //lastName必须是邮箱格式
//@Value("${person.last-name}")
private String lastName;
//@Value("#{11*2}")
private Integer age;
//@Value("true")
private Boolean boss; private Date birth;
private Map<String,Object> maps;
private List<Object> lists;
private Dog dog;
@PropertySource&@ImportResource&@Bean
/**

 * 将配置文件中配置的每一个属性的值,映射到这个组件中

 * @ConfigurationProperties:告诉SpringBoot将本类中的所有属性和配置文件中相关的配置进行绑定;

 *      prefix = "person":配置文件中哪个下面的所有属性进行一一映射

 *

 * 只有这个组件是容器中的组件,才能容器提供的@ConfigurationProperties功能;

 *  @ConfigurationProperties(prefix = "person")默认从全局配置文件中获取值;

 *

 */
例子:
@PropertySource(value = {"classpath:person.properties"})//classpath表示的是main路径下的

@Component

@ConfigurationProperties(prefix = "person")

//@Validated

public class Person {
@ImportResource:导入Spring的配置文件,让配置文件里面的内容生效;
Spring Boot里面没有Spring的配置文件,我们自己编写的配置文件,也不能自动识别;
想让Spring的配置文件生效,加载进来;@ImportResource标注在一个配置类上
@ImportResource(locations = {"classpath:beans.xml"})

导入Spring的配置文件让其生效
以前需要编写spring配置文件:
<?xml version="1.0" encoding="UTF-8"?>

<beans xmlns="http://www.springframework.org/schema/beans"

       xmlns:xsi="http://www.w3.org/2001/XMLSchema-instance"

       xsi:schemaLocation="http://www.springframework.org/schema/beans http://www.springframework.org/schema/beans/spring-beans.xsd">

    <bean id="helloService" class="com.atguigu.springboot.service.HelloService"></bean>

</beans>
现在:
SpringBoot推荐给容器中添加组件的方式;推荐使用全注解的方式
1、配置类@Configuration------>Spring配置文件
2、使用@Bean给容器中添加组件
/**

 * @Configuration:指明当前类是一个配置类;就是来替代之前的Spring配置文件

 *

 * 在配置文件中用<bean><bean/>标签添加组件

 *

 */

@Configuration

public class MyAppConfig {

    //将方法的返回值添加到容器中;容器中这个组件默认的id就是方法名

    @Bean

    public HelloService helloService02(){

        System.out.println("配置类@Bean给容器中添加组件了...");

        return new HelloService();

    }

}
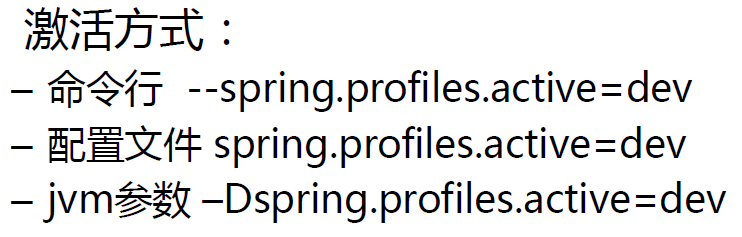
多Profile文件
我们在主配置文件编写的时候,文件名可以是 application-{profile}.properties/yml
默认使用application.properties的配置;
编写不同环境的配置文件:

application-dev.properties

在默认的全局配置文件当中

即application.properties中配置:

在配置文件中指定  spring.profiles.active=dev
yml支持多文档块方式
server:

  port: 8081

spring:

  profiles:

    active: prod

---

server:

  port: 8083

spring:

  profiles: dev

---

server:

  port: 8084

spring:

  profiles: prod  #指定属于哪个环境
---三个横线就是代表不同的配置内容分块,active:就是要激活的配置块
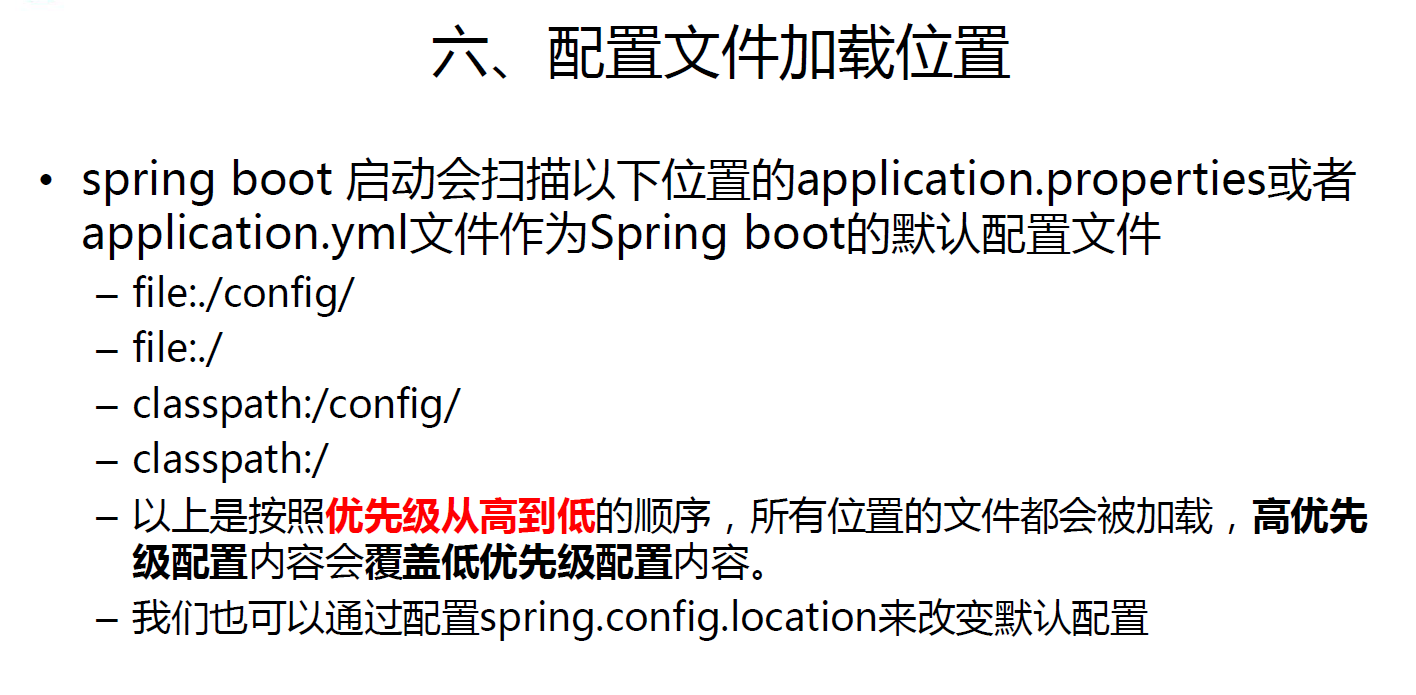
SpringBoot会从这四个位置全部加载主配置文件;互补配置;
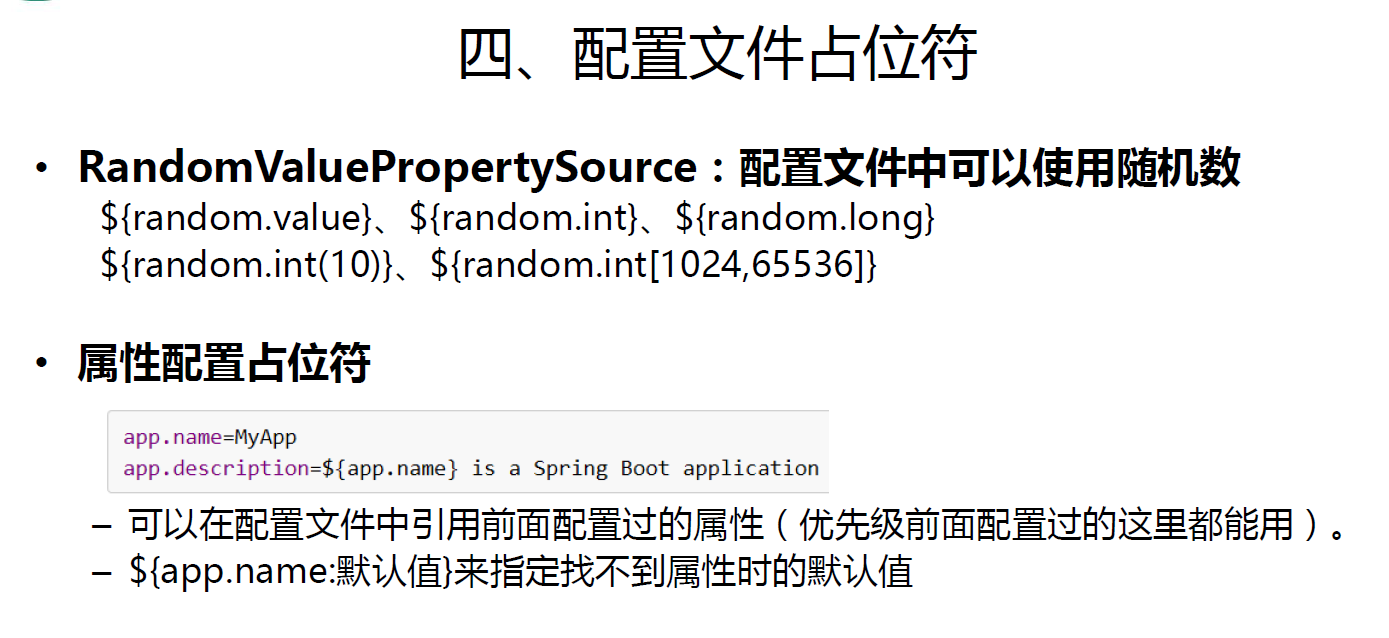
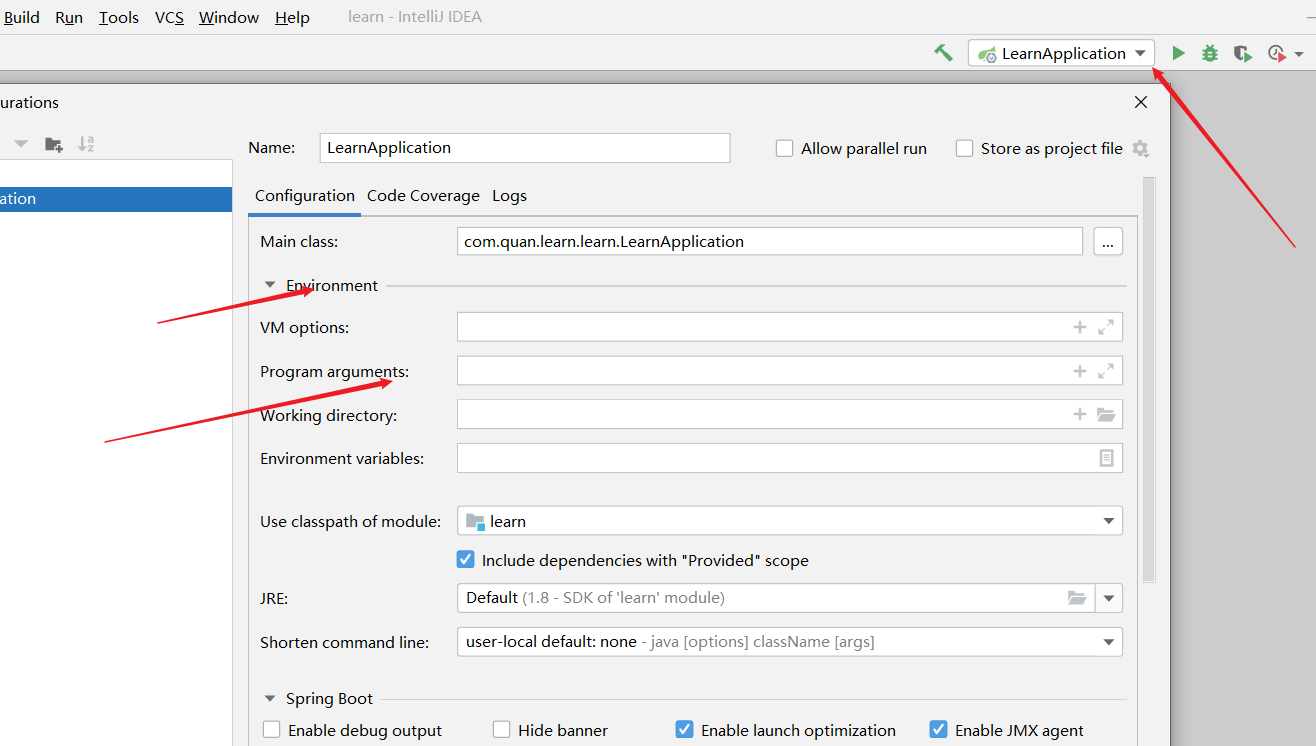
**项目打包好以后,我们可以使用命令行参数的形式,启动项目的时候来指定配置文件的新位置;
指定配置文件和默认加载的这些配置文件共同起作用形成互补配置;**

java -jar spring-boot-02-config-02-0.0.1-SNAPSHOT.jar
--spring.config.location=G:/application.properties

jar --jfijeifjie --server.port= 8089 命令行
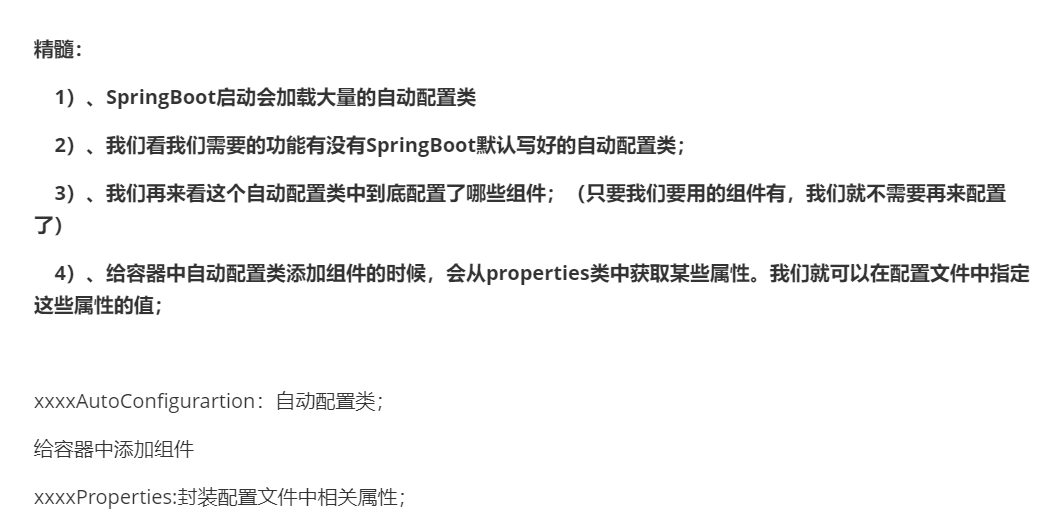
自动配置原理:
SpringBoot启动的时候加载主配置类,开启了自动配置功能 ==@EnableAutoConfiguration==
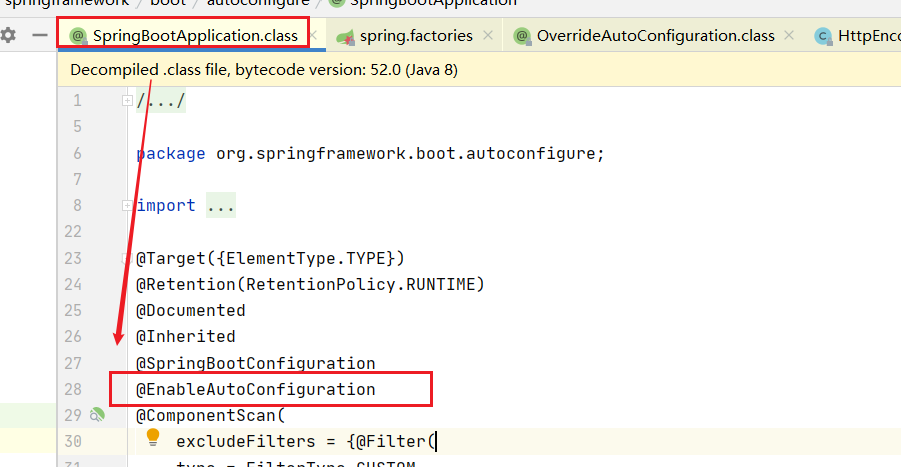
@EnableAutoConfiguration 作用:
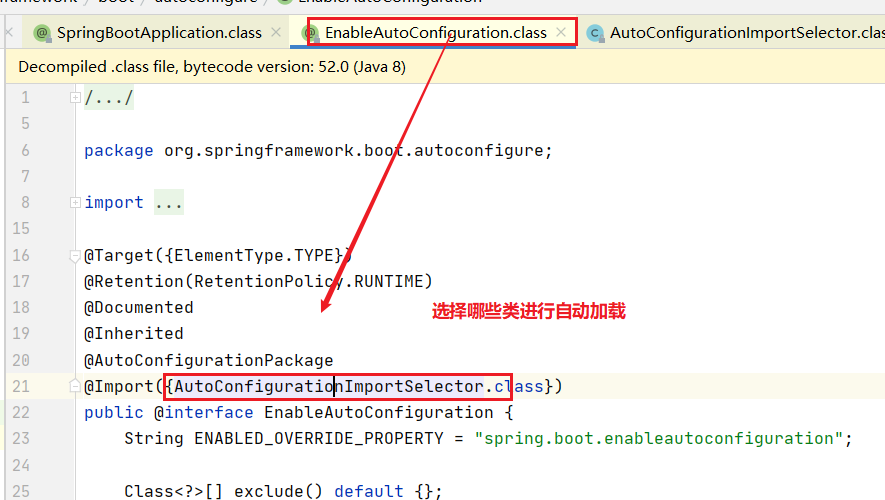
通过selectImport方法进行选择加载
        public Iterable<Entry> selectImports() {

            if (this.autoConfigurationEntries.isEmpty()) {

                return Collections.emptyList();

            } else {

                Set<String> allExclusions = (Set)this.autoConfigurationEntries.stream().map(AutoConfigurationImportSelector.AutoConfigurationEntry::getExclusions).flatMap(Collection::stream).collect(Collectors.toSet());

                Set<String> processedConfigurations = (Set)this.autoConfigurationEntries.stream().map(AutoConfigurationImportSelector.AutoConfigurationEntry::getConfigurations).flatMap(Collection::stream).collect(Collectors.toCollection(LinkedHashSet::new));

                processedConfigurations.removeAll(allExclusions);

                return (Iterable)this.sortAutoConfigurations(processedConfigurations, this.getAutoConfigurationMetadata()).stream().map((importClassName) -> {

                    return new Entry((AnnotationMetadata)this.entries.get(importClassName), importClassName);

                }).collect(Collectors.toList());

            }

        }
List<String> configurations = getCandidateConfigurations(annotationMetadata, attributes);获取候选的配置
    protected List<String> getCandidateConfigurations(AnnotationMetadata metadata, AnnotationAttributes attributes) {

        List<String> configurations = SpringFactoriesLoader.loadFactoryNames(this.getSpringFactoriesLoaderFactoryClass(), this.getBeanClassLoader());

        Assert.notEmpty(configurations, "No auto configuration classes found in META-INF/spring.factories. If you are using a custom packaging, make sure that file is correct.");

        return configurations;

    }
SpringFactoriesLoader.loadFactoryNames()

扫描所有jar包类路径下  META-INF/spring.factories

把扫描到的这些文件的内容包装成properties对象

从properties中获取到EnableAutoConfiguration.class类(类名)对应的值,然后把他们添加在容器中
==将 类路径下 META-INF/spring.factories 里面配置的所有EnableAutoConfiguration的值加入到了容器中;==
# PropertySource Loaders

org.springframework.boot.env.PropertySourceLoader=\

org.springframework.boot.env.PropertiesPropertySourceLoader,\

org.springframework.boot.env.YamlPropertySourceLoader

# Run Listeners

org.springframework.boot.SpringApplicationRunListener=\

org.springframework.boot.context.event.EventPublishingRunListener

# Error Reporters

org.springframework.boot.SpringBootExceptionReporter=\

org.springframework.boot.diagnostics.FailureAnalyzers

# Application Context Initializers

org.springframework.context.ApplicationContextInitializer=\

org.springframework.boot.context.ConfigurationWarningsApplicationContextInitializer,\

org.springframework.boot.context.ContextIdApplicationContextInitializer,\

org.springframework.boot.context.config.DelegatingApplicationContextInitializer,\

org.springframework.boot.rsocket.context.RSocketPortInfoApplicationContextInitializer,\

org.springframework.boot.web.context.ServerPortInfoApplicationContextInitializer

# Application Listeners

org.springframework.context.ApplicationListener=\

org.springframework.boot.ClearCachesApplicationListener,\

org.springframework.boot.builder.ParentContextCloserApplicationListener,\

org.springframework.boot.cloud.CloudFoundryVcapEnvironmentPostProcessor,\

org.springframework.boot.context.FileEncodingApplicationListener,\

org.springframework.boot.context.config.AnsiOutputApplicationListener,\

org.springframework.boot.context.config.ConfigFileApplicationListener,\

org.springframework.boot.context.config.DelegatingApplicationListener,\

org.springframework.boot.context.logging.ClasspathLoggingApplicationListener,\

org.springframework.boot.context.logging.LoggingApplicationListener,\

org.springframework.boot.liquibase.LiquibaseServiceLocatorApplicationListener

# Environment Post Processors

org.springframework.boot.env.EnvironmentPostProcessor=\

org.springframework.boot.cloud.CloudFoundryVcapEnvironmentPostProcessor,\

org.springframework.boot.env.SpringApplicationJsonEnvironmentPostProcessor,\

org.springframework.boot.env.SystemEnvironmentPropertySourceEnvironmentPostProcessor,\

org.springframework.boot.reactor.DebugAgentEnvironmentPostProcessor

# Failure Analyzers

org.springframework.boot.diagnostics.FailureAnalyzer=\

org.springframework.boot.diagnostics.analyzer.BeanCurrentlyInCreationFailureAnalyzer,\

org.springframework.boot.diagnostics.analyzer.BeanDefinitionOverrideFailureAnalyzer,\

org.springframework.boot.diagnostics.analyzer.BeanNotOfRequiredTypeFailureAnalyzer,\

org.springframework.boot.diagnostics.analyzer.BindFailureAnalyzer,\

org.springframework.boot.diagnostics.analyzer.BindValidationFailureAnalyzer,\

org.springframework.boot.diagnostics.analyzer.UnboundConfigurationPropertyFailureAnalyzer,\

org.springframework.boot.diagnostics.analyzer.ConnectorStartFailureAnalyzer,\

org.springframework.boot.diagnostics.analyzer.NoSuchMethodFailureAnalyzer,\

org.springframework.boot.diagnostics.analyzer.NoUniqueBeanDefinitionFailureAnalyzer,\

org.springframework.boot.diagnostics.analyzer.PortInUseFailureAnalyzer,\

org.springframework.boot.diagnostics.analyzer.ValidationExceptionFailureAnalyzer,\

org.springframework.boot.diagnostics.analyzer.InvalidConfigurationPropertyNameFailureAnalyzer,\

org.springframework.boot.diagnostics.analyzer.InvalidConfigurationPropertyValueFailureAnalyzer

# FailureAnalysisReporters

org.springframework.boot.diagnostics.FailureAnalysisReporter=\

org.springframework.boot.diagnostics.LoggingFailureAnalysisReporter
每一个这样的 xxxAutoConfiguration类都是容器中的一个组件,都加入到容器中;用他们来做自动配置;
每一个自动配置类进行自动配置功能;
以HttpEncodingAutoConfiguration(Http编码自动配置)为例解释自动配置原理;
//表示这是一个配置类,以前编写的配置文件一样,也可以给容器中添加组件

@Configuration(

    proxyBeanMethods = false

)

 //启动指定类的ConfigurationProperties功能;将配置文件中对应的值和HttpEncodingProperties绑定起来;
并把HttpEncodingProperties加入到ioc容器中

@EnableConfigurationProperties({ServerProperties.class})

/Spring底层@Conditional注解(Spring注解版),根据不同的条件,如果满足指定的条件,整个配置类里面的配置
就会生效;    判断当前应用是否是web应用,如果是,当前配置类生效

@ConditionalOnWebApplication(

    type = Type.SERVLET

)

//判断当前项目有没有这个类CharacterEncodingFilter;SpringMVC中进行乱码解决的过滤器;

@ConditionalOnClass({CharacterEncodingFilter.class})

//判断配置文件中是否存在某个配置  spring.http.encoding.enabled;如果不存在,判断也是成立的

//即使我们配置文件中不配置pring.http.encoding.enabled=true,也是默认生效的;

@ConditionalOnProperty(

    prefix = "server.servlet.encoding",

    value = {"enabled"},

    matchIfMissing = true

)

public class HttpEncodingAutoConfiguration {

    //他已经和SpringBoot的配置文件映射了

    private final Encoding properties;

      //只有一个有参构造器的情况下,参数的值就会从容器中拿

    public HttpEncodingAutoConfiguration(ServerProperties properties) {

        this.properties = properties.getServlet().getEncoding();

    }

    @Bean//给容器中添加一个组件,这个组件的某些值需要从properties中获取

//判断容器没有这个组件?

    @ConditionalOnMissingBean

    public CharacterEncodingFilter characterEncodingFilter() {

        CharacterEncodingFilter filter = new OrderedCharacterEncodingFilter();

        filter.setEncoding(this.properties.getCharset().name());

        filter.setForceRequestEncoding(this.properties.shouldForce(org.springframework.boot.web.servlet.server.Encoding.Type.REQUEST));

        filter.setForceResponseEncoding(this.properties.shouldForce(org.springframework.boot.web.servlet.server.Encoding.Type.RESPONSE));

        return filter;

    }
根据当前不同的条件判断,决定这个配置类是否生效?
一但这个配置类生效;这个配置类就会给容器中添加各种组件;这些组件的属性是从对应的properties类中获取的,这些类里面的每一个属性又是和配置文件绑定的;
所有在配置文件中能配置的属性都是在xxxxProperties类中封装者‘;配置文件能配置什么就可以参照某个
功能对应的这个属性类
@Conditional派生注解(Spring注解版原生的@Conditional作用)
作用:必须是@Conditional指定的条件成立,才给容器中添加组件,配置配里面的所有内容才生效;
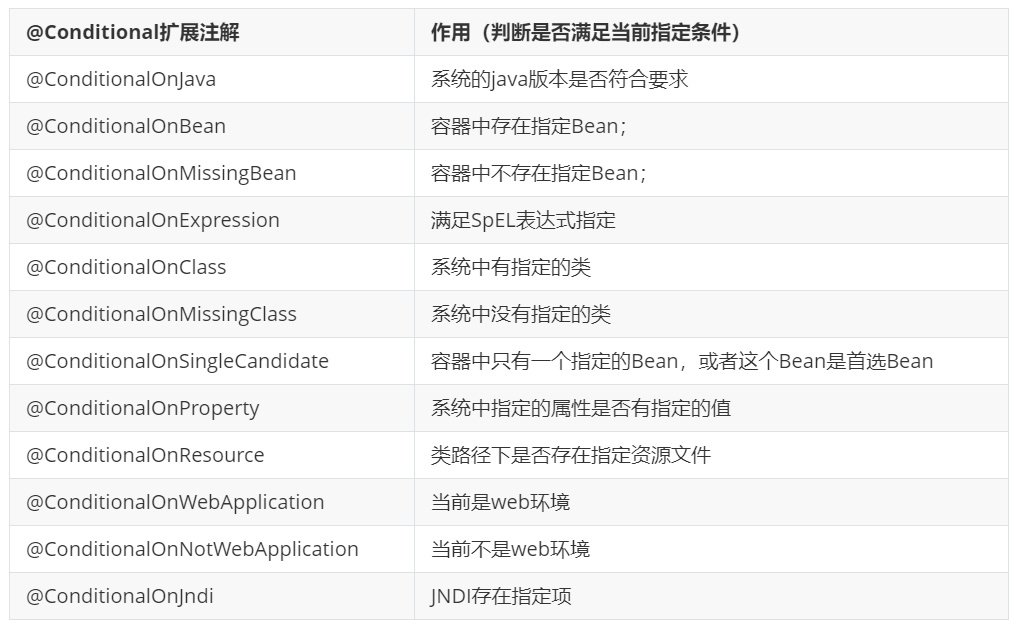
自动配置类必须在一定的条件下才能生效;
==我们可以通过启用 debug=true属性;来让控制台打印自动配置报告==,这样我们就可以很方便的知道哪些自动配置类生效;
============================

CONDITIONS EVALUATION REPORT

============================

Positive matches:   //自动加载启用的配置累

-----------------

   AopAutoConfiguration matched:

      - @ConditionalOnProperty (spring.aop.auto=true) matched (OnPropertyCondition)

   AopAutoConfiguration.ClassProxyingConfiguration matched:

      - @ConditionalOnMissingClass did not find unwanted class 'org.aspectj.weaver.Advice' (OnClassCondition)

      - @ConditionalOnProperty (spring.aop.proxy-target-class=true) matched (OnPropertyCondition)

   DispatcherServletAutoConfiguration matched:

      - @ConditionalOnClass found required class 'org.springframework.web
Negative matches:自动加载不启用,不满足condition条件的

-----------------

   ActiveMQAutoConfiguration:

      Did not match:

         - @ConditionalOnClass did not find required class 'javax.jms.ConnectionFactory' (OnClassCondition)

   AopAutoConfiguration.AspectJAutoProxyingConfiguration:

      Did not match:

         - @ConditionalOnClass did not find required class 'org.aspectj.weaver.Advice' (OnClassCondition)
spring-boot -配置文件值注入的更多相关文章
- Spring Boot之配置文件值注入(@ConfigurationProperties)
前言:Spring Boot配置文件值的注入有两种方式,分别是 @ConfigurationProperties @Value 这里我们使用第一种 首先我们创建一个application.yml文件, ...
- Spring Boot 配置文件详解
Spring Boot配置文件详解 Spring Boot提供了两种常用的配置文件,分别是properties文件和yml文件.他们的作用都是修改Spring Boot自动配置的默认值.相对于prop ...
- Springboot 系列(二)Spring Boot 配置文件
注意:本 Spring Boot 系列文章基于 Spring Boot 版本 v2.1.1.RELEASE 进行学习分析,版本不同可能会有细微差别. 前言 不管是通过官方提供的方式获取 Spring ...
- 史上最全的Spring Boot配置文件详解
Spring Boot在工作中是用到的越来越广泛了,简单方便,有了它,效率提高不知道多少倍.Spring Boot配置文件对Spring Boot来说就是入门和基础,经常会用到,所以写下做个总结以便日 ...
- 2、spring boot 配置文件
配置文件 SpringBoot使用一个全局的配置文件,配置文件名是固定的: •application.properties •application.yml 配置文件的作用:修改SpringBoot自 ...
- 【串线篇】spring boot配置文件大全【上】
一.配置文件 SpringBoot使用一个全局的配置文件,配置文件名是固定的: • application.properties • application.yml 配置文件的作用:修改SpringB ...
- Spring Boot配置文件大全
Spring Boot配置文件大全 ############################################################# # mvc ############## ...
- Spring Boot 配置文件和命令行配置
Spring Boot 属于约定大于配置,就是说 Spring Boot 推荐不做配置,很多都是默认配置,但如果想要配置系统,使得软件符合业务定义,Spring Boot 可以通过多种方式进行配置. ...
- Spring Boot 配置文件密码加密两种方案
Spring Boot 配置文件密码加密两种方案 jasypt 加解密 jasypt 是一个简单易用的加解密Java库,可以快速集成到 Spring 项目中.可以快速集成到 Spring Boot 项 ...
- 黑马_13 Spring Boot:04.spring boot 配置文件
13 Spring Boot: 01.spring boot 介绍&&02.spring boot 入门 04.spring boot 配置文件 05.spring boot 整合其他 ...
随机推荐
- Java:修饰符小记
Java:修饰符小记 对 Java 中的 修饰符,做一个微不足道的小小小小记 Java 语言提供了很多修饰符,大概分为两类: 访问权限修饰符 非访问权限修饰符 访问权限修饰符 修饰符 说明 publi ...
- UltraSoft - Alpha - Scrum Meeting 4
Date: Apr 18th, 2020. 会议内容为 例行汇报. Scrum 情况汇报 进度情况 组员 负责 前两日进度 后两日任务 CookieLau PM 完成前后端交互规格的约定,了解前后端进 ...
- seata整合多数据源
seata整合多数据源 一.背景 二.整合步骤 1.seata server的搭建 2.引入数据源切换组件 3.引入seata组件 4.配置多数据源 5.关闭seata自己默认的数据源代理 6.配置s ...
- Noip模拟62 2021.9.26
T1 Set 真就随机化拿了$90$?? 不过还是有依据的,毕竟这道题出解的几率很大,随出答案的概率也极大 所以不妨打一个随机化 1 #include<bits/stdc++.h> 2 # ...
- 热身训练2 The All-purpose Zero
The All-purpose Zero 简要题意: 长度为n的数组,每个数字为S[i],$0$是一种很神奇的数字,你想要的,它都可以变! 问这个序列的最长上升子序列长度为多少? 分析: 我们将除了 ...
- 2021.7.29考试总结[NOIP模拟27]
T1 牛半仙的妹子图 做法挺多的,可以最小生成树或者最短路,复杂度O(cq),c是颜色数. 我考场上想到了原来做过的一道题影子,就用了并查集,把边权排序后一个个插入,记录权值的前缀和,复杂度mlogm ...
- 单源最短路径算法:迪杰斯特拉 (Dijkstra) 算法(一)
一.算法介绍 迪杰斯特拉算法(英语:Dijkstra's algorithm)由荷兰计算机科学家艾兹赫尔·迪杰斯特拉在1956年提出.迪杰斯特拉算法使用了广度优先搜索解决赋权有向图的单源最短路径问题. ...
- NavigationView使用简介
Android支持直接创建带有NavigationView的Activity,这里主要介绍NavigationView的逻辑. NavigationView通常是跟DrawerLayout一起使用.D ...
- linux下使用shell命令通过wpa_cli控制wpa_supplicant连接wifi
最近在调试wifi,已经把wpa_supplicant 工具编译打包好了,为了测试wif驱动及wifi模块是否ok,需要用shell命令临时启动wifi服务连接wifi热点测试. 首先板子启动用ifc ...
- JS基础面试
1. JS是高级语言弱类型语言 脚本语言 1.1高级语言我们写完的代码不能直接执行,要先经过js引擎翻译成0101这种机器语言才能执行 1.2 弱类型语言变量可以在前一行设置为一个数字,下一行修改为一 ...