MySQL 绿色版安装方法图文教程
一、下载,这里使用绿色解压缩版
http://mirror.services.wisc.edu/mysql/Downloads/MySQL-5.1/mysql-noinstall-5.1.32-win32.zip
二、配置MySQL的参数
1、解压缩绿色版软件到D:\AppServ\MySQL
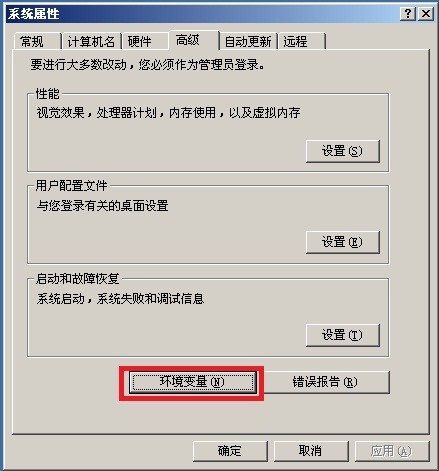
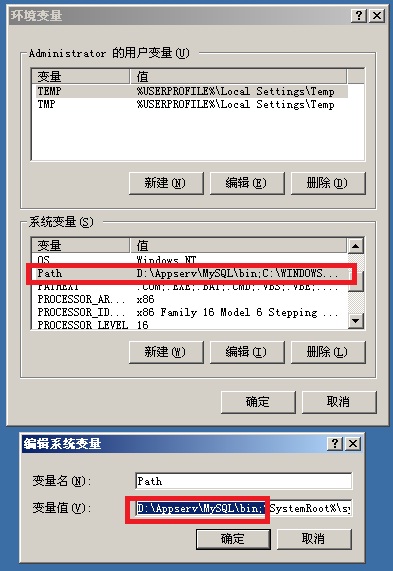
设置系统环境变量, 在Path中添加 D:\AppServ\MySQL\bin;


2、修改D:\AppServ\MySQL\my-small.ini文件内容,添加红色内容
[client]
#password = your_password
port = 3306
socket = /tmp/mysql.sock
default-character-set=gbk
[mysqld]
port = 3306
socket = /tmp/mysql.sock
default-character-set=gbk
skip-locking
key_buffer = 16K
max_allowed_packet = 1M
table_cache = 4
sort_buffer_size = 64K
read_buffer_size = 256K
read_rnd_buffer_size = 256K
net_buffer_length = 2K
thread_stack = 64K
basedir=D:\Appserv\MySQL\
datadir=D:\Appserv\MySQL\Data\
#basedir是mysql安装目录;#datadir是mysql数据库存放位置,必须是Data文件夹名
将修改后的文件另存为my.ini
3、安装MySQL的服务,服务名自己定义为MySQL.
1)、进入DOS窗口
2)、执行安装MySQL服务名的命令:
D:\AppServ\MySQL\bin\mysqld-nt -install mysql --defaults-file="D:\Appserv\MySQL\my.ini"
出现Service successfully installed.表示安装成功。
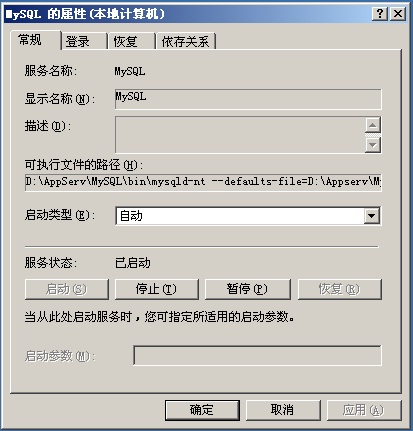
然后打开服务窗口(在运行框中输入services.msc即可打开服务窗口,然后可以找到mysql服务了,右键mysql服务属性,在弹出的窗口中可以看到以下信息:)
D:\AppServ\MySQL\bin\mysqld-nt --defaults-file=D:\Appserv\MySQL\my.ini mysql 则表示mysql会随开机启动而启动!
3)、启动MySQL服务
net start mysql
MySQL服务正在启动 .
MySQL服务无法启动。
4)、登陆MySQL服务器
mysql -uroot -p
Enter password:
Welcome to the MySQL monitor. Commands end with ; or \g.
Your MySQL connection id is 1
Server version: 5.1.32-community MySQL Community Edition (GPL)
Type 'help;' or '\h' for help. Type '\c' to clear the buffer.
mysql>
注意:MySQL的管理员用户名为root,密码默认为空。
5)、查看数据库
mysql> show databases;
+--------------------+
| Database |
+--------------------+
| information_schema |
| mysql |
| test |
+--------------------+
3 rows in set (0.02 sec)
可以看到MySQL服务器中有三个数据库。
6)、使用数据库
mysql> use test
Database changed
7)、查看数据库中的表
mysql> show tables;
Empty set (0.00 sec)
8)、创建表ttt
mysql> create table ttt(a int,b varchar(20));
Query OK, 0 rows affected (0.00 sec)
9)、插入三条数据
mysql> insert into ttt values(1,'aaa');
Query OK, 1 row affected (0.02 sec)
mysql> insert into ttt values(2,'bbb');
Query OK, 1 row affected (0.00 sec)
mysql> insert into ttt values(3,'ccc');
Query OK, 1 row affected (0.00 sec)
10)、查询数据
mysql> select * from ttt;
+------+------+
| a | b |
+------+------+
| 1 | aaa |
| 2 | bbb |
| 3 | ccc |
+------+------+
3 rows in set (0.00 sec)
11)、删除数据
mysql> delete from ttt where a=3;
Query OK, 1 row affected (0.01 sec)
删除后查询操作结果:
mysql> select * from ttt;
+------+------+
| a | b |
+------+------+
| 1 | aaa |
| 2 | bbb |
+------+------+
2 rows in set (0.00 sec)
12)、更新数据
mysql> update ttt set b = 'xxx' where a =2;
Query OK, 1 row affected (0.00 sec)
Rows matched: 1 Changed: 1 Warnings: 0
查看更新结果:
mysql> select * from ttt;
+------+------+
| a | b |
+------+------+
| 1 | aaa |
| 2 | xxx |
+------+------+
2 rows in set (0.00 sec)
13)、删除表
mysql> drop table ttt;
Query OK, 0 rows affected (0.00 sec)
查看数据库中剩余的表:
mysql> show tables;
Empty set (0.00 sec)
三、更改MySQL数据库root用户的密码
1、使用mysql数据库
mysql> use mysql
Database changed
2、查看mysql数据库中所有的表
mysql>show tables;
+---------------------------+
| Tables_in_mysql |
+---------------------------+
| columns_priv |
| db |
| func |
| help_category |
| help_keyword |
| help_relation |
| help_topic |
| host |
| proc |
| procs_priv |
| tables_priv |
| time_zone |
| time_zone_leap_second |
| time_zone_name |
| time_zone_transition |
| time_zone_transition_type |
| user |
+---------------------------+
17 rows in set (0.00 sec)
3、删除mysql数据库中用户表的所有数据
mysql> delete from user;
Query OK, 3 rows affected (0.00 sec)
4、创建一个root用户,密码为"xiaohui"。
mysql>grant all on *.* to root@'%' identified by 'xiaohui' with grant option;
Query OK, 0 rows affected (0.02 sec)
5、查看user表中的用户
mysql> select User from user;
+------+
| User |
+------+
| root |
+------+
1 row in set (0.00 sec)
6、重启MySQL:更改了MySQL用户后,需要重启MySQL服务器才可以生效。
net stop mysql
MySQL 服务正在停止..
MySQL 服务已成功停止。
net start mysql
MySQL 服务正在启动 .
MySQL 服务已经启动成功。
7、重新登陆MySQL服务器
mysql -uroot -pxiaohui
Welcome to the MySQL monitor. Commands end with ; or \g.
Your MySQL connection id is 1
Server version: 5.1.32-community MySQL Community Edition (GPL)
Type 'help;' or '\h' for help. Type '\c' to clear the buffer.
mysql>
如果修改密码后net startmysql出现不能启动mysql的1067错误,则可以使用以下办法解决:
使用cmd命令:D:\Appserv\mysql\bin\mysqladmin -uroot -p shutdown,然后输入密码,再net start mysql 就没有这个错误提示了!
四、数据库的创建与删除
1、创建数据库testdb
mysql> create database testdb;
Query OK, 1 row affected (0.02 sec)
2、使用数据库testdb
mysql> use testdb;
Database changed
3、删除数据库testdb
mysql> drop database testdb;
Query OK, 0 rows affected (0.00 sec)
4、退出登陆
mysql>exit
Bye
C:\Documents and Settings\Administrator>
五、操作数据库数据的一般步骤
1、启动MySQL服务器
2、登陆数据库服务器
3、使用某个要操作的数据库
4、操作该数据库中的表,可执行增删改查各种操作。
5、退出登陆。
MySQL 绿色版安装方法图文教程的更多相关文章
- MySQL 5.7.20绿色版安装详细图文教程
MySQL 5.7.20绿色版安装详细图文教程 MySQL是一个关系型数据库管理系统,由瑞典MySQL AB公司开发,目前属于Oracle旗下产品.这篇文章主要介绍了MySQL 5.7.20绿色版安装 ...
- 【Vegas原创】Mysql绿色版安装方法
所谓的绿色版,就是没有installer的MySQL,完全需要靠人工来操作,好处是,重装系统后,只要再做一次本次配置,即可使用. 具体操作方法: 1,设置系统环境变量, 在Path中添加 D:\mys ...
- 安装、设置与启动MySql绿色版的方法
原文:安装.设置与启动MySql绿色版的方法 1.解压 mysql-noinstall-5.1.30-win32.zip(下载地址http://dev.mysql.com/downloads/mysq ...
- Windows 8.1下 MySQL绿色版安装配置与使用
原文:Windows 8.1下 MySQL绿色版安装配置与使用 Mysql-5.6.17-winx64操作步骤: 一.安装MySQL数据库 1.下载. 下载地址:http://downloads.my ...
- Mysql绿色版安装和遇到的问题
MySQL绿色版安装整套流程,http://www.cnblogs.com/LiuChunfu/p/6426918.html,按这个教程装完后,用cmd命令窗口也能登陆.但是用mysql-font登不 ...
- MySql绿色版安装步骤和方法,以及配置文件修改,Mysql服务器启动
MySql绿色版Windows安装步骤和方法,以及配置文件修改,Mysql服务器启动 支持“标准”Markdown / CommonMark和Github风格的语法,也可变身为代码编辑器: 支持实时预 ...
- mysql绿色版安装及授权连接
--安装包官网下载地址:https://dev.mysql.com/downloads/mysql/5.7.html#downloads --安装教程参见:https://www.cnblogs.co ...
- MySql绿色版安装过程记录
作为程序猿,要多动手,周末趁着有空且笔记本刚刚装了系统,所以就配置了下绿色版的MySQL. 多动手,多动手,多动手. 多总结,多总结,多总结. 以下为正文: 一.下载MySQL绿色版: 1.这个地址: ...
- MySQL绿色版安装
下载MySQL绿色版 去官方下载mysql.,我下载的是 mysql-5.6.27-winx64,下载后解压缩到D:盘. 安装MySQL服务 拷贝my-default.ini重命名为my.ini,修改 ...
随机推荐
- How to Configure the Gradient Boosting Algorithm
How to Configure the Gradient Boosting Algorithm by Jason Brownlee on September 12, 2016 in XGBoost ...
- Compiler ,Interpreter, Linker
https://en.wikipedia.org/wiki/Interpreter_(computing) https://en.wikipedia.org/wiki/Compiler https:/ ...
- lucene 基本原理整理
基本原理:http://www.cnblogs.com/forfuture1978/archive/2009/12/14/1623594.html 所有过程:http://www.cnblogs.co ...
- 怎么用OCR图文识别软件在MS Office中创建PDF文件
ABBYY PDF Transformer+是一款可创建.编辑及将PDF文件转换为其他可编辑格式的OCR图文识别软件,不仅可以从纸质文档.图像文件和任何其他流行格式创建PDF文件(相关文章请参考如何从 ...
- SQL Server 索引分类
什么是索引 拿汉语字典的目录页(索引)打比方:正如汉语字典中的汉字按页存放一样,SQL Server中的数据记录也是按页存放的,每页容量一般为4K .为了加快查找的速度,汉语字(词)典一般都有按拼音. ...
- window.parent与window.openner
window.parent与window.openner区别介绍 作者: 字体:[增加 减小] 类型:转载 今天总结一下js中几个对象的区别和用法,对这几个概念混淆的朋友可以看看 今天总结一下js中几 ...
- Java 异常处理机制和集合框架
一.实验目的 掌握面向对象程序设计技术 二.实验环境 1.微型计算机一台 2.WINDOWS操作系统,Java SDK,Eclipse开发环境 三.实验内容 1.Java异常处理机制涉及5个关键字:t ...
- dwr使用步骤
DWR(Direct Web Remoting)是一个用于改善web页面与Java类交互的远程服务器端Ajax开源框架,可以帮助开发人员开发包含AJAX技术的网站.它可以允许在浏览器里的代码使用运行在 ...
- 【Reporting Services 报表开发】— 交互式报表
我们知道,界面是人与系统间的对话方式,当使用者面对的是冷冰冰的界面,不但会造成使用者对于系统的热情减低,也会因为不便而产生诸多抱怨.尤其像报表时企业内几乎每日都会使用到的工具,因此,如何让使用者可以再 ...
- R(五): R常用函数
工作笔记记录,会持续更新.... 目录: apply tapply lapply sapply merge substr.substring.strsplit.unlist.paste.paste0. ...
