使用GoodFeaturesToTrack进行关键点检测---29
原创博客:转载请标明出处:http://www.cnblogs.com/zxouxuewei/
关键点:是多个方向上亮度变化强的区域。
opencv:版本是2.4.
侦测器:opencv有大量的关键点侦测器,我们本次采用goodFeaturesToTrack()。
相应的启动文件为:good_features.launch
侦测器返回的关键点变量:
maxCorners : 设置最多返回的关键点数量。
qualityLevel : 反应一个像素点强度有多强才能成为关键点。
minDistance : 关键点之间的最少像素点。
blockSize : 计算一个像素点是否为关键点时所取的区域大小。
useHarrisDetector :使用原声的 Harris 角侦测器或最小特征值标准。
k : 一个用在Harris侦测器中的自由变量。
首先确保你的kinect驱动或者uvc相机驱动能正常启动:(如果你使用的是kinect,请运行openni驱动)
- roslaunch openni_launch openni.launch
如果你没有安装kinect深度相机驱动,请看我前面的博文。
然后运行下面的launch文件:
- roslaunch rbx1_vision good_features.launch
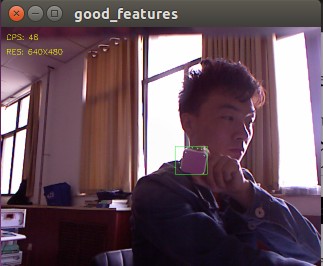
当视频出现时,通过鼠标画矩形将图像中的某个对象框住。这个矩形表示所选的区域,你会看到这个区域中会出现一些绿色的小圆点,他们是goodFeaturesToTrack()。侦测器在该区域中发现的关键点,
以下是我的运行结果:
下面我们看看代码,主要是good_features.py脚本。
- #!/usr/bin/env python
- """ good_features.py - Version 1.1 2013-12-20
- Locate the Good Features To Track in a video stream.
- Created for the Pi Robot Project: http://www.pirobot.org
- Copyright (c) Patrick Goebel. All rights reserved.
- This program is free software; you can redistribute it and/or modify
- it under the terms of the GNU General Public License as published by
- the Free Software Foundation; either version of the License, or
- (at your option) any later version.
- This program is distributed in the hope that it will be useful,
- but WITHOUT ANY WARRANTY; without even the implied warranty of
- MERCHANTABILITY or FITNESS FOR A PARTICULAR PURPOSE. See the
- GNU General Public License for more details at:
- http://www.gnu.org/licenses/gpl.html
- """
- import rospy
- import cv2
- import cv2.cv as cv
- from rbx1_vision.ros2opencv2 import ROS2OpenCV2
- import numpy as np
- class GoodFeatures(ROS2OpenCV2):
- def __init__(self, node_name):
- super(GoodFeatures, self).__init__(node_name)
- # Do we show text on the display?
- self.show_text = rospy.get_param("~show_text", True)
- # How big should the feature points be (in pixels)?
- self.feature_size = rospy.get_param("~feature_size", )
- # Good features parameters
- self.gf_maxCorners = rospy.get_param("~gf_maxCorners", )
- self.gf_qualityLevel = rospy.get_param("~gf_qualityLevel", 0.02)
- self.gf_minDistance = rospy.get_param("~gf_minDistance", )
- self.gf_blockSize = rospy.get_param("~gf_blockSize", )
- self.gf_useHarrisDetector = rospy.get_param("~gf_useHarrisDetector", True)
- self.gf_k = rospy.get_param("~gf_k", 0.04)
- # Store all parameters together for passing to the detector
- self.gf_params = dict(maxCorners = self.gf_maxCorners,
- qualityLevel = self.gf_qualityLevel,
- minDistance = self.gf_minDistance,
- blockSize = self.gf_blockSize,
- useHarrisDetector = self.gf_useHarrisDetector,
- k = self.gf_k)
- # Initialize key variables
- self.keypoints = list()
- self.detect_box = None
- self.mask = None
- def process_image(self, cv_image):
- try:
- # If the user has not selected a region, just return the image
- if not self.detect_box:
- return cv_image
- # Create a greyscale version of the image
- grey = cv2.cvtColor(cv_image, cv2.COLOR_BGR2GRAY)
- # Equalize the histogram to reduce lighting effects
- grey = cv2.equalizeHist(grey)
- # Get the good feature keypoints in the selected region
- keypoints = self.get_keypoints(grey, self.detect_box)
- # If we have points, display them
- if keypoints is not None and len(keypoints) > :
- for x, y in keypoints:
- cv2.circle(self.marker_image, (x, y), self.feature_size, (, , , ), cv.CV_FILLED, , )
- # Process any special keyboard commands
- if self.keystroke != -:
- try:
- cc = chr(self.keystroke & ).lower()
- if cc == 'c':
- # Clear the current keypoints
- keypoints = list()
- self.detect_box = None
- except:
- pass
- except:
- pass
- return cv_image
- def get_keypoints(self, input_image, detect_box):
- # Initialize the mask with all black pixels
- self.mask = np.zeros_like(input_image)
- # Get the coordinates and dimensions of the detect_box
- try:
- x, y, w, h = detect_box
- except:
- return None
- # Set the selected rectangle within the mask to white
- self.mask[y:y+h, x:x+w] =
- # Compute the good feature keypoints within the selected region
- keypoints = list()
- kp = cv2.goodFeaturesToTrack(input_image, mask = self.mask, **self.gf_params)
- if kp is not None and len(kp) > :
- for x, y in np.float32(kp).reshape(-, ):
- keypoints.append((x, y))
- return keypoints
- if __name__ == '__main__':
- try:
- node_name = "good_features"
- GoodFeatures(node_name)
- rospy.spin()
- except KeyboardInterrupt:
- print "Shutting down the Good Features node."
- cv.DestroyAllWindows()
使用GoodFeaturesToTrack进行关键点检测---29的更多相关文章
- OpenCV实战:人脸关键点检测(FaceMark)
Summary:利用OpenCV中的LBF算法进行人脸关键点检测(Facial Landmark Detection) Author: Amusi Date: 2018-03-20 ...
- PCL—低层次视觉—关键点检测(NARF)
关键点检测本质上来说,并不是一个独立的部分,它往往和特征描述联系在一起,再将特征描述和识别.寻物联系在一起.关键点检测可以说是通往高层次视觉的重要基础.但本章节仅在低层次视觉上讨论点云处理问题,故所有 ...
- PCL—低层次视觉—关键点检测(rangeImage)
关键点又称为感兴趣的点,是低层次视觉通往高层次视觉的捷径,抑或是高层次感知对低层次处理手段的妥协. ——三维视觉关键点检测 1.关键点,线,面 关键点=特征点: 关键线=边缘: 关键面=foregro ...
- dlib人脸关键点检测的模型分析与压缩
本文系原创,转载请注明出处~ 小喵的博客:https://www.miaoerduo.com 博客原文(排版更精美):https://www.miaoerduo.com/c/dlib人脸关键点检测的模 ...
- 用keras实现人脸关键点检测(2)
上一个代码只能实现小数据的读取与训练,在大数据训练的情况下.会造内存紧张,于是我根据keras的官方文档,对上一个代码进行了改进. 用keras实现人脸关键点检测 数据集:https://pan.ba ...
- keras实现简单CNN人脸关键点检测
用keras实现人脸关键点检测 改良版:http://www.cnblogs.com/ansang/p/8583122.html 第一步:准备好需要的库 tensorflow 1.4.0 h5py ...
- 『计算机视觉』Mask-RCNN_从服装关键点检测看KeyPoints分支
下图Github地址:Mask_RCNN Mask_RCNN_KeyPoints『计算机视觉』Mask-RCNN_论文学习『计算机视觉』Mask-RCNN_项目文档翻译『计算机视觉』Mas ...
- 机器学习进阶-人脸关键点检测 1.dlib.get_frontal_face_detector(构建人脸框位置检测器) 2.dlib.shape_predictor(绘制人脸关键点检测器) 3.cv2.convexHull(获得凸包位置信息)
1.dlib.get_frontal_face_detector() # 获得人脸框位置的检测器, detector(gray, 1) gray表示灰度图, 2.dlib.shape_predict ...
- PCL—低层次视觉—关键点检测(iss&Trajkovic)
关键点检测往往需要和特征提取联合在一起,关键点检测的一个重要性质就是旋转不变性,也就是说,物体旋转后还能够检测出对应的关键点.不过说实话我觉的这个要求对机器人视觉来说是比较鸡肋的.因为机器人采集到的三 ...
随机推荐
- Cisco IOS Software Activation Command Reference
clear license agent : to clear license agent statistics counters or connection statistics (in privil ...
- java基础之hashmap
Hashmap是一种非常常用的.应用广泛的数据类型,最近研究到相关的内容,就正好复习一下.网上关于hashmap的文章很多,但到底是自己学习的总结,就发出来跟大家一起分享,一起讨论. 1.hashma ...
- OpenCV之响应鼠标(四):在图像上绘制出矩形并标出起点的坐标
涉及到两方面的内容:1. 用鼠标画出矩形.2.在图像上绘制出点的坐标 用鼠标绘制矩形,涉及到鼠标的操作,opencv中有鼠标事件的介绍.需要用到两个函数:回调函数CvMouseCallback和注册回 ...
- git命令学习用
- 理解Mac和iOS中的 Event 处理
根据现在的理解,我把event处理分为5部分,第一是,Event处理的Architecture:第二是,Event的Dispatch到first responder之前: 第三是,Event从firs ...
- poj1651 区间dp
//Accepted 200 KB 0 ms //dp区间 //dp[i][j]=min(dp[i][k]+dp[k][j]+a[i]*a[k]*a[j]) i<k<j #include ...
- jsCodeWar 多函数嵌套调用
function compose(f, g) { return function() { return f(g.apply(this, arguments)); }; } --- function c ...
- HttpClient -- 血的教训
HttpClient -- 血的教训 千万别用httpClient 不支持httpVersion2.0 因为这个导致项目重做
- hdu 2054
Ps:WA了无数次,,简直成了心病..今天终于AC了..先取整数部分,去零,判断位数相等否,再比较.如果相等,再取小数部分,去零,比较,输出....好烦... 代码; #include "s ...
- javascript树形菜单简单实例
参考博客地址:http://chengyoyo2006.blog.163.com/blog/static/8451734820087843950604/ <!DOCTYPE HTML PUBLI ...