win10下Resin安装--入门(1)
我个人采用是解压版的,直接解压亦可使用下载地址
开启该服务需要的环境:首先你的JDK必须安装成功
解压后你会看到
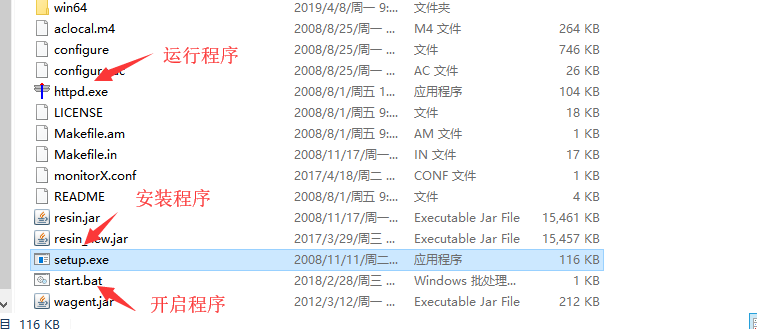
当我们运行程序时,需要修改配置文件中的相关配置:
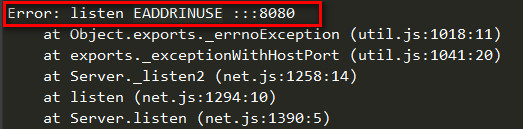
1、端口:以免端口被占用
2、相应的初始页面:默认的路劲会出现找不到也没的情况(404)
以上两点是最基本的
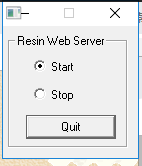 该窗口是对resin服务的开启和停止

出现改信息则服务启动成功,可以对该端口进行访问了
一下对resin.xonf配置文件进行详细描述:
<resin xmlns="http://caucho.com/ns/resin" xmlns:resin="http://caucho.com/ns/resin/core">
<!-- adds all .jar files under the resin/lib directory (加载 resin/lib 下的所有.jar文件) -->
<class-loader>
<tree-loader path="${resin.home}/ext-lib"/>
<tree-loader path="${resin.root}/ext-lib"/>
<tree-loader path="${resin.home}/lib"/>
<tree-loader path="${resin.root}/lib"/>
</class-loader>
<span id="more-321"></span>
<!--Management configuration Remote management requires at least one enabled admin user.(管理配置,需要一个管理员用户)-->
<management path="${resin.root}/admin">
<user name="admin" password="password" disable="true"/>
<resin:if test="${resin.professional}">
<deploy-service/>
<jmx-service/>
<log-service/>
<xa-log-service/>
</resin:if>
</management>
<!--Logging configuration for the JDK logging API.(JDK日志配置)-->
<log name="" level="info" path="stdout:"
timestamp="[%H:%M:%S.%s] {%{thread}} "/>
<!-- 'info' for production 'fine' or 'finer' for development and troubleshooting (日志信息级别:info生产环境 fine和finer适合开发环境和调试环境)-->
<logger name="com.caucho" level="info"/>
<logger name="com.caucho.java" level="config"/>
<logger name="com.caucho.loader" level="config"/>
<!--For production sites, change dependency-check-interval to something like 600s, so it only checks for updates every 10 minutes.(环境依赖检查时间,生产系统设置长点,600s 10分钟)-->
<dependency-check-interval>2s</dependency-check-interval>
<!-- SMTP server for sending mail notifications (SMTP服务器配置)-->
<system-property mail.smtp.host="127.0.0.1"/>
<system-property mail.smtp.port="25"/>
<!-- Sets the default character encoding to utf-8 <character-encoding>utf-8</character-encoding> (默认字符集为 utf-8 ) -->
<!-- You can change the compiler to "javac", "eclipse" or "internal".(你可以把编译器改成 javac、eclipse 或 internal)-->
<javac compiler="internal" args="-source 1.5"/>
<!-- Security providers. <security-provider> com.sun.net.ssl.internal.ssl.Provider </security-provider> (SSL 安全)-->
<!-- Uncomment to use Resin's XML implementations
- <system-property javax.xml.parsers.DocumentBuilderFactory
- ="com.caucho.xml.parsers.XmlDocumentBuilderFactory"/>
- <system-property javax.xml.parsers.SAXParserFactory
- ="com.caucho.xml.parsers.XmlSAXParserFactory"/>
(去掉注视,可以使用resin提供的xml应用)
-->
<cluster id="app-tier">
<!-- sets the content root for the cluster, relative to server.root (设置集群的根目录)-->
<root-directory>.</root-directory>
<server-default>
<!-- The http port (http服务的端口)-->
<http address="*" port="8080"/>
<!-- SSL port configuration:
- <http address="*" port="8443">
- <openssl>
- <certificate-file>keys/gryffindor.crt</certificate-file>
- <certificate-key-file>keys/gryffindor.key</certificate-key-file>
- <password>test123</password>
- </openssl>
- </http> (SSL配置)
-->
<!-- The JVM arguments (JVM参数设置)-->
<jvm-arg>-Xmx256m</jvm-arg>
<jvm-arg>-Xss1m</jvm-arg>
<jvm-arg>-Xdebug</jvm-arg>
<jvm-arg>-Dcom.sun.management.jmxremote</jvm-arg>
<!-- Uncomment to enable admin heap dumps (去掉注释 你可以自己管理内存堆)
- <jvm-arg>-agentlib:resin</jvm-arg> -->
<!-- arguments for the watchdog process (配置watchdog)-->
<watchdog-jvm-arg>-Dcom.sun.management.jmxremote</watchdog-jvm-arg>
<watchdog-port>6600</watchdog-port>
<!-- Configures the minimum free memory allowed before Resin will force a restart.(配置resin强制重启时的最小空闲内存)-->
<memory-free-min>1M</memory-free-min>
<!-- Maximum number of threads.(最大线程数量) -->
<thread-max>256</thread-max>
<!-- Configures the socket timeout (套接字超时时间) -->
<socket-timeout>65s</socket-timeout>
<!-- Configures the keepalive (keepalive 的最大链接数和keepalive的超时时间)-->
<keepalive-max>128</keepalive-max>
<keepalive-timeout>15s</keepalive-timeout>
<!--
- If starting bin/resin as root on Unix, specify the user name
- and group name for the web server user.(使用unix系统时 启动resin的用户和组)
- <user-name>resin</user-name>
- <group-name>resin</group-name>
-->
</server-default>
<!-- define the servers in the cluster (定义集群服务器)-->
<server id="" address="127.0.0.1" port="6800"/>
<!-- Configures the persistent store for single-server or clustered in Resin professional.(配置独立或集群的持久化存储,专业版功能) -->
<resin:if test="${resin.professional}">
<persistent-store type="cluster">
<init path="session"/>
</persistent-store>
</resin:if>
<!-- For security, use a different cookie for SSL sessions.(为了安全 你可以为SSL会话定义一个不同的cookie)
- <ssl-session-cookie>SSL_JSESSIONID</ssl-session-cookie>
-->
<!-- Enables the cache (available in Resin Professional) (缓存功能启用, Professional功能)-->
<resin:if test="${resin.professional}">
<cache path="cache" memory-size="64M">
<!-- Vary header rewriting for IE -->
<rewrite-vary-as-private/>
</cache>
</resin:if>
<!-- Enables periodic checking of the server status and check for deadlocks.. All servers can add <url>s to be checked. (可以定期检查服务器的状态和死锁检查..所有服务器都可以添加的<url> s的检查 Professional功能 )-->
<resin:if test="${resin.professional}">
<ping>
<!-- <url>http://localhost:8080/test-ping.jsp</url> -->
</ping>
</resin:if>
<!-- Defaults applied to each web-app.(默认web程序)-->
<web-app-default>
<prologue>
<!-- Extension library for common jar files. The ext is safe
- even for non-classloader aware jars. The loaded classes
- will be loaded separately for each web-app, i.e. the class
- itself will be distinct. (扩展库的公共jar文件,扩展是安全的即使没有类装载器知道的jars,装载的类将为每个应用分别装载,也就是这些类都是不同的)
-->
<class-loader>
<tree-loader path="${resin.root}/ext-webapp-lib"/>
</class-loader>
<!-- Enable EL expressions in Servlet and Filter init-param ()-->
<allow-servlet-el/>
</prologue>
<!-- Sets timeout values for cacheable pages, e.g. static pages (设置缓存、静态页面的数值。)-->
<cache-mapping url-pattern="/" expires="5s"/>
<cache-mapping url-pattern="*.gif" expires="60s"/>
<cache-mapping url-pattern="*.jpg" expires="60s"/>
<cache-mapping url-pattern="*.png" expires="60s"/>
<!-- for security, disable session URLs by default. (安全的原因,默认禁用了会话的URL) -->
<session-config>
<enable-url-rewriting>false</enable-url-rewriting>
</session-config>
<!-- For security, set the HttpOnly flag in cookies.(安全原因,在cokkies中设置 HttpOnly标记 防止跨站攻击)
- <cookie-http-only/>
-->
<!-- Some JSP packages have incorrect .tld files. It's possible to set validate-taglib-schema to false to work around these packages. (一些JSP包有不正确的。TLD文件。它可以设置validate-taglib-schema为false来变通解决这些包。使其可以正常工作) -->
<jsp>
<validate-taglib-schema>true</validate-taglib-schema>
<fast-jstl>true</fast-jstl>
</jsp>
</web-app-default>
<!-- includes the app-default for default web-app behavior (导入用于默认网络应用程序的行为违约) -->
<resin:import path="${resin.home}/conf/app-default.xml"/>
<!-- Sample database pool configuration The JDBC name is java:comp/env/jdbc/test (简单的数据池配置)
<database>
<jndi-name>jdbc/mysql</jndi-name>
<driver type="org.gjt.mm.mysql.Driver">
<url>jdbc:mysql://localhost:3306/test</url>
<user></user>
<password></password>
</driver>
<prepared-statement-cache-size>8</prepared-statement-cache-size>
<max-connections>20</max-connections>
<max-idle-time>30s</max-idle-time>
</database>
-->
<!-- Default host configuration applied to all virtual hosts.(定义所有虚拟主机的默认配置) -->
<host-default>
<!-- With another web server, like Apache, this can be commented out because the web server will log this information.(如果和别的 web服务器整合,这个可以被去掉,因为web服务器也可以记录这些信息)-->
<access-log path="logs/access.log"
format='%h %l %u %t "%r" %s %b "%{Referer}i" "%{User-Agent}i"'
rollover-period="1W"/>
<!-- creates the webapps directory for .war expansion (.war文件的目录)-->
<web-app-deploy path="webapps"/>
<!-- creates the deploy directory for .ear expansion (.ear文件的目录)-->
<ear-deploy path="deploy">
<ear-default>
<ejb-server>
<config-directory>WEB-INF</config-directory>
</ejb-server>
</ear-default>
</ear-deploy>
<!-- creates the deploy directory for .rar expansion (.rar文件目录)-->
<resource-deploy path="deploy"/>
</host-default>
<!-- configures a deployment directory for virtual hosts (虚拟主机的目录)-->
<host-deploy path="hosts">
<host-default>
<resin:import path="host.xml" optional="true"/>
</host-default>
</host-deploy>
<!-- configures the default host, matching any host name (默认虚拟主机配置)-->
<host id="" root-directory=".">
<!-- configures an explicit root web-app matching the webapp's ROOT (默认的虚拟主机配置) -->
<web-app id="/" root-directory="webapps/ROOT"/>
<web-app id="/resin-admin" root-directory="${resin.home}/php/admin">
<!-- Administration application /resin-admin (管理应用程序 /resin-admin) -->
<prologue>
<resin:set var="resin_admin_external" value="false"/>
<resin:set var="resin_admin_insecure" value="true"/>
</prologue>
</web-app>
</host>
</cluster>
<!-- Configuration for the web-tier/load-balancer (配置为Web层/负载平衡器)-->
<resin:if test="${resin.professional}">
<cluster id="web-tier">
<server-default>
<!-- The http port -->
<http address="*" port="9080"/>
</server-default>
<server id="web-a" address="127.0.0.1" port="6700"/>
<cache path="cache" memory-size="64M"/>
<host id="">
<web-app id="/">
<rewrite-dispatch>
<load-balance regexp="" cluster="app-tier"/>
</rewrite-dispatch>
</web-app>
</host>
</cluster>
</resin:if>
</resin>
win10下Resin安装--入门(1)的更多相关文章
- 全网最新方法:Win10下如何安装和搭建appium自动化测试环境
为了方便大家,下面是本人安装和搭建appium所需要的软件,自取. 链接:https://pan.baidu.com/s/1wl5Xnos4BmnSZsBRd6B5YA#list/path=%2F ...
- Anaconda3(5-2)程序编辑器 win10下PyCharm安装及配置Pytorch流程
由于破解和付费问题,不推荐.优先用自带的spyder Win10 下PyCharm安装流程:(1)官网:https://www.jetbrains.com/pycharm/download/#sect ...
- win10 下Oracle安装
在win10 64bit下安装oracle 11的时候,有些问题不注意,安装的时候才遇到就gg了.下面将介绍win10下安装oracle 11的步骤以及安装过程中遇到的一些问题及解决方案. 安装过程中 ...
- ml-agent:Win10下环境安装
这是我看到的最全面最详细的ml-agent讲解.(只用于学习与知识分享,如有侵权,联系删除.谢谢!) 来自CodeGize的个人博客 .源链接:https://www.cnblogs.com/Code ...
- MongoDB在Win10下的安装
原文地址:http://blog.csdn.net/polo_longsan/article/details/52430539 1.下载MongoDB在windows下的安装文件 首先去官网https ...
- 萌新深度学习与Pytorch入门记录(一):Win10下环境安装
深度学习从入门到入土,安装软件及配置环境踩了不少坑,过程中参考了多处博主给的解决方法,遂整合一下自己的采坑记录. (若遇到不一样的错误,请参考其他博主答案解决) 笔者电脑系统为win10系统,在此环境 ...
- win10下caffe安装与mnist测试实验注意点
caffe安装 安装内容:win10教育版+anaconda2+python(无gpu版本) 安装教程:主要依照三年一梦教程:https://www.cnblogs.com/king-lps/p/65 ...
- 【20181025】win10下Python安装osmnx包
系统:win10 64位 Python:3.7 在网上查了很多资料,主要有两种方法安装osmnx包,一种是通过anaconda安装,这种方法会自动帮你装好osmnx的依赖包:另一种是用pip安装,需要 ...
- win10下MongoDB安装
下载 MongoDB 官网下载链接 如果被墙的话,请点击 mongodb-win32-x86_64-2008plus-ssl-3.4.1-signed.msi 下载 选择custom安装方式,手动切换 ...
随机推荐
- Android利用RecyclerView实现列表倒计时效果
最近面试时,面试官问了一个列表倒计时效果如何实现,然后脑袋突然懵的了O(∩_∩)O,现在记录一下. 运行效果图 实现思路 实现方法主要有两个: 1.为每个开始倒计时的item启动一个定时器,再做更新i ...
- Windows Server 2016-三种方法备份还原DHCP服务器
方法一:图形化备份还原DHCP: 备份操作: 1.DHCP控制台,属性选择"备份"选项: 2.指定备份路径,默认是C:\Windows\System32\dhcp\ 3.备份完成后 ...
- 中国四大骨干网与十大ISP服务商
1.骨干网 几台计算机连接起来,互相可以看到其他人的文件,这叫局域网,整个城市的计算机都连接起来,就是城域网,把城市之间连接起来的网就叫骨干网.这些骨干网是国家批准的可以直接和国外连接的互联网.其他有 ...
- Python项目,VS Code控制台输出乱码问题解决办法
一.添加系统变量 在window环境变量中,添加环境变量 PYTHONIOENCODING = UTF-8. 二.在文件中设置输出编码 import io import sys sys.stdout ...
- Fastadmin安装以及各种问题解决
FastAdmin是一款基于ThinkPHP5+Bootstrap的极速后台开发框架 https://www.fastadmin.net/ 参照官方文档安装,还是有坑的 首先注意:无需下载PHP.Th ...
- Velocity 模板引擎的应用
springboot三层机构,还有数据映射待实体.肯定需要一套模板引擎呀.那不然还手写不成. 根据我们的实际业务需求,我添加了一套数据库反向生成实体类的模板,用的是Velocity 的引擎. 不多说直 ...
- Android开发:Eclipse+OpenCV环境搭建
一.OpenCV预备: OpenCV是一个跨平台计算机视觉库,可以运行在Linux.Windows.Android和Mac OS操作系统上.它由一系列 C 函数和少量 C++ 类构成,同时提供了Pyt ...
- 从壹开始微服务 [ DDD ] 之四 ║让你明白DDD的小故事 & EFCore初探
缘起 哈喽大家好哟,今天又到了老张的周二四放送时间了,当然中间还有不定期的更新(因为个人看papi酱看多了),这个主要是针对小伙伴提出的问题和优秀解决方案而写的,经过上周两篇DDD领域驱动设计的试水, ...
- .NET Core TDD 前传: 编写易于测试的代码 -- 缝
有时候不是我们不想做单元测试, 而是这代码写的实在是没法测试.... 举个例子, 如果一辆汽车在产出后没完成测试, 那么没人敢去驾驶它. 代码也是一样的, 如果项目未能进行该做的测试, 那么客户就不敢 ...
- Entity Framework Core 2.1,添加种子数据
EFCore 2.1出来有一段时间了,里面的新功能还没怎么用,今天研究下如何使用EF Core 2.1添加种子数据. 这部分的官方文档地址是:https://docs.microsoft.com/en ...