User Authentication with Angular and ASP.NET Core

User authentication is a fundamental part of any meaningful application. Unfortunately, implementing it properly can be a painful exercise that steals time and energy away from more meaningful features of our application. In this post, we'll learn step by step how to add user registration and login functionality to an Angular app powered by an ASP.NET Core backend API. Our approach will use JSON Web Tokens which provide a modern, industry standard method for token-based authentication in web and mobile apps.
Note, the Angular portion of this guide is based on version >= 2.x.
 The finished product
Dev environment
- Windows 10
- Visual Studio Code - v1.11.2
- Angular v4.0.2
- C# for Visual Studio Code extension
- SQL Server Express 2016
- .NET Core SDK v1.0.1
dotnet --version - node v6.10.0
node -v - npm v3.10.10
npm -v
Get the code
In my last post I showed how to get started with Angular and ASP.NET Core so I'm going to use the finished product of that post as the foundation for this one. If you're following along step by step you'll need to grab that code here. If you just want the code from this post, it's here.
Plan of attack
Here's a summary of the steps we'll be going through in this tutorial. The first half involve building out our ASP.NET Core backend while the second half focuses on the frontend Angular app.
- Apply required packages to our ASP.NET Core project
- Create a data model
- Use Entity Framework Core to create a data context and sql database via migrations
- Register new users with AccountsController
- Implement JWT
- Authenticate users with AuthController
- Secure a controller using claims authorization
- Angular app setup
- Using a service to talk to the backend
- Registration form
- Login form
- Protected routes
- Authenticated API requests
Install packages
We're going to use the ASP.NET Core Identity provider with SQL Server to store our user account information. The identity provider is a membership system that allows us to easily add login capabilities to our ASP.NET Core app. Add the required packages from the command line within your project directory.
Protip: to save on typing each of these you can copy/paste the package list from my .csproj below into yours and run dotnet restore
dotnet add package Automapperdotnet add package AutoMapper.Extensions.Microsoft.DependencyInjectiondotnet add package Microsoft.AspNetCore.Mvcdotnet add package Microsoft.EntityFrameworkCore.Designdotnet add package Microsoft.EntityFrameworkCore.SqlServerdotnet add package Microsoft.EntityFrameworkCore.sqlserver.Designdotnet add package Microsoft.EntityFrameworkCore.Toolsdotnet add package Microsoft.EntityFrameworkCore.Tools.DotNetdotnet add package Microsoft.AspNetCore.Authentication.JwtBearerdotnet add package FluentValidation.AspNetCoredotnet add package Microsoft.IdentityModel.Tokensdotnet add package System.IdentityModel.Tokens.Jwt
Here's what the package list in my csproj file looks like.
 <ItemGroup>

    <PackageReference Include="AutoMapper" Version="6.0.2" />

    <PackageReference Include="AutoMapper.Extensions.Microsoft.DependencyInjection" Version="2.0.1" />

    <PackageReference Include="FluentValidation.AspNetCore" Version="6.4.0" />

    <PackageReference Include="Microsoft.AspNetCore" Version="1.1.1" />

    <PackageReference Include="Microsoft.AspNetCore.Authentication.JwtBearer" Version="1.1.1" />

    <PackageReference Include="Microsoft.AspNetCore.Identity.EntityFrameworkCore" Version="1.1.1" />

    <PackageReference Include="Microsoft.AspNetCore.Mvc" Version="1.1.2" />

    <PackageReference Include="microsoft.aspnetcore.staticfiles" Version="1.1.1" />

    <PackageReference Include="Microsoft.EntityFrameworkCore.Design" Version="1.1.1" />

    <PackageReference Include="Microsoft.EntityFrameworkCore.SqlServer" Version="1.1.1" />

    <PackageReference Include="Microsoft.EntityFrameworkCore.sqlserver.Design" Version="1.1.1" />

    <PackageReference Include="Microsoft.EntityFrameworkCore.Tools" Version="1.0.0" />

    <PackageReference Include="Microsoft.IdentityModel.Tokens" Version="5.1.3" />

    <PackageReference Include="System.IdentityModel.Tokens.Jwt" Version="5.1.3" />

    <DotNetCliToolReference Include="Microsoft.EntityFrameworkCore.Tools.DotNet" Version="1.0.0" />

  </ItemGroup>
Note, the first time you open the project or add packages from the command line you may be prompted to restore them in the IDE so go ahead and do that when requested.

Creating a data model
We need an object to represent a user in the app. Fortunately, the ASP.NET Core Identity provider has a built-in class IdentityUser that we can use. This maps to the AspNetUsers database table and has a few expected properties out of the box like Email, UserName, BirthDate etc. Adding your own custom properties is very simple. We can just subclass IdentityUser and extend with whatever new properties we require. I'd like my app to be able to record the first and last name of a user so those are the 2 we'll add. I made a new class in the Models\Entities folder called AppUser.cs.
namespace DotNetGigs.Models.Entities

{

    // Add profile data for application users by adding properties to this class

    public class AppUser : IdentityUser

    {

        // Extended Properties

       public string FirstName { get; set; }

       public string LastName { get; set; }

    }

}
In addition to AppUser containing the core user identity data, we'll add another class to represent a specific role in our app beyond just a generic user: JobSeeker.
namespace DotNetGigs.Models.Entities

{

    public class JobSeeker

    {

        public int Id { get; set; }

        public string IdentityId { get; set; }

        public AppUser Identity { get; set; }  // navigation property

        public string Location {get; set;}

    }

}
This class has a reference to AppUser and maps to it via the IdentityId property. This is represented as a foreign key in the database. I find the approach of creating separate classes/tables for unique user roles better than polluting the IdentityUser table with a bunch of different columns when there is specific data required for each. If we were to add Admin or Client roles we can follow the same pattern by storing their universal profile data in IdentityUser/AspNetUsers and creating unique classes/tables for more specific stuff.
Creating the database context
The DatabaseContext is the primary class responsible for interacting with data as objects in Entity Framework Core. It manages the entity objects during run time, this includes populating objects with data from the database, change tracking, and persisting data to the database. We'll create our ApplicationDbContext by deriving from IdentityDbContext which is basically a regular DbContext that includes the identity-related entity sets.
namespace DotNetGigs.Data

{

 public class ApplicationDbContext : IdentityDbContext

 {

     public ApplicationDbContext(DbContextOptions options) : base(options)

     {

     }

     public DbSet JobSeekers { get; set; }

  }

}
Next step is to register ApplicationDbContext in the container so we can easily inject an instance into our controllers down the road.
In Startup.cs I added the following to the ConfigureServices method.
public void ConfigureServices(IServiceCollection services)

{

   // Add framework services.

   services.AddDbContext<ApplicationDbContext>(options =>

   options.UseSqlServer(Configuration.GetConnectionString("DefaultConnection"),

   b => b.MigrationsAssembly("DotNetGigs")));

}
The connection string is obtained from the appsettings.json file.
Creating the database
With the data model and context setup we're ready to create the actual database by using code first migrations.
We'll use the Entity Framework CLI tooling to generate and apply our migration file to create a local SQL Server database.
From the command line in the root of the project run:
dotnet ef migrations add initialAfter the command completes you should see a new Migrations folder created in the project.

In addition to the migration file, a Snapshot and Designer file are also created. They are used to store the current state of the model and get updated with each subsequent migration. They help EF figure out the changes required to keep the database in sync with the model.
The next command applies the migration and creates the database.
dotnet ef database updateThis creates the database with the identity-related tables and one representing the JobSeeker entity.

Creating new users
The responsibility of creating new users will belong to an action method on the AccountsController. It accepts a RegistrationViewModel, performs some validation on it and calls the UserManager service to create the user account in the database.
// POST api/accounts

[HttpPost]

public async Task<IActionResult> Post([FromBody]RegistrationViewModel model)

{

    if (!ModelState.IsValid)

    {

         return BadRequest(ModelState);

    }

    var userIdentity=_mapper.Map<AppUser>(model);

    var result = await _userManager.CreateAsync(userIdentity, model.Password);

    if (!result.Succeeded) return new BadRequestObjectResult(Errors.AddErrorsToModelState(result, ModelState));

    await _appDbContext.JobSeekers.AddAsync(new JobSeeker{IdentityId=userIdentity.Id, Location=model.Location});

    await _appDbContext.SaveChangesAsync();

    return new OkResult();

}
It's also worth mentioning the use of AutoMapper here to map the RegistrationViewModel to an AppUser. Secondly, there is additional validation happening implicitly on the viewmodel thanks to FluentValidation. I won't go into the setup of both of these right now but if you're interested please take a closer look at the code or drop me a question in the comments. If you're new to these libraries they're both great to have in your toolbox as they can really help to keep your code clean and DRY.
At this point, I tested the new user endpoint by running the project and using Postman to send a request and received a 200 OK success response - cool. Checking the database also confirmed a record was created in the AspNetUsers and JobSeekers tables.

Postman is a great tool for quickly doing manual testing of your api. Sending the same request again I get an error response from the method because the email is already in use. We'll look at proper error handling in the Angular app but for now, you can see how easy it is to quickly poke your api and ensure it responds as expected.

Sending an empty location in the request body triggers the fluent validation validator and results in an error.

Implement JSON Web Tokens
The final thing our ASP.NET Core server requires is the ability to authorize users using JSON Web Tokens. In a nutshell, JWT is a method for 2 parties to securely pass tokens back and forth that contain properties known as claims about a subject. Wikipedia has a decent summary of this usage. There's a bit more to claims but starting out a basic understanding of the concept is all you need.
For example, a server could generate a token that has the claim "logged in as admin" and provide that to a client. The client could then use that token to prove that it is logged in as admin.
I adopted most of the steps in this section from William Hallatt's excellent guide on Issuing and authenticating JWT tokens in ASP.NET Core WebAPI
Before we write any code to support JWT we need to ensure we have the required packages added to the ASP.NET Core project as mentioned at the start of the post. Make sure you have these 3 in your csproj file:
- Microsoft.AspNetCore.Authentication.JwtBearer
- Microsoft.IdentityModel.Tokens
- System.IdentityModel.Tokens.Jwt
The first class we'll add is JwtIssuerOptions.cs which will provide the JWT claim properties for our generated tokens.
using System;

using System.Threading.Tasks;

using Microsoft.IdentityModel.Tokens;

namespace DotNetGigs.Models

{

public class JwtIssuerOptions

{

        /// <summary>

        /// 4.1.1.  "iss" (Issuer) Claim - The "iss" (issuer) claim identifies the principal that issued the JWT.

        /// </summary>

        public string Issuer { get; set; }

        /// <summary>

        /// 4.1.2.  "sub" (Subject) Claim - The "sub" (subject) claim identifies the principal that is the subject of the JWT.

        /// </summary>

        public string Subject { get; set; }

        /// <summary>

        /// 4.1.3.  "aud" (Audience) Claim - The "aud" (audience) claim identifies the recipients that the JWT is intended for.

        /// </summary>

        public string Audience { get; set; }

        /// <summary>

        /// 4.1.4.  "exp" (Expiration Time) Claim - The "exp" (expiration time) claim identifies the expiration time on or after which the JWT MUST NOT be accepted for processing.

        /// </summary>

        public DateTime Expiration => IssuedAt.Add(ValidFor);

        /// <summary>

        /// 4.1.5.  "nbf" (Not Before) Claim - The "nbf" (not before) claim identifies the time before which the JWT MUST NOT be accepted for processing.

        /// </summary>

        public DateTime NotBefore { get; set; } = DateTime.UtcNow;

        /// <summary>

        /// 4.1.6.  "iat" (Issued At) Claim - The "iat" (issued at) claim identifies the time at which the JWT was issued.

        /// </summary>

        public DateTime IssuedAt { get; set; } = DateTime.UtcNow;

        /// <summary>

        /// Set the timespan the token will be valid for (default is 5 min/300 seconds)

        /// </summary>

        public TimeSpan ValidFor { get; set; } = TimeSpan.FromMinutes(5);

        /// <summary>

        /// "jti" (JWT ID) Claim (default ID is a GUID)

        /// </summary>

        public Func<Task<string>> JtiGenerator =>

          () => Task.FromResult(Guid.NewGuid().ToString());

        /// <summary>

        /// The signing key to use when generating tokens.

        /// </summary>

        public SigningCredentials SigningCredentials { get; set; }

    }

}
Next I added a related configuration section to my appsettings.json config.
...

"JwtIssuerOptions": {

    "Issuer": "dotNetGigs",

    "Audience": "http://localhost:5000/"

  }
The next thing we'll do is use the built-in Configuration API to read the JwtIssuerOptions settings from the config file and register them with IoC container.
I added the following to the ConfigureServices method in Startup.cs.
...

// jwt wire up

// Get options from app settings

var jwtAppSettingOptions = Configuration.GetSection(nameof(JwtIssuerOptions));

// Configure JwtIssuerOptions

services.Configure<JwtIssuerOptions>(options =>

{

  options.Issuer = jwtAppSettingOptions[nameof(JwtIssuerOptions.Issuer)];

  options.Audience = jwtAppSettingOptions[nameof(JwtIssuerOptions.Audience)];

  options.SigningCredentials = new SigningCredentials(_signingKey, SecurityAlgorithms.HmacSha256);

});
We need to add some additional code in Startup.cs to tell the ASP.NET Core middleware that we want to use JWT authentication on incoming requests. In the Configure method I added the following code:
...

var jwtAppSettingOptions = Configuration.GetSection(nameof(JwtIssuerOptions));

var tokenValidationParameters = new TokenValidationParameters

{

  ValidateIssuer = true,

  ValidIssuer = jwtAppSettingOptions[nameof(JwtIssuerOptions.Issuer)],

  ValidateAudience = true,

  ValidAudience = jwtAppSettingOptions[nameof(JwtIssuerOptions.Audience)],

  ValidateIssuerSigningKey = true,

  IssuerSigningKey = _signingKey,

  RequireExpirationTime = false,

  ValidateLifetime = false,

  ClockSkew = TimeSpan.Zero

};

app.UseJwtBearerAuthentication(new JwtBearerOptions

{

  AutomaticAuthenticate = true,

  AutomaticChallenge = true,

  TokenValidationParameters = tokenValidationParameters

});

...
The last major piece I added was the JwtFactory class that will perform the task of creating encoded tokens.
public async Task<string> GenerateEncodedToken(string userName, ClaimsIdentity identity)

{

   var claims = new[]

   {

      new Claim(JwtRegisteredClaimNames.Sub, userName),

      new Claim(JwtRegisteredClaimNames.Jti, await _jwtOptions.JtiGenerator()),

      new Claim(JwtRegisteredClaimNames.Iat, ToUnixEpochDate(_jwtOptions.IssuedAt).ToString(), ClaimValueTypes.Integer64), identity.FindFirst(Helpers.Constants.Strings.JwtClaimIdentifiers.Rol),

      identity.FindFirst(Helpers.Constants.Strings.JwtClaimIdentifiers.Id)

   };

  // Create the JWT security token and encode it.

     var jwt = new JwtSecurityToken(

         issuer: _jwtOptions.Issuer,

         audience: _jwtOptions.Audience,

         claims: claims,

         notBefore: _jwtOptions.NotBefore,

         expires: _jwtOptions.Expiration,

         signingCredentials: _jwtOptions.SigningCredentials);

     var encodedJwt = new JwtSecurityTokenHandler().WriteToken(jwt);

     return encodedJwt;

}
The most interesting part of this class is the GenerateEncodedToken method which creates an encoded token containing the claims we'd like to exchange between the client and backend. Note we're using the JwtIssuerOptions we configured in the previous step by injecting them into the factory.
Authenticating users and issuing JSON Web Tokens
With the JWT infrastructure in place we're ready to put it into action using the AuthController. There's a single action/route at /api/auth/login that will authenticate the given credentials using the UserManager api and if successful return a new security token using the JwtFactory that can be used for subsequent authenticated requests by the user.
// POST api/auth/login

[HttpPost("login")]

public async Task<IActionResult> Post([FromBody]CredentialsViewModel credentials)

{

       if (!ModelState.IsValid)

       {

            return BadRequest(ModelState);

        }

        var identity = await GetClaimsIdentity(credentials.UserName, credentials.Password);

        if (identity == null)

        {

                return BadRequest(Errors.AddErrorToModelState("login_failure", "Invalid username or password.", ModelState));

         }

         // Serialize and return the response

         var response = new

          {

                id=identity.Claims.Single(c=>c.Type=="id").Value,

                auth_token = await _jwtFactory.GenerateEncodedToken(credentials.UserName, identity),

                expires_in = (int)_jwtOptions.ValidFor.TotalSeconds

          };

         var json = JsonConvert.SerializeObject(response, _serializerSettings);

         return new OkObjectResult(json);

 }
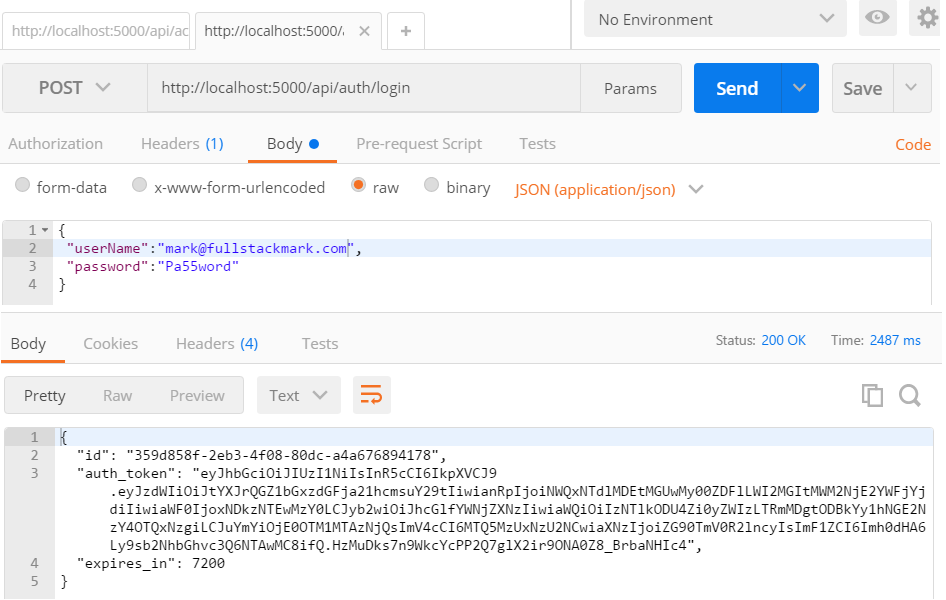
With the action created, we can use postman once again to test our authentication endpoint and see how things look.
I used the mark@fullstackmark.com account we created in the previous test and POSTed the credentials to /api/auth/login and success! - the authentication passed and the server returned a JWT token.
Securing a controller with claims-based authorization
One of the claims we store as part of our token is Rol which is just a string representing a role named ApiAccess. This gets added in the JwtFactoryGenerateClaimsIdentity helper method.
public ClaimsIdentity GenerateClaimsIdentity(string userName,string id)

{

  return new ClaimsIdentity(new GenericIdentity(userName, "Token"), new[]

  {

     new Claim(Helpers.Constants.Strings.JwtClaimIdentifiers.Id, id),

     new Claim(Helpers.Constants.Strings.JwtClaimIdentifiers.Rol, Helpers.Constants.Strings.JwtClaims.ApiAccess)

  });

}
With this role stashed in our token, we can use a claim based authorization check to give the role access to certain controllers and actions so that only users possessing the role claim can access those resources.
All I had to do to enable the claim check was register it in a policy in the ConfigureServices method in Startup.cs.
...

// api user claim policy

services.AddAuthorization(options =>

{

options.AddPolicy("ApiUser", policy => policy.RequireClaim(Constants.Strings.JwtClaimIdentifiers.Rol, Constants.Strings.JwtClaims.ApiAccess));

});

...
With the policy in place I created a new DashboardController.cs decorated with [Authorize(Policy = "ApiUser")] meaning that only users with the ApiAccess role claim as part of the ApiUser policy can access this controller.
[Authorize(Policy = "ApiUser")]

[Route("api/[controller]")]

public class DashboardController : Controller

{

   public DashboardController()

   {

   }

   // GET api/dashboard/home

   [HttpGet("home")]

   public IActionResult GetHome()

   {

       return new OkObjectResult(new { Message = "This is secure data!" });

   }

}
I tested once again with postman by creating a GET request to the http://localhost:5000/api/dashboard/home endpoint but before sending it I also included a request header containing the JWT token that was created for us in the previous user authentication test. The header key is Authorization and the value is in the format of Bearer xxx where xxx is the JWT. Looking at the response I get back a 200 OK status and some secure data in the body.

We tested the happy path but what happens if a request is made with an invalid, missing or expired token? To test that I changed just a single character in the token making it invalid then sent the request again and received a 401 Unauthorized code as expected - looks like JWT claims authorization is working!

Angular app setup
With the backend complete, we can now turn our attention to building out the Angular frontend to see how JWT authentication works in a real world app. The app has 3 major functions:
- User registration form
- Login form
- Dashboard which only authenticated users can access
Structuring the app with modules
Modules have existed since AngularJS 1.x and provide an effective mechanism to group related components, directives, and services, in a way that they may be combined with other modules to assemble an application. In this project, I created two modules to house the major features.
From within the src\app project folder on the command line I used the CLI to generate account and dashboard modules.
ng g module accountng g module dashboardAfter running the commands, new folders representing the modules are added to the project. We'll wire up the code in these shortly but we have a few more components to add first.

Creating a registration form component
Next step is to create a new form component so users can create a new account. To do that I went back to the command line and ran the following from within the src\app\account module folder.
ng g component registration-formA new registration-form folder is generated containing associated .ts, .scss and .html files.
Creating additional components
I repeated the steps above to generate the remaining components we'll require including:
- The login-form
- A home component representing the default view for the app
- A spinner comonent to display while the UI is busy
Communicating with the backend via UserService
The key functions for registering and authenticating users on the backend live in the UserService class.
register(email: string, password: string, firstName: string, lastName: string,location: string): Observable<UserRegistration>

{

   let body = JSON.stringify({ email, password, firstName, lastName,location });

   let headers = new Headers({ 'Content-Type': 'application/json' });

   let options = new RequestOptions({ headers: headers });

    return this.http.post(this.baseUrl + "/accounts", body, options)

      .map(res => true)

      .catch(this.handleError);

}
login(userName, password)

{

 let headers = new Headers();

 headers.append('Content-Type', 'application/json');

 return this.http.post(

      this.baseUrl + '/auth/login',

      JSON.stringify({ userName, password }),{ headers })

      .map(res => res.json())

      .map(res => {

        localStorage.setItem('auth_token', res.auth_token);

        this.loggedIn = true;

        this._authNavStatusSource.next(true);

        return true;

      })

      .catch(this.handleError);

}
Note we're storing the authorization token issued by the server in the users's local storage via the localStorage.setItem('auth_token', res.auth_token) call. We'll see shortly how to use this token to make authenticated requests to the backend api.
Completing the registration form
With my component and service in place, I have the necessary pieces to complete the user registration feature. The major steps were to add the form markup to registration-form.component.html and add bind the submit button on the form to a method in the registration-form.component.ts class.
registerUser({ value, valid }: { value: UserRegistration, valid: boolean }) {

  this.submitted = true;

  this.isRequesting = true;

  this.errors='';

  if(valid)

  {

     this.userService.register(value.email,value.password,value.firstName,value.lastName,value.location)

       .finally(() => this.isRequesting = false)

       .subscribe(result  => {if(result){

          this.router.navigate(['/login'],{queryParams: {brandNew: true,email:value.email}});

          }},

       errors =>  this.errors = errors);

  }

}
The method is pretty simple, it calls userService.register() passing along the user data and handles the observable response accordingly. If the server-side validation returns an error it is displayed to the user. If the request succeeds, the user is routed to the login view. The isRequesting property flag triggers the spinner so the UI can indicate that the app is busy while the request is in flight.

Completing the login form
The login form is nearly identical to the registration form. I added required markup to login-form.component.html and setup an event handler method in in the login-form.component.ts class.
login({ value, valid }: { value: Credentials, valid: boolean })

{

    this.submitted = true;

    this.isRequesting = true;

    this.errors='';

    if (valid) {

      this.userService.login(value.email, value.password)

        .finally(() => this.isRequesting = false)

        .subscribe(

        result => {

          if (result) {

             this.router.navigate(['/dashboard/home']);

          }

        },

        error => this.errors = error);

    }

}
The pattern here is identical, call userService.login() to make a request to the server with the given user credentials and handle the response accordingly. Again, either display any errors returned by the server or route the user to the Dashboard component if they've authenticated successfully.

Protected routes
Right now in our application, any user can navigate anywhere, let's change this by restricting access to certain areas to logged-in users only. The Angular router provides a feature specifically for this purpose in Navigation Guards.
A guard is simply a function added to your route configuration that returns either trueor false.
true means navigation can proceed. false means navigation halts and the route is not accessed.
Guards are registered using providers so they can be injected into your component routing modules where needed.
In this app, I created auth.guard.ts to protect access to the dashboard which acts as an administrative feature only logged in users can see.
// auth.guard.ts

import { Injectable } from '@angular/core';

import { Router, CanActivate } from '@angular/router';

import { UserService } from './shared/services/user.service';

@Injectable()

export class AuthGuard implements CanActivate {

  constructor(private user: UserService,private router: Router) {}

  canActivate() {

    if(!this.user.isLoggedIn())

    {

       this.router.navigate(['/account/login']);

       return false;

    }

    return true;

  }

}
The AuthGuard is simply an @Injectable() class that implements CanActivate. It has a single method that checks the logged in status of the user by calling the isLoggedIn() method on the UserService.
isLoggedIn() is a little naive as it simply checks for the presence of the JWT token in local storage and if it exists we assume the user is logged in by returning true. If it is not found the user is redirected to the login page.
...

this.loggedIn = !!localStorage.getItem('auth_token')

...
To implement the guard in the dashboard routing module I simply imported and updated the root dashboard route with a CanActivate() guard property references it.
import { ModuleWithProviders } from '@angular/core';

import { RouterModule }        from '@angular/router';

import { RootComponent }    from './root/root.component';

import { HomeComponent }    from './home/home.component';

import { AuthGuard } from '../auth.guard';

export const routing: ModuleWithProviders = RouterModule.forChild([

  {

      path: 'dashboard',

      component: RootComponent, canActivate: [AuthGuard],

      children: [

       { path: '', component: HomeComponent },

       { path: 'home',  component: HomeComponent },

      ]

    }

]);
The dasbhoard feature is now protected by the guard!
Making authenticated API requests
The last thing we need to do is pass our JWT back to the server for API calls that require authentication. This is where we'll be utilizing the authorization policy we created and applied previously to the DashboardController in our ASP.NET Core api.
I created a new dashboard service with a single method that retrieves some data for the Home page by making an authenticated HTTP call to the backend and passing the authorization token in the request header.
...

getHomeDetails(): Observable<HomeDetails> {

      let headers = new Headers();

      headers.append('Content-Type', 'application/json');

      let authToken = localStorage.getItem('auth_token');

      headers.append('Authorization', `Bearer ${authToken}`);

    return this.http.get(this.baseUrl + "/dashboard/home",{headers})

      .map(response => response.json())

      .catch(this.handleError);

  }
The method simply retrieves the auth_token from localStorage and includes it as the value for the Authorization header in the format Bearer '{auth_token}'.
With authenticated requests in place, I ran the project again and was able to complete an end to end test by creating a new user, logging in, and navigating to a protected route in the dashboard which displayed a piece of super-secure data!
Wrapping up
I mentioned in the intro that adding authentication in most systems is often a pain and I think that's proven by the length of this post but I hope at very least I've saved you some time and effort by outlining a clear plan of the major steps required to implement token based authentication with Angular and ASP.NET Core.
Security is a serious concern so please don't take every code sample in this tutorial verbatim and copy/paste into production-bound projects without careful review to ensure your implementation meets the standards required for securing your application.
If you have a question or are building something cool using Angular and ASP.NET Core please let me know in the comments below.
Thanks for reading!
User Authentication with Angular and ASP.NET Core的更多相关文章
- docker部署angular和asp.net core组成的前后端分离项目
最近使用docker对项目进行了改进,把步骤记录一下,顺便说明一下项目的结构. 项目是前后端分离的项目,后端使用asp.net core 2.2,采用ddd+cqrs架构的分层思想,前端使用的是ang ...
- Angular调用Asp.net Core JWT Authentication接口
基本思路是调用登录接口,获取token,使用token请求其他JWT接口: getHomeDetails(): Observable<HomeDetails> { let headers ...
- Essential pro angular and asp.net core 笔记
1. dotnet ef相关命令 删除数据库(适合只有一个数据库的情形) dotnet ef database drop --force 更新数据库(适合只有一个数据库的情形) dotnet ef d ...
- Angular 5和ASP.NET Core入门
我希望你们都知道Angular 5已经发布了.在本文中,我们将看到如何使用Angular5TemplateCore开始使用Angular 5和ASP.NET Core. 使用Angular5Templ ...
- Cookies, Claims and Authentication in ASP.NET Core(转载)
Most of the literature concerning the theme of authentication in ASP.NET Core focuses on the use of ...
- 升级 asp.net core 1.1 到 2.0 preview
Upgrading to .NET Core 2.0 Preview 1 更新 依赖的类库 改为 标准库 2 web app 更改 csproj 文件---升级版本 <PropertyGrou ...
- [转]An introduction to OAuth 2.0 using Facebook in ASP.NET Core
本文转自:http://andrewlock.net/an-introduction-to-oauth-2-using-facebook-in-asp-net-core/ This is the ne ...
- 在ASP.NET Core中实现一个Token base的身份认证
注:本文提到的代码示例下载地址> How to achieve a bearer token authentication and authorization in ASP.NET Core 在 ...
- 【原生态跨平台:ASP.NET Core 1.0(非Mono)在 Ubuntu 14.04 服务器上一对一的配置实现-篇幅1】
鸡冻人心的2016,微软高产年. build 2016后 各种干货层出不穷. 1 Win10 集成了bash ,实现了纳德拉的成诺,Microsoft Love Linux!!! 2 跨平台 ,收 ...
随机推荐
- ASP.NET Core MVC – Tag Helpers 介绍
ASP.NET Core Tag Helpers系列目录,这是第一篇,共五篇: ASP.NET Core MVC – Tag Helpers 介绍 ASP.NET Core MVC – Caching ...
- Linux运维必会的MySQL企业面试题大全
(1)基础笔试命令考察 1.开启MySQL服务 /etc/init.d/mysqld start service mysqld start systemctl start mysqld 2.检测端口是 ...
- Python从菜鸟到高手(7):字符串
1. 单引号字符串和转义符 字符串与数字一样,都是值,可以直接使用,在Python控制台中直接输入字符串,如"Hello World",会按原样输出该字符串,只不过用单引号括了 ...
- Bing.com在.NET Core 2.1上运行!
Bing.com在.NET Core 2.1上运行! 相关知识请参考.netCore开发团队博客(https://blogs.msdn.microsoft.com/dotnet/) Bing.com是 ...
- WIFI智能配网 - SmartConfig
要开始IoT项目的第一步是什么?当然不是硬件,而是硬件与硬件的连接!即使有各种各样的通信协议没有好的连接方式绝对不行.那外设上没有的屏幕,没有键盘怎末输入密码怎末选择网络?对,这就是WIFI模块最重要 ...
- leveldb和fork的初始化顺序
我们服务器内用leveldb存一些不是很重要的, 但是又需要(半)持久化的东西. 可是自从2016到现在, 碰见好几次不同类型的死锁. 直到今天, 才发现真正的原因, 那就是leveldb不支持for ...
- hdu3790 dijkstra+堆优化
题目来源:http://acm.hdu.edu.cn/showproblem.php?pid=3790 分析:dijkstra没有优化的话,复杂度是n*n,优化后的复杂度是m*logm,n是顶点数,m ...
- hdu 2063 给男女匹配 (匈牙利算法)
来源:http://acm.hdu.edu.cn/showproblem.php?pid=2063 题意: 有k个组合a,b组合,代表a愿意与b坐过山车,共m个女生 n个男生,问有多少个满意的匹配 题 ...
- MySql concat与字符转义
mysql函数之四:concat() mysql 多个字段拼接 - duanxz - 博客园https://www.cnblogs.com/duanxz/p/5098875.html mysql 多个 ...
- ::class 意思
自 PHP 5.5 起,关键词 class 也可用于类名的解析.使用 ClassName::class 你可以获取一个字符串,包含了类 ClassName 的完全限定名称.这对使用了 命名空间 的类尤 ...