Spring的核心
技术书籍这么多,每次好不容易读完一本,但总过不了多久就会遗忘。为了对抗,整理记录和回看,也是实属必要。
由此,从这《Spring 实战(第四版)》开始,记录一下知识点,下次再要复习时,能免去翻阅厚厚的原文,是以为把书读薄。
1、Spring概要
1.1、Spring简化开发
Spring的使命是简化java开发,为此其采用了4种关键策略:
基于POJO的轻量级和最小侵入性编程;
通过依赖注入和面向接口实现松耦合;
基于切面和惯例进行声明式编程;
通过切面和模板减少样式代码;
1.1.1、DI依赖注入Demo:
- package sia.knights;
- public class BraveKnight implements Knight {
- private Quest quest;
- public BraveKnight(Quest quest) {
- this.quest = quest;
- }
- public void embarkOnQuest() {
- quest.embark();
- }
- }
在BraveKnight的构造方法中,Quest被作为参数传入,这是依赖注入的方式之一,即构造器注入。
- package sia.knights;
- import java.io.PrintStream;
- public class SlayDragonQuest implements Quest {
- private PrintStream stream;
- public SlayDragonQuest(PrintStream stream) {
- this.stream = stream;
- }
- public void embark() {
- stream.println("Embarking on quest to slay the dragon!");
- }
- }
SlayDragonQuest没有使用System.out.println(),而是在构造方法中请求一个更为通用的PrintStream。
- <?xml version="1.0" encoding="UTF-8"?>
- <beans xmlns="http://www.springframework.org/schema/beans"
- xmlns:xsi="http://www.w3.org/2001/XMLSchema-instance"
- xsi:schemaLocation="http://www.springframework.org/schema/beans
- http://www.springframework.org/schema/beans/spring-beans.xsd">
- <bean id="knight" class="sia.knights.BraveKnight">
- <constructor-arg ref="quest" />
- </bean>
- <bean id="quest" class="sia.knights.SlayDragonQuest">
- <constructor-arg value="#{T(System).out}" />
- </bean>
- </beans>
如上XML的装配(wiring)方式,用一个简单的Spring配置文件:knights.xml,该配置文件将BraveKnight、SlayDragonQuest和PrintStream装配到了一起。这里,BraveKnight和SlayDragonQuest被声明为Spring中的bean。就BraveKnight bean来讲, 它在构造时传入了对SlayDragonQuest bean的引用,将其作为构造器参数。同时,SlayDragonQuest bean的声明使用了Spring表达式语言(Spring Expression Language),将System.out(这是一个PrintStream)传入到了SlayDragonQuest的构造器中。 当然xml配置也可换成java配置。
- package sia.knights.config;
- import org.springframework.context.annotation.Bean;
- import org.springframework.context.annotation.Configuration;
- import sia.knights.BraveKnight;
- import sia.knights.Knight;
- import sia.knights.Quest;
- import sia.knights.SlayDragonQuest;
- @Configuration
- public class KnightConfig {
- @Bean
- public Knight knight() {
- return new BraveKnight(quest());
- }
- @Bean
- public Quest quest() {
- return new SlayDragonQuest(System.out);
- }
- }
Spring通过应用上下文(Application Context)装载bean的定义并把它们组装起来。Spring应用上下文全权负责对象的创建和组装。Spring自带了多种应用上下文的实现,它们之间主要的区别仅仅在于如何加载配置。因为knights.xml中的bean是使用XML文件进行配置的,所以选择ClassPathXmlApplicationContext作为应用上下文(采用knightConfig的话,选择AnnotationConfigApplicationContext)。该类加载位于应用程序类路径下的一个或多个XML配置文件。下面的代码中的main()方法调用ClassPathXmlApplicationContext加载knights.xml,并获得Knight对象的引用。
- package sia.knights;
- import org.springframework.context.support.
- ClassPathXmlApplicationContext;
- public class KnightMain {
- public static void main(String[] args) throws Exception {
- ClassPathXmlApplicationContext context =
- new ClassPathXmlApplicationContext(
- "META-INF/spring/knight.xml");
- Knight knight = context.getBean(Knight.class);
- knight.embarkOnQuest();
- context.close();
- }
- }
1.1.2、AOP切面Demo:
利用上面依赖注入的Demo,添加一个组件,再将这个组件声明为切面,再适当配置即可。
- package sia.knights;
- import java.io.PrintStream;
- public class Minstrel {
- private PrintStream stream;
- public Minstrel(PrintStream stream) {
- this.stream = stream;
- }
- public void singBeforeQuest() {
- stream.println("Fa la la, the knight is so brave!");
- }
- public void singAfterQuest() {
- stream.println("Tee hee hee, the brave knight " +
- "did embark on a quest!");
- }
- }
- <?xml version="1.0" encoding="UTF-8"?>
- <beans xmlns="http://www.springframework.org/schema/beans"
- xmlns:xsi="http://www.w3.org/2001/XMLSchema-instance"
- xmlns:aop="http://www.springframework.org/schema/aop"
- xsi:schemaLocation="http://www.springframework.org/schema/aop
- http://www.springframework.org/schema/aop/spring-aop.xsd
- http://www.springframework.org/schema/beans
- http://www.springframework.org/schema/beans/spring-beans.xsd">
- <bean id="knight" class="sia.knights.BraveKnight">
- <constructor-arg ref="quest" />
- </bean>
- <bean id="quest" class="sia.knights.SlayDragonQuest">
- <constructor-arg value="#{T(System).out}" />
- </bean>
- <bean id="minstrel" class="sia.knights.Minstrel">
- <constructor-arg value="#{T(System).out}" />
- </bean>
- <aop:config>
- <aop:aspect ref="minstrel">
- <aop:pointcut id="embark"
- expression="execution(* *.embarkOnQuest(..))"/>
- <aop:before pointcut-ref="embark"
- method="singBeforeQuest"/>
- <aop:after pointcut-ref="embark"
- method="singAfterQuest"/>
- </aop:aspect>
- </aop:config>
- </beans>
这里使用了Spring的aop配置命名空间把Minstrel bean声明为一个切面。首先,需要把Minstrel声明为一个bean,然后在<aop:aspect>元素中引用该bean。为了进一步定义切面,声明(使用<aop:before>)在embarkOnQuest()方法执行前调用Minstrel的singBeforeQuest()方法。这种方式被称为前置通知(before advice)。同时声明(使用<aop:after>)在embarkOnQuest()方法执行后调用singAfter Quest()方法。这种方式被称为后置通知(after advice)。
在这两种方式中,pointcut-ref属性都引用了名字为embank的切入点。该切入点是在前边的<pointcut>元素中定义的, 并配置expression属性来选择所应用的通知。表达式的语法采用的是AspectJ的切点表达式语言。
1.1.3、使用模板消除样板式代码Demo:
如下为一般的使用JDBC访问数据库查询数据的代码:
- public Employee getEmployeeById(long id) {
- Connection conn = null;
- PreparedStatement stmt = null;
- ResultSet rs = null;
- try {
- conn = dataSource.getConnection();
- stmt = conn.prepareStatement("select id, firstname, lastname, salary from employee where id=?");
- stmt.setLong(1, id);
- rs = stmt.executeQuery();
- Employee employee = null;
- if (rs.next()) {
- employee.setId(rs.getLong("id"));
- employee.setFirstName(rs.getString("firstname"));
- employee.setLastName(rs.getString("lastname"));
- employee.setSalary(rs.getBigDecimal("salary"));
- }
- return employee;
- } catch (SQLEception e) {
- } finally {
- if (rs != null) {
- try {
- rs.close();
- } catch(SQLEception e) {}
- }
- if (stmt != null) {
- try {
- rs.close();
- } catch(SQLEception e) {}
- }
- if (conn != null) {
- try {
- rs.close();
- } catch(SQLEception e) {}
- }
- }
- return null;
- }
Spring通过模板封装来消除样板式代码。使用Spring的JdbcTemplate执行数据库操作时,可以避免传统的JDBC样板代码。对上例的方法重写:
- public Employee getEmployeeById(long id) {
- return jdbcTemplate.queryForObject(
- "select id, firstname, lastname, salary from employee where id=?",
- new RowMapper<Employee>() {
- public Employee mapRow(ResultSet rs, int rowNum) throws SQLException {
- Employee employee = new Employee();
- employee.setId(rs.getLong("id"));
- employee.setFirstName(rs.getString("firstname"));
- employee.setLastName(rs.getString("lastname"));
- employee.setSalary(rs.getBigDecimal("salary"));
- return employee;
- }
- },
- id);
- }
1.2、Spring容器和Bean对象
在基于Spring的应用中,应用对象生存于Spring容器(container)中。容器是Spring框架的核心。Spring容器使用DI管理构成应用的组件,它会创建相互协作的组件之间的关联。
Spring容器并不是只有一个。Spring自带了多个容器实现,可以归为两种不同的类型。bean工厂(由org.springframework. beans.factory.eanFactory接口定义)是最简单的容器,提供基本的DI支持。应用上下文(由org.springframework.context.ApplicationContext接口定义)基于BeanFactory构建,并提供应用框架级别的服务,例如从属性文件解析文本信息以及发布应用事件给感兴趣的事件监听者。
虽然我们可以在bean工厂和应用上下文之间任选一种,但bean工厂对大多数应用来说往往太低级了,因此,应用上下文要比bean工厂更受欢迎。我们会把精力集中在应用上下文的使用上,不再浪费时间讨论bean工厂。
1.2.1、使用应用上下文(ApplicationContext)
Spring中常用的几种应用上下文:
AnnotationConfigApplicationContext:从一个或多个基于Java的配置类中加载Spring应用上下文。
AnnotationConfigWebApplicationContext:从一个或多个基于Java的配置类中加载Spring Web应用上下文。
ClassPathXmlApplicationContext:从类路径下的一个或多个XML配置文件中加载上下文定义,把应用上下文的定义文件作为类资源。
FileSystemXmlapplicationcontext:从文件系统下的一个或多个XML配置文件中加载上下文定义。
XmlWebApplicationContext:从Web应用下的一个或多个XML配置文件中加载上下文定义。
获得上下文示例:
- ApplicationContext context = new FileSystemXmlapplicationcontext("D:/knight.xml");
- ApplicationContext context = new ClassPathXmlApplicationContext("knight.xml");
- ApplicationContext context = new AnnotationConfigApplicationContext(com.springinaction.knights.config.knightConfig.class);
获得应用上下文后,调用geiBean()方法,即可获取Spring容器中的bean。
1.2.2、bean的生命周期
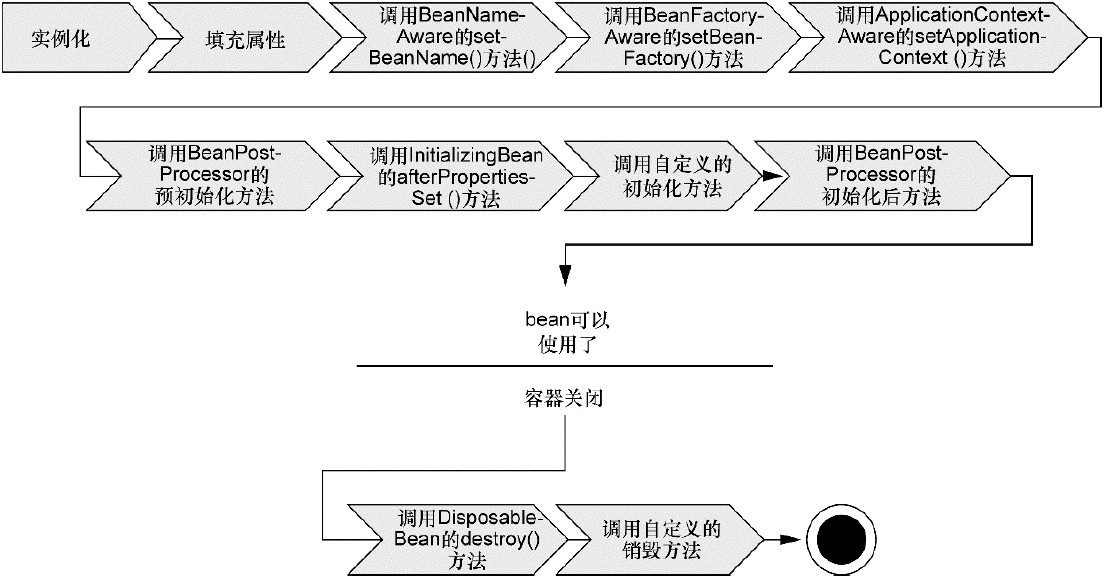
bean在Spring容器中从创建到销毁经历了若干阶段,每一阶段都可以针对Spring如何管理bean进行个性化定制。
1.Spring对bean进行实例化;
2.Spring将值和bean的引用注入到bean对应的属性中;
3.如果bean实现了BeanNameAware接口,Spring将bean的ID传递给setBean-Name()方法;
4.如果bean实现了BeanFactoryAware接口,Spring将调用setBeanFactory()方法,将BeanFactory容器实例传入;
5.如果bean实现了ApplicationContextAware接口,Spring将调用setApplicationContext()方法,将bean所在的应用上下文的引用传入进来;
6.如果bean实现了BeanPostProcessor接口,Spring将调用它们的post-ProcessBeforeInitialization()方法;
7.如果bean实现了InitializingBean接口,Spring将调用它们的after-PropertiesSet()方法;
8.如果bean使用initmethod声明了初始化方法,该方法也会被调用;
9.如果bean实现了BeanPostProcessor接口,Spring将调用它们的post-ProcessAfterInitialization()方法;
10.此时,bean已经准备就绪,可以被应用程序使用了,它们将一直驻留在应用上下文中,直到该应用上下文被销毁;
11.如果bean实现了DisposableBean接口,Spring将调用它的destroy()接口方法;
12.如果bean使用destroymethod声明了销毁方法,该方法也会被调用。
第3、4、5步是让Bean了解spring容器。
第6和第9步 可以针对指定的Bean进行功能增强,这时一般会使用动态代理。BeanPostProcessor是容器级别的,默认会对applicationContext里的所有bean增强。
第7和第11步是通过实现指定的接口来完成init与destroy操作,但一般不用,而是使用第8步和第12步来做。自定义的初始化与销毁操作它无耦合,推荐使用。但是必须在配置文件中指定初始化与销毁的方法,通过bean标签的 init-method="myInit" 和 destroy-method="myDestroy" 来完成。
对于bean的生命周期,我们需要关注的主要有两个方法:
1. 增强bean的功能可以使用后处理Bean, BeanPostProcessor
2. 如果需要初始化或销毁操作我们可以使用 init-method destroy-method
注意:destroy-method只对scope=singleton有效果。
2、装配Bean
2.1、Spring配置的可选方案
Spring为Bean的装配提供了三种主要的装配机制:
在xml中进行显示配置;
在java中进行显示配置;
隐式的bean发现机制和自动装配。
这三种配置方案可以任意选择,及搭配使用。在实际的开发中使用的最多的还是自动装配机制,这也是书作者推荐的,但在xml和javaConfig的选择上个人更愿意使用xml。
2.2、自动化装配bean
自动装配的实现有两部分:
组件扫描(component scanning):Spring会自动发现应用上下文中所创建的bean。
自动装配(autowiring):Spring自动满足bean之间的依赖。
2.2.1、创建可被发现的bean
Demo:
- package soundsystem;
- public interface CompactDisc {
- void play();
- }
- package soundsystem;
- import org.springframework.stereotype.Component;
- @Component
- public class SgtPeppers implements CompactDisc {
- private String title = "Sgt. Pepper's Lonely Hearts Club Band";
- private String artist = "The Beatles";
- public void play() {
- System.out.println("Playing " + title + " by " + artist);
- }
- }
- package soundsystem;
- import org.springframework.context.annotation.ComponentScan;
- import org.springframework.context.annotation.Configuration;
- @Configuration
- @ComponentScan
- public class CDPlayerConfig {
- }
@Component 注解表示该类是组件类;
@Configuration 注解表示该类是配置类;
@ComponentScan 注解表示会扫描与配置类相同的包及子包,因为Spring默认不开启组件扫描。
若是使用xml来启用组件扫描,那得使用Spring context命名空间的<context:component-scan>元素。
- <?xml version="1.0" encoding="UTF-8"?>
- <beans xmlns="http://www.springframework.org/schema/beans"
- xmlns:xsi="http://www.w3.org/2001/XMLSchema-instance"
- xmlns:context="http://www.springframework.org/schema/context"
- xmlns:c="http://www.springframework.org/schema/c"
- xmlns:p="http://www.springframework.org/schema/p"
- xsi:schemaLocation="http://www.springframework.org/schema/beans http://www.springframework.org/schema/beans/spring-beans.xsd
- http://www.springframework.org/schema/context http://www.springframework.org/schema/context/spring-context.xsd">
- <context:component-scan base-package="soundsystem" />
- </beans>
soundsystem.xml
创建JUnit测试,它会创建Spring上下文, 并判断CompactDisc是不是真的创建出来了。
- package soundsystem;
- import static org.junit.Assert.*;
- import org.junit.Test;
- import org.junit.runner.RunWith;
- import org.springframework.beans.factory.annotation.Autowired;
- import org.springframework.test.context.ContextConfiguration;
- import org.springframework.test.context.junit4.SpringJUnit4ClassRunner;
- @RunWith(SpringJUnit4ClassRunner.class)
- @ContextConfiguration(classes=CDPlayerConfig.class)
- public class CDPlayerTest {
- @Autowired
- private CompactDisc cd;
- @Test
- public void cdShouldNotBeNull() {
- assertNotNull(cd);
- }
- }
CDPlayerTest.java
CDPlayerTest使用了Spring的SpringJUnit4ClassRunner,以便在测试开始的时候自动创建Spring的应用上下文。 注解@ContextConfiguration会告诉它需要在CDPlayerConfig中加载配置。 因为CDPlayerConfig类中包含了@ComponentScan,因此最终的应用上下文中应该包含CompactDisc bean。
2.2.2、为组件扫描的bean命名
Spring应用上下文中所有的bean都会给定一个ID。在前面的例子中,尽管没有明确地为SgtPeppersbean设置ID, 但Spring会将类名的第一个字母变为小写指定为其ID,这个bean所给定的ID即为sgtPeppers。
如果想为这个bean设置不同的ID,你所要做的就是将期望的ID作为值传递给@Component注解。比如说, 如果想将这个bean标识为lonelyHeartsClub,@Component注解配置为 @Component("lonelyHeartsClub")。
@Component注解的替换对象为@Named,不过几乎不用,字面意思不直观。
2.2.3、设置组件扫描的基础包
通过对@ComponentScan注解的value的设置,来指定组件扫描的包。
@ComponentScan("soundsystem")
@ComponentScan(basePackages="soundsystem")
@ComponentScan(basePackages={"soundsystem", "video"})
上例中,所设置的基础包都是String类型表示的,但是类型不安全,如果重构代码(改变了包名或包层次),那么指定的基础包就可能会出错。为此可以将其指定为包中所包含的类或接口:
@ComponentScan(basePackageClasses={CDPlayer.class, DVDPlayer.class})
这里,给basePackageClasses设置的是组件类, 但是你可以考虑在包中创建一个用来进行扫描的空标记接口(markerinterface)。通过标记接口的方式, 你依然能够保持对重构友好的接口引用,但是可以避免引用任何实际的应用程序代码。但实际上这个影响不大,智能的ide能告诉你这个包是否应用出错。
2.2.4、bean添加注解完成制动装配
在构造方法、属性的Setter方法或其他方法上加上@Autowired注解就可以注入。如果没有匹配的bean,那么在应用上下文创建的时候,Spring会抛出异常。为了避免异常的出现,可以将@Autowired的required属性设置为false:@Autowired(required=false) 。@Inject和@Autowired可以互相替换。
@Autowired
public CDPlayer(CompactDisc cd) { this.cd = cd; }
@Autowired
public void setCompactDisc(CompactDisc cd) { this.cd = cd; }
@Autowired
public void insertDisc(CompactDisc cd) { this.cd = cd; }
2.2.5、验证自动装配
- package soundsystem;
- import static org.junit.Assert.*;
- import org.junit.Rule;
- import org.junit.Test;
- import org.junit.contrib.java.lang.system.StandardOutputStreamLog;
- import org.junit.runner.RunWith;
- import org.springframework.beans.factory.annotation.Autowired;
- import org.springframework.test.context.ContextConfiguration;
- import org.springframework.test.context.junit4.SpringJUnit4ClassRunner;
- @RunWith(SpringJUnit4ClassRunner.class)
- @ContextConfiguration(classes=CDPlayerConfig.class)
- public class CDPlayerTest {
- @Rule
- public final StandardOutputStreamLog log = new StandardOutputStreamLog();
- @Autowired
- private MediaPlayer player;
- @Autowired
- private CompactDisc cd;
- @Test
- public void cdShouldNotBeNull() {
- assertNotNull(cd);
- }
- @Test
- public void play() {
- player.play();
- assertEquals(
- "Playing Sgt. Pepper's Lonely Hearts Club Band by The Beatles\n",
- log.getLog());
- }
- }
CDPlayerTest.java
2.3、通过java代码装配bean
有时候自动化配置的方案行不通,因此需要明确配置Spring。比如说,你想要将第三方库中的组件装配到你的应用中,在这种情况下,是没有办法在它的类上添加@Component和@Autowired注解的, 因此就不能使用自动化装配的方案了。在这种情况下,你必须要采用显式装配的方式。在进行显式配置的时候,有两种可选方案:Java和XML。
javaConfig就是java代码,但不包含业务逻辑,也不应该侵入到业务逻辑代码中。尽管不是必须的,但通常会将JavaConfig放到单独的包中,使它与其他的应用程序逻辑分离开来。
- package soundsystem;
- import org.springframework.context.annotation.Bean;
- import org.springframework.context.annotation.Configuration;
- @Configuration
- public class CDPlayerConfig {
- @Bean
- public CompactDisc compactDisc() {
- return new SgtPeppers();
- }
- @Bean
- public CDPlayer cdPlayer(CompactDisc compactDisc) {
- return new CDPlayer(compactDisc);
- }
- }
默认情况下,bean的ID与带有@Bean注解的方法名是一样的。在本例中,bean的名字将会是compactDisc。也可以通过name属性指定不同的名字,@Bean(name="xxx")。
在这里,cdPlayer()方法请求一个CompactDisc作为参数。当Spring调用cdPlayer()创建CDPlayerbean的时候, 它会自动装配一个CompactDisc到配置方法之中。然后,方法体就可以按照合适的方式来使用它。借助这种技术, cdPlayer()方法也能够将CompactDisc注入到CDPlayer的构造器中,而且不用明确引用CompactDisc的@Bean方法。
通过这种方式引用其他的bean通常是最佳的选择,因为它不会要求将CompactDisc声明到同一个配置类之中,也不要求必须在javaConfig中声明。你可以将配置分散到多个配置类、XML文件以及自动扫描和装配bean之中,只要功能完整健全即可。不管CompactDisc是采用什么方式创建出来的,Spring都会将其传入到配置方法中,并用来创建CDPlayer bean。
2.4、通过xml装配bean
2.4.1、构造器注入初始化bean
1、构造器注入bean两种方式
<constructor-arg>元素
- <?xml version="1.0" encoding="UTF-8"?>
- <beans xmlns="http://www.springframework.org/schema/beans"
- xmlns:xsi="http://www.w3.org/2001/XMLSchema-instance"
- xsi:schemaLocation="http://www.springframework.org/schema/beans http://www.springframework.org/schema/beans/spring-beans.xsd">
- <bean id="compactDisc" class="soundsystem.SgtPeppers" />
- <bean id="cdPlayer" class="soundsystem.CDPlayer">
- <constructor-arg ref="compactDisc" />
- </bean>
- </beans>
constructor-arg.xml
使用Spring 3.0所引入的c-命名空间
- <?xml version="1.0" encoding="UTF-8"?>
- <beans xmlns="http://www.springframework.org/schema/beans"
- xmlns:xsi="http://www.w3.org/2001/XMLSchema-instance"
- xmlns:c="http://www.springframework.org/schema/c"
- xsi:schemaLocation="http://www.springframework.org/schema/beans http://www.springframework.org/schema/beans/spring-beans.xsd">
- <bean id="compactDisc" class="soundsystem.SgtPeppers" />
- <bean id="cdPlayer" class="soundsystem.CDPlayer"
- c:cd-ref="compactDisc" />
- </beans>
c-名称空间.xml

在这里,引用了构造器参数的名称,为了避免优化时参数名称的该变造成问题,可以使用参数的索引来表示,上例可变成:c:_0-ref="compactDisc"。因为xml中不允许数字属性的第一个字符,因此加了一个下划线作为前缀。如果只有一个参数,数值索引也可以省略成为c:_-ref的表示方式。
2、构造注入字面量
- <bean id="compactDisc" class="soundsystem.BlankDisc">
- <constructor-arg value="Sgt. Pepper's Lonely Hearts Club Band" />
- <constructor-arg value="The Beatles" />
- </bean>
- <bean id="compactDisc" class="soundsystem.BlankDisc"
- c:_0="Sgt. Pepper's Lonely Hearts Club Band"
- c:_1="The Beatles" />
constructor-arg标签和c-名称空间的字面量注入.xml
3、构造注入装配集合
- <bean id="compactDisc" class="soundsystem.collections.BlankDisc">
- <constructor-arg value="Sgt. Pepper's Lonely Hearts Club Band" />
- <constructor-arg value="The Beatles" />
- <constructor-arg>
- <list>
- <value>Sgt. Pepper's Lonely Hearts Club Band</value>
- <value>With a Little Help from My Friends</value>
- <value>Lucy in the Sky with Diamonds</value>
- <value>Getting Better</value>
- <value>Fixing a Hole</value>
- <value>She's Leaving Home</value>
- <value>Being for the Benefit of Mr. Kite!</value>
- <value>Within You Without You</value>
- <value>When I'm Sixty-Four</value>
- <value>Lovely Rita</value>
- <value>Good Morning Good Morning</value>
- <value>Sgt. Pepper's Lonely Hearts Club Band (Reprise)</value>
- <value>A Day in the Life</value>
- </list>
- </constructor-arg>
- </bean>
- <constructor-arg>
- <list>
- <ref bean="sgtPeppers" />
- ...
- </list>
- </constructor-arg>
构造注入字面值和引用值集合.xml
2.4.2、设置属性
1、使用Spring XML实现属性注入的两种方式:<property>元素和p-命名空间。
- <bean id="cdPlayer" class="soundsystem.properties.CDPlayer">
- <property name="compactDisc" ref="compactDisc" />
- </bean>
- <bean id="cdPlayer"
- class="soundsystem.properties.CDPlayer"
- p:compactDisc-ref="compactDisc" />
property标签和p-名称空间属性注入
<property>元素为属性的Setter方法所提供的功能与<constructor-arg>元素为构造器所提供的功能是一样的。上面,它将ID为compactDisc的bean注入到compactDisc属性中(通过setCompactDisc()方法)。Spring提供了p-命名空间,作为<property>元素的替代方案。在XML文件中与其他的命名空间一起对其进行声明,启用p-命名空间。
2、属性注入字面量和装配注入集合
- <?xml version="1.0" encoding="UTF-8"?>
- <beans xmlns="http://www.springframework.org/schema/beans"
- xmlns:xsi="http://www.w3.org/2001/XMLSchema-instance"
- xmlns:p="http://www.springframework.org/schema/p"
- xsi:schemaLocation="http://www.springframework.org/schema/beans http://www.springframework.org/schema/beans/spring-beans.xsd">
- <bean id="compactDisc"
- class="soundsystem.properties.BlankDisc"
- p:title="Sgt. Pepper's Lonely Hearts Club Band"
- p:artist="The Beatles">
- <property name="tracks">
- <list>
- <value>Sgt. Pepper's Lonely Hearts Club Band</value>
- <value>With a Little Help from My Friends</value>
- <value>Lucy in the Sky with Diamonds</value>
- <value>Getting Better</value>
- <value>Fixing a Hole</value>
- <value>She's Leaving Home</value>
- <value>Being for the Benefit of Mr. Kite!</value>
- <value>Within You Without You</value>
- <value>When I'm Sixty-Four</value>
- <value>Lovely Rita</value>
- <value>Good Morning Good Morning</value>
- <value>Sgt. Pepper's Lonely Hearts Club Band (Reprise)</value>
- <value>A Day in the Life</value>
- </list>
- </property>
- </bean>
- <bean id="cdPlayer"
- class="soundsystem.properties.CDPlayer"
- p:compactDisc-ref="compactDisc" />
- </beans>
属性注入字面量和集合
3、util-命名空间
名称空间不能用来装配集合,不能指定一个值(或bean引用)的列表。但是,我们可以使用Spring util-命名空间中的一些功能来简化BlankDisc bean。
- <?xml version="1.0" encoding="UTF-8"?>
- <beans xmlns="http://www.springframework.org/schema/beans"
- xmlns:xsi="http://www.w3.org/2001/XMLSchema-instance"
- xmlns:p="http://www.springframework.org/schema/p"
- xmlns:util="http://www.springframework.org/schema/util"
- xsi:schemaLocation="http://www.springframework.org/schema/beans
- http://www.springframework.org/schema/beans/spring-beans.xsd
- http://www.springframework.org/schema/util
- http://www.springframework.org/schema/util/spring-util.xsd">
- <bean id="compactDisc"
- class="soundsystem.properties.BlankDisc"
- p:title="Sgt. Pepper's Lonely Hearts Club Band"
- p:artist="The Beatles"
- p:tracks-ref="trackList" />
- <util:list id="trackList">
- <value>Sgt. Pepper's Lonely Hearts Club Band</value>
- <value>With a Little Help from My Friends</value>
- <value>Lucy in the Sky with Diamonds</value>
- <value>Getting Better</value>
- <value>Fixing a Hole</value>
- <value>She's Leaving Home</value>
- <value>Being for the Benefit of Mr. Kite!</value>
- <value>Within You Without You</value>
- <value>When I'm Sixty-Four</value>
- <value>Lovely Rita</value>
- <value>Good Morning Good Morning</value>
- <value>Sgt. Pepper's Lonely Hearts Club Band (Reprise)</value>
- <value>A Day in the Life</value>
- </util:list>
- <bean id="cdPlayer"
- class="soundsystem.properties.CDPlayer"
- p:compactDisc-ref="compactDisc" />
- </beans>
util-List简化bean
<util:list>只是util-命名空间中的多个元素之一。 下表列出了util-命名空间提供的所有元素。
| 元素 | 描述 |
| util:constant | 引用某个类型的public static域,并将其暴露为bean |
| util:list | 创建一个java.util.List类型的bean,其中包含值或引用 |
| util:map | 创建一个java.util.Map类型的bean,其中包含值或引用 |
| util:properties | 创建一个java.util.Properties类型的bean |
| util:property-path | 引用一个bean的属性(或内嵌属性),并将其暴露为bean |
| util:set | 创建一个java.util.Set类型的bean,其中包含值或引用 |
2.5、导入和混合配置
JavaConfig中引用XML配置
创建一个高级别的SoundSystemConfig,在这个类中使用@Import将两个配置类组合在一起:@Import({CDPlayerConfig.class, CDConfig.class})。或一个配置类,一个xml:
- package soundsystem;
- import org.springframework.context.annotation.Configuration;
- import org.springframework.context.annotation.Import;
- import org.springframework.context.annotation.ImportResource;
- @Configuration
- @Import(CDPlayerConfig.class)
- @ImportResource("classpath:cd-config.xml")
- public class SoundSystemConfig {
- }
Import和ImportResource引入配置
XML中引用JavaConfig:用<bean>
- package soundsystem;
- import org.springframework.context.annotation.Bean;
- import org.springframework.context.annotation.Configuration;
- @Configuration
- public class CDConfig {
- @Bean
- public CompactDisc compactDisc() {
- return new SgtPeppers();
- }
- }
在soundsystem包下的CDConfig
把CDConfig中的bean元素引入到XML中
- <?xml version="1.0" encoding="UTF-8"?>
- <beans xmlns="http://www.springframework.org/schema/beans"
- xmlns:xsi="http://www.w3.org/2001/XMLSchema-instance"
- xmlns:c="http://www.springframework.org/schema/c"
- xsi:schemaLocation="http://www.springframework.org/schema/beans http://www.springframework.org/schema/beans/spring-beans.xsd">
- <bean class="soundsystem.CDConfig" />
- <bean id="cdPlayer"
- class="soundsystem.CDPlayer"
- c:cd-ref="compactDisc" />
- </beans>
在cdplayer-config.xml中引入JavaConfig中定义的bean
也可以创建一个更高层次的配置文件,这个文件不声明任何的bean,只是负责将两个或更多的配置组合起来。可以将CDConfig bean从之前的XML文件中移除掉,而是使用第三个配置文件将这两个组合在一起:
- <?xml version="1.0" encoding="UTF-8"?>
- <beans xmlns="http://www.springframework.org/schema/beans"
- xmlns:xsi="http://www.w3.org/2001/XMLSchema-instance"
- xmlns:c="http://www.springframework.org/schema/c"
- xsi:schemaLocation="http://www.springframework.org/schema/beans http://www.springframework.org/schema/beans/spring-beans.xsd">
- <bean class="soundsystem.CDConfig" />
- <import resource="cdplayer-config.xml" />
- </beans>
root configuration根配置
3、高级装配
3.1、环境和profile
3.1.1、配置profile bean
在开发的时候,基于开发、测试、预发、线上等不同环境,会有某些对应的东西是不能通用的。例如数据库配置、加密算法以及与外部系统的集成在跨环境部署时会发生变化。
使用@Profile注解指定某个bean属于哪一个profile,@Profile("dev")此注解在Spring3.1里是只能加在类上,要分别对对不同的环境配置不同的类(类中的bean随环境的激活生成)。到了Spring3.2时,@Profile注解可以加在方法上,和@Bean注解一起使用,这样能将多个bean的声明放到同一个配置类中。
- package com.myapp;
- import javax.sql.DataSource;
- import org.springframework.context.annotation.Bean;
- import org.springframework.context.annotation.Configuration;
- import org.springframework.context.annotation.Profile;
- import org.springframework.jdbc.datasource.embedded.EmbeddedDatabaseBuilder;
- import org.springframework.jdbc.datasource.embedded.EmbeddedDatabaseType;
- import org.springframework.jndi.JndiObjectFactoryBean;
- @Configuration
- public class DataSourceConfig {
- @Bean(destroyMethod = "shutdown")
- @Profile("dev")
- public DataSource embeddedDataSource() {
- return new EmbeddedDatabaseBuilder()
- .setType(EmbeddedDatabaseType.H2)
- .addScript("classpath:schema.sql")
- .addScript("classpath:test-data.sql")
- .build();
- }
- @Bean
- @Profile("prod")
- public DataSource jndiDataSource() {
- JndiObjectFactoryBean jndiObjectFactoryBean = new JndiObjectFactoryBean();
- jndiObjectFactoryBean.setJndiName("jdbc/myDS");
- jndiObjectFactoryBean.setResourceRef(true);
- jndiObjectFactoryBean.setProxyInterface(javax.sql.DataSource.class);
- return (DataSource) jndiObjectFactoryBean.getObject();
- }
- }
DataSourceConfig.java
每个DataSource bean都被声明在一个profile中,并且只有当规定的profile激活时,相应的bean才会被创建,但是可能会有其他的bean并没有声明在一个给定的profile范围内。没有指定profile的bean始终都会被创建,与激活哪个profile没有关系。
3.1.2、激活profile
Spring在确定哪个profile处于激活状态时,需要依赖两个独立的属性:spring.profiles.active和spring.profiles.default。如果设置了spring.profiles.active属性的话,那么它的值就会用来确定哪个profile是激活的。但如果没有设置spring.profiles.active属性(优先于default)的话,那Spring将会查找spring.profiles.default的值。如果spring.profiles.active和spring.profiles.default均没有设置的话,那就没有激活的profile,因此只会创建那些没有定义在profile中的bean。
有多种方式来设置这两个属性:
作为DispatcherServlet的初始化参数;
作为Web应用的上下文参数;
作为JNDI条目;
作为环境变量;
作为JVM的系统属性;
在集成测试类上,使用@ActiveProfiles注解设置。
- <?xml version="1.0" encoding="UTF-8"?>
- <web-app version="2.5"
- xmlns="http://java.sun.com/xml/ns/javaee"
- xmlns:xsi="http://www.w3.org/2001/XMLSchema-instance"
- xsi:schemaLocation="http://java.sun.com/xml/ns/javaee
- http://java.sun.com/xml/ns/javaee/web-app_2_5.xsd">
- <context-param>
- <param-name>contextConfigLocation</param-name>
- <param-value>/WEB-INF/spring/root-context.xml</param-value>
- </context-param>
- <context-param>
- <param-name>spring.profiles.default</param-name>
- <param-value>dev</param-vaule>
- </context-param>
- <listener>
- <listener-class>
- org.springframework.web.context.ContextLoaderListener
- </listener-class>
- <servlet>
- <servlet-name>appServlet</servlet-name>
- <servlet-class>
- org.springframework.web.servlet.DispatcherServlet
- </servlet-class>
- <init-param>
- <param-name>spring.profiles.default</param-name>
- <param-value>dev</param-value>
- </init-param>
- <load-on-startup>1</load-on-startup>
- </servlet>
- <servlet-mapping>
- <servlet-name>appServlet</servlet-name>
- <url-pattern>/</url-pattern>
- </servlet-mapping>
- </web-app>
在Web应用的web.xml文件中设置默认的profile
使用profile进行测试
Spring提供了@ActiveProfiles注解,我们可以使用它来指定运行测试时要激活哪个profile。在集成测试时,通常想要激活的是开发环境的profile。例如,下面的测试类片段展现了使用@ActiveProfiles激活dev profile:
- @RunWith(SpringJUnit4ClassRunner.class)
- @ContextConfiguration(classes={PersistenceTestConfig.class})
- @ActiveProfiles("dev")
- public class PersistenceTest {
- ...
- }
3.2 条件化的bean
若希望一个或多个bean只有在应用的类路径下包含特定的库时才创建。或希望某个bean只有当另外某个特定的bean也声明了之后才会创建。或要求只有某个特定的环境变量设置之后,才会创建某个bean。在Spring 4之前,很难实现这种级别的条件化配置,但是Spring 4引入了一个新的@Conditional注解,它可以用到带有@Bean注解的方法上。如果给定的条件计算结果为true,就会创建这个bean,否则的话,这个bean会被忽略。
- package com.habuma.restfun;
- import org.springframework.context.annotation.Bean;
- import org.springframework.context.annotation.Conditional;
- import org.springframework.context.annotation.Configuration;
- @Configuration
- public class MagicConfig {
- @Bean
- @Conditional(MagicExistsCondition.class)
- public MagicBean magicBean() {
- return new MagicBean();
- }
- }
MagicConfig
@Conditional中给定了一个Class,它指明了条件,即matches()方法的返回结果。在本例中,也就是MagicExistsCondition。@Conditional将会通过Condition接口进行条件对比,设置给@Conditional的类可以是任意实现了Condition接口的类型。
- package com.habuma.restfun;
- import org.springframework.context.annotation.Condition;
- import org.springframework.context.annotation.ConditionContext;
- import org.springframework.core.env.Environment;
- import org.springframework.core.type.AnnotatedTypeMetadata;
- public class MagicExistsCondition implements Condition {
- @Override
- public boolean matches(ConditionContext context, AnnotatedTypeMetadata metadata) {
- Environment env = context.getEnvironment();
- return env.containsProperty("magic");
- }
- }
MagicExistsCondition
MagicExistsCondition中只是使用了ConditionContext得到的Environment,但Condition实现的考量因素可能会比这更多。matches()方法会得到ConditionContext和AnnotatedTypeMetadata对象用来做出决策。ConditionContext是一个接口,通过ConditionContext,我们可以做到如下几点:
借助getRegistry()返回的BeanDefinitionRegistry检查bean定义;
借助getBeanFactory()返回的ConfigurableListableBeanFactory检查bean是否存在,甚至探查bean的属性;
借助getEnvironment()返回的Environment检查环境变量是否存在以及它的值是什么;
读取并探查getResourceLoader()返回的ResourceLoader所加载的资源;
借助getClassLoader()返回的ClassLoader加载并检查类是否存在。
AnnotatedTypeMetadata则能够让我们检查带有@Bean注解的方法上还有什么其他的注解。像ConditionContext一样,AnnotatedTypeMetadata也是一个接口。借助isAnnotated()方法,我们能够判断带有@Bean注解的方法是不是还有其他特定的注解。借助其他的那些方法,我们能够检查@Bean注解的方法上其他注解的属性。
从Spring 4开始,@Profile注解进行了重构,使其基于@Conditional和Condition实现。
3.3、自动处理装配的歧义性
3.3.1、标示首选的bean
- @Component
- @Primary
- public class IceCream implements Dessert {...}
- @Bean
- @Primary
- public Dessert iceCream() { return new IceCream(); }
- <bean id="iceCream"
- class="com.desserteater.IceCream"
- primary="true" />
组件扫描、java配置和xml配置标示首选bean
不管采用什么方式来标示首选bean,效果都是一样的,都是告诉Spring在遇到歧义性的时候要选择首选的bean。但是,如果标示了两个或更多的首选bean,那么它就无法正常工作了。就得采用限定自动装配的bean的方式。
3.3.2、限定自动装配的bean
- @Autowored
- @Qualifier("iceCream")
- public void setDessert (Dessert dessert) {
- this.dessert = dessert;
- }
如果没有指定其他的限定符的话,所有的bean都会给定一个默认的限定符,这个限定符与bean的ID相同。基于默认的bean ID作为限定符是非常简单的,但这有可能会引入一些问题。如果你重构了IceCream类,自动装配会失败。
可以为bean设置自己的限定符,而不是依赖于将bean ID作为限定符。在这里所需要做的就是在bean声明上添加@Qualifier注解。例如,它可以与@Component组合使用或与@Bean组合使用。
- @Component
- @Qualifier("cold")
- public class IceCream implements Dessert {...}
- @Bean
- @Qualifier("cold")
- public Dessert iceCream() {
- return new IceCream();
- }
- /**使用*/
- @Autowired
- @Qualifier("cold")
- public void setDessert(Dessert dessert) {
- this.dessert = dessert;
- }
为bean设置自定义限定符
若要给bean添加多限定符,通过添加多个@Qualifier()注解的方式,不被允许。单是可以创建新的注解来完成。
- /**自定义限定注解*/
- @Target({ElementType.CONSTRUCTOR, ElementType.FIELD,
- ElementType.METHOD, ElementType.TYPE})
- @Retention(RetentionPolicy.RUNTIME)
- @Qualifier
- public @interface Cold {}
- /**自定义限定注解*/
- @Target({ElementType.CONSTRUCTOR, ElementType.FIELD,
- ElementType.METHOD, ElementType.TYPE})
- @Retention(RetentionPolicy.RUNTIME)
- @Qualifier
- public @interface Creamy {}
- /**使用,bean*/
- @Component
- @Cold
- @Creamy
- public class IceCream implements Dessert {...}
- /**使用,注入点*/
- @Autowired
- @Cold
- @Creamy
- public void setDessert(Dessert dessert) {
- this.dessert = dessert;
- }
自定义限定符注解
3.4、bean的作用域
Spring定义了多种作用域,可以基于这些作用域创建bean,包括:
单例(Singleton):在整个应用中,只创建bean的一个实例。
原型(Prototype):每次注入或者通过Spring应用上下文获取的时候,都会创建一个新的bean实例。
会话(Session):在Web应用中,为每个会话创建一个bean实例。
请求(Rquest):在Web应用中,为每个请求创建一个bean实例。
单例是默认的作用域。如果选择其他的作用域,要使用@Scope注解。
- @Component
- @Scope(ConfigurableBeanFactory.SCOPE_PROTOTYPE)
- public class Notepad {...}
- @Bean
- @Scope(ConfigurableBeanFactory.SCOPE_PROTOTYPE)
- public Notepad notepad {
- return new Notepad();
- }
- <bean id="notpad"
- class="com.myapp.Notepad"
- scope="prototype" />
自动扫描、java配置和xml配置定义bean作用域
3.4.1、使用Session和Rquest域
以购物车bean来说,会话作用域是最为合适的,因为它与给定的用户关联性最大。要指定会话作用域,我们可以使用@Scope注解,它的使用方式与指定原型作用域是相同的。
- @Component
- @Scope(value=WebApplicationContext.SCOPE_SESSION,
- proxyMode=ScopedProxyMode.INTERFACES)
- public ShoppingCart cart() {...}
@Scope同时还有一个proxyMode属性,它被设置成了ScopedProxyMode.INTERFACES。这个属性解决了将会话或请求作用域的bean注入到单例bean中所遇到的问题。
proxyMode所解决问题的场景。
假设我们要将ShoppingCart bean注入到单例StoreService bean的Setter方法中。因为StoreService是一个单例的bean,会在Spring应用上下文加载的时候创建。当它创建的时候,Spring会试图将ShoppingCart bean注入到setShoppingCart()方法中。但是ShoppingCart bean是会话作用域的,此时并不存在。直到某个用户进入系统,创建了会话之后,才会出现ShoppingCart实例。
另外,系统中将会有多个ShoppingCart实例:每个用户一个。我们并不想让Spring注入某个固定的ShoppingCart实例到StoreService中。我们希望的是当StoreService处理购物车功能时,它所使用的ShoppingCart实例恰好是当前会话所对应的那一个。
Spring并不会将实际的ShoppingCart bean注入到StoreService中,Spring会注入一个ShoppingCart bean的代理。这个代理会暴露与ShoppingCart相同的方法,所以StoreService会认为它就是一个购物车。但是,当StoreService调用ShoppingCart的方法时,代理会对其进行懒解析并将调用委托给会话作用域内真正的ShoppingCart bean。
现在,我们带着对这个作用域的理解,讨论一下proxyMode属性。如配置所示,proxyMode属性被设置成了ScopedProxyMode.INTERFACES,这表明这个代理要实现ShoppingCart接口,并将调用委托给实现bean。
如果ShoppingCart是接口而不是类的话,这是可以的(也是最为理想的代理模式)。但如果ShoppingCart是一个具体的类的话,Spring就没有办法创建基于接口的代理了。此时,它必须使用CGLib来生成基于类的代理。所以,如果bean类型是具体类的话,我们必须要将proxyMode属性设置为ScopedProxyMode.TARGET_CLASS,以此来表明要以生成目标类扩展的方式创建代理。
尽管我主要关注了会话作用域,但是请求作用域的bean会面临相同的装配问题。因此,请求作用域的bean应该也以作用域代理的方式进行注入。
3.4.2、在XML中声明作用域代理
使用<aop:scoped-proxy>元素,在XML配置中声明Spring的aop命名空间。<aop:scoped-proxy>是与@Scope注解的proxyMode属性功能相同的Spring XML配置元素。它会告诉Spring为bean创建一个作用域代理。默认情况下,它会使用CGLib创建目标类的代理。但是我们也可以将proxy-target-class属性设置为false,进而要求它生成基于接口的代理。
- <bean id="cart" class="com.myapp.ShoppingCart" scope="session" />
- <aop:scoped-proxy proxy-target-class="false" />
- </bean>
3.5、运行时值注入
避免硬编码,Spring提供了两种在运行时求值的方式:
属性占位符(Property placeholder)。
Spring表达式语言(SpEL)。
3.5.1、注入外部的值
在Spring中,处理外部值的最简单方式就是声明属性源并通过Spring的Environment来检索属性。@PropertySource引用的路径,申明了属性来源。
- package com.soundsystem;
- import org.springframework.beans.factory.annotation.Autowired;
- import org.springframework.context.annotation.Bean;
- import org.springframework.context.annotation.Configuration;
- import org.springframework.context.annotation.PropertySource;
- import org.springframework.core.env.Environment;
- @Configuration
- @PropertySource("classpath:/com/soundsystem/app.properties")
- public class EnvironmentConfig {
- @Autowired
- Environment env;
- @Bean
- public BlankDisc blankDisc() {
- return new BlankDisc(
- env.getProperty("disc.title"),
- env.getProperty("disc.artist"));
- }
- }
EnvironmentConfig.java
Environment的常用方法:
String getProperty(String key) // 返回String类型的值
String getProperty(String key, String defaultValue) // 返回String类型,env没有值返回默认值
<T> T getProperty(String key, Class<T> targetType) // 返回指定类型的值
<T> T getProperty(String key, Class<T> targetType, T defaultValue)
String getRequiredProperty(String key) throws java.lang.IllegalStateException // 属性必须定义,没有会抛异常
boolean containsProperty(java.lang.String key) //检查属性是否存在
<T> T getRequiredProperty(String key, Class<T> targetType)
boolean acceptsProfiles(String... profiles) // 如果environment支持给定profile的话,就返回true
String[] getActiveProfiles() // 返回激活profile名称的数组
String[] getDefaultProfiles() // 返回默认profile名称的数组
在JavaConfig中装配使用Environment检索属性方便,但采用属性占位符能支持XML装配和组件扫描自动装配。
- <?xml version="1.0" encoding="UTF-8"?>
- <beans xmlns="http://www.springframework.org/schema/beans"
- xmlns:xsi="http://www.w3.org/2001/XMLSchema-instance"
- xmlns:c="http://www.springframework.org/schema/c"
- xmlns:context="http://www.springframework.org/schema/context"
- xsi:schemaLocation="http://www.springframework.org/schema/beans http://www.springframework.org/schema/beans/spring-beans.xsd
- http://www.springframework.org/schema/context http://www.springframework.org/schema/context/spring-context-4.0.xsd">
- <context:property-placeholder
- location="com/soundsystem/app.properties" />
- <bean class="com.soundsystem.BlankDisc"
- c:_0 = "${disc.title}"
- c:_1 = "${disc.artist}"/>
- </beans>
属性占位符的XML装配
- // 解析占位符的配置bean
- @Bean
- public static PropertySourcesPlaceholderConfigurer placeholderConfigurer() {
- return new PropertySourcesPlaceholderConfigurer();
- }
- public BlackDisc(
- @Value("${disc.title}") String title,
- @Value("${disc.artist}") String artist) {
- this.title = title;
- this.artist = artist;
- }
属性占位符的组件扫描自动装配
为了使用占位符,我们必须要配置一个PropertyPlaceholderConfigurer bean或PropertySourcesPlaceholderConfigurer bean。从Spring3.1开始,推荐使用PropertySourcesPlaceholderConfigurer,因为它能够基于Spring Environment及其属性源来解析占位符。
使用XML配置的话,Spring context命名空间中的<context:propertyplaceholder>元素将会生成PropertySourcesPlaceholderConfigurer bean。
解析外部属性能够将值的处理推迟到运行时,但是它的关注点在于根据名称解析来自于Spring Environment和属性源的属性。而Spring表达式语言提供了一种更通用的方式在运行时计算所要注入的值。
3.5.2、使用Spring表达式语言进行装配
SpEL表达式要放到“#{ ... }”之中,属性占位符需要放到“${ ... }”之中。
SpE特性,包括:
使用bean的ID来引用bean;
调用方法和访问对象的属性;
对值进行算术、关系和逻辑运算;
正则表达式匹配;
集合操作。
bean装配的时候使用表达式
通过组件扫描创建bean
public BlackDisc(
@Value("#{systemProperties['disc.title']}") String title,
@Value("#{systemProperties['disc.artist']}") String artist) {
this.title = title;
this.artist = artist;
}
XML配置
将SpEL表达式传入<property>或<constructor-arg>的value属性中,或者将其作为p-命名空间或c-命名空间条目的值。
<bean id="sgtPeppers"
class="com.soundsystem.BlankDisc"
c:_title = "#{systemProperties['disc.title']}"
c:_artist = "#{systemProperties['disc.artist']}" />
SpEL表达式
#{1} 常量数字
#{3.14} 浮点值
#{9.87E4} 科学计数法
#{'Hello'} String类型
#{false} Boolean类型
#{sgtPeppers} 通过ID引用其他的bean
#{sgtPeppers.artist} 引用bean的属性
#{sgtPeppers.selectArtist()} 调用bean的方法
#{T(System).currentTimeMillis()} T(),会将System视为Java中对应的类型
#{SystemProperties['disc.title']} 通过systemProperties对象引用系统属性
#{artistSelector.selectArtist()?.toUpperCase()} 使用了“?.”运算符,能确保在访问右边之前,对应元素不是null。是null表达式返回null。
T()运算符的结果是一个Class对象,可以将其装配到一个Class类型的bean属性中。但是T()运算符的真正价值在于它能够访问目标类型的静态方法(T(java.lang.Math).random())和常量(T(java.lang.Math).PI)。
SpEL运算符
| 运算符类型 | 运 算 符 |
| 算术运算 | +、-、 * 、/、%、^ |
| 比较运算 | < 、 > 、 == 、 <= 、 >= 、 lt 、 gt 、 eq 、 le 、 ge |
| 逻辑运算 | and 、 or 、 not 、│ |
| 条件运算 | ?: (ternary) 、 ?: (Elvis) |
| 正则表达式 | matches |
| 集合运算符 | 查询.?[]、查询第一个匹配项.^[]、、查询最后一个匹配项.$[]、投影.![] |
Spring的核心的更多相关文章
- spring IOC核心原理
下面来了解一下Spring到底是怎么运行的. public static void main(String[] args) { ApplicationContext context = new Fil ...
- spring技术核心概念纪要
一.背景 springframework 从最初的2.5版本发展至今,期间已经发生了非常多的修正及优化.许多新特性及模块的出现,使得整个框架体系显得越趋庞大,同时也带来了学习及理解上的困难. 本文阐述 ...
- spring三大核心学习(一)---控制反转
记得当年大学时候,java的企业级框架还是ssh的天下(spring,struts和hibernate),但是现在,感觉spring已经完全把那两个框架甩在后边了.用spring的人越来越多,用str ...
- Spring最核心的功能是什么?使用Spring框架的最核心的原因是什么?
quote:Spring最核心的功能是什么?使用Spring框架的最核心的原因是什么? (IT公司面试手册,可以多看看) spring 框架中核心组件有三个:Core.Context 和 Beans. ...
- JAVA WEB快速入门之通过一个简单的Spring项目了解Spring的核心(AOP、IOC)
接上篇<JAVA WEB快速入门之从编写一个JSP WEB网站了解JSP WEB网站的基本结构.调试.部署>,通过一个简单的JSP WEB网站了解了JAVA WEB相关的知识,比如:Ser ...
- Spring系列(一) Spring的核心
Spring 简介 Spring 是一个开源轻量级企业应用架构,目的是为了简化企业级应用开发.(1)Spring 框架可以帮我们管理对象的生命周期,帮助我们管理对象间的依赖关系,相互协作:(2)Spr ...
- Spring的核心之IoC容器创建对象
Spring的Ioc容器,是Spring的核心内容: 作用:对象的创建和处理对象的依赖关系. Spring容器创建对象有以下几种方式: 1:调用无参数的构造器 <!-- 默认无参的构造器 --& ...
- 7 -- Spring的基本用法 -- 3... Spring 的核心机制 : 依赖注入
7.3 Spring 的核心机制 : 依赖注入 Spring 框架的核心功能有两个. Spring容器作为超级大工厂,负责创建.管理所有的Java对象,这些Java对象被称为Bean. Spring容 ...
- Spring之核心容器bean
摘要:Spring的核心容器实现了Ioc,其目 的是提供一种无侵入式的框架.在本文中,首先讲解了Spring的基础bean的相关知识,然后介绍了Spring是如何对bean进行管理的. 在Spring ...
- 一头扎进Spring之---------Spring七大核心模块
Spring七大核心模块 核心容器(Spring Core) 核心容器提供Spring框架的基本功能.Spring以bean的方式组织和管理Java应用中的各个组件及其关系.Spring使用BeanF ...
随机推荐
- Oracle Profile 配置文件
Profile是用户的配置文件,它是密码限制,资源限制的命名集合.利用profile 可以对数据库用户进行基本的资源管理,密码管理. 1 创建profile 的语法 create profile pr ...
- 微信小程序登录授权并获取手机号
一.请求发送 携带 code 到后台换取 openid var that = this; wx.login({ success(res) { console.log(res); var code = ...
- Keras和tensorflow的区别
参考: https://blog.csdn.net/zhangbaoanhadoop/article/details/82111056
- hive JDBC客户端启动
JDBC客户端操作步骤
- PLA-1
PLA(Principal Component Analysis)主成分分析: 思路1:坐标旋转 1.数据分布以及投影: 2.特征值以及特征向量 思路2: 未完待续...
- 用 Python 写一个多进程兼容的 TimedRotatingFileHandler
我前面有篇文章已经详细介绍了一下 Python 的日志模块.Python 提供了非常多的可以运用在各种不同场景的 Log Handler. TimedRotatingFileHandler 是 Pyt ...
- 猜数字游戏 在控制台运行--java详解!了;来玩
import java.util.Scanner;//导入包 import java.util.Scanner; 注意格式 符号的使用 public class Demo{ //猜数字游戏 练习 pu ...
- Appium之开发环境搭建
1.下载Appium 去官方网站下载http://appium.io/# : 本次以appium-desktop-setup-1.8.0.exe 文件为例,使用桌面版就不再需要下载server版本: ...
- 当使用cokie进行数据交互时候,cookie只需存储该对象的id即可不需要存放其他数据;只需在写个接口根据cookie里面的对象id来创建对象
当使用cokie进行数据交互时候,cookie只需存储该对象的id即可不需要存放其他数据:只需在写个接口根据cookie里面的对象id来创建对象
- 训练赛-Eyad and Math
题意:给你四个数,求出a^b是否小于c^d,是的话输出<,否则输出>; 思路:因为数据很大,所以我们需要降低数据的规模,比如用一个log10()函数,这就能解决了,注意,要用scanf输入 ...