QEMU KVM libvirt 手册(3) - Storage Media
访问Hard Drive
使用-hda –hdb
qemu-system-x86_64 -enable-kvm -name ubuntutest -m 2048 -hda ubuntutest.img -hdb ubuntutest1.img -boot c -vnc :19 -net nic,model=virtio -net tap,ifname=tap0,script=no,downscript=no
访问CD-ROM/DVD-ROM
使用-cdrom
如果想直接挂载Host机器上的CD-ROM
-cdrom /dev/cdrom
boot order
-boot order=cdnop
c表示第一个hard drive
d表示cd or dvd
nop表示网络启动
可以用-boot menu=on显示boot menu
可以在monitor中设置boot_set c
boot from snapshot
如果带参数-snapshot,则所有的修改将被放入临时文件中,如果虚拟机结束了,修改就丢失了。
也可以在monitor里面用命令
commit all
hda commit
来提交修改
qemu-system-x86_64 -enable-kvm -name ubuntutest -m 2048 -hda ubuntutest.img -boot c -vnc :19 -net nic,model=virtio -net tap,ifname=tap0,script=no,downscript=no -snapshot
使用drive option
下面的参数是openstack启动的虚拟机中有关drive的参数
-drive file=/var/lib/nova/instances/d4c576ec-c70e-4de1-95b1-0b99ec9c2b9b/disk,if=none,id=drive-virtio-disk0,format=qcow2,cache=none
-device virtio-blk-pci,scsi=off,bus=pci.0,addr=0x4,drive=drive-virtio-disk0,id=virtio-disk0,bootindex=1
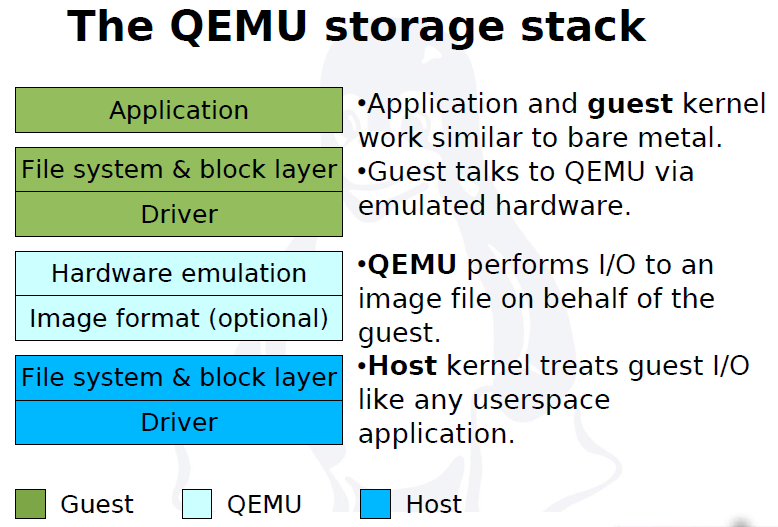
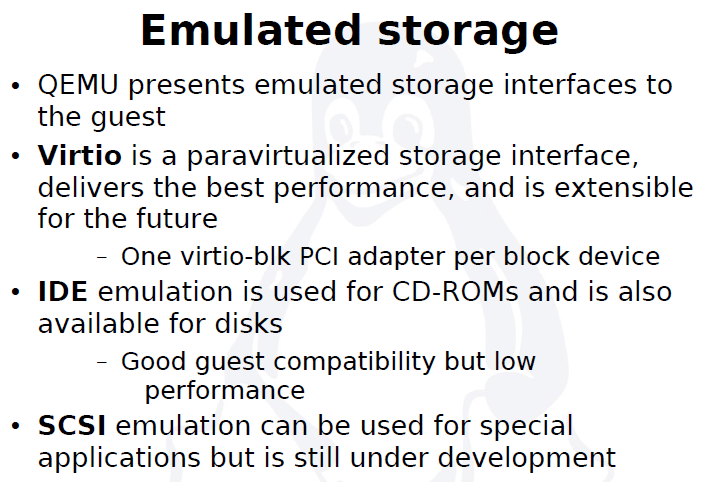
QEMU virtual machines emulate all devices needed to run a VM Guest.
Block Devices
Block devices are fixed or removable storage media usually referred to as 'drives'.
Virtual machine drives are defined with -drive.
Specifies the path to the disk image which will be used with this drive.
Specifies the type of interface to which the drive is connected. Currently only floppy, ide, or virtio are supported by SUSE. virtio defines a paravirtualized disk driver. Default is ide.
Specifies the index number of a connector on the disk interface (see the if option) where the drive is connected.
Specifies the type of the media. Can be disk for hard disks, or cdrom for removable CD-ROM drives.
Specifies the format of the connected disk image. If not specified, the format is autodetected. Currently, SUSE supports qcow2, qed and raw formats.
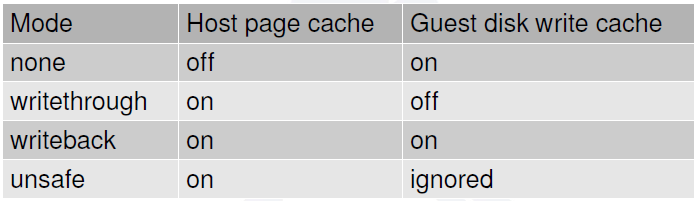
Specifies the caching method for the drive. Possible values are unsafe, writethrough, writeback, directsync, or none.
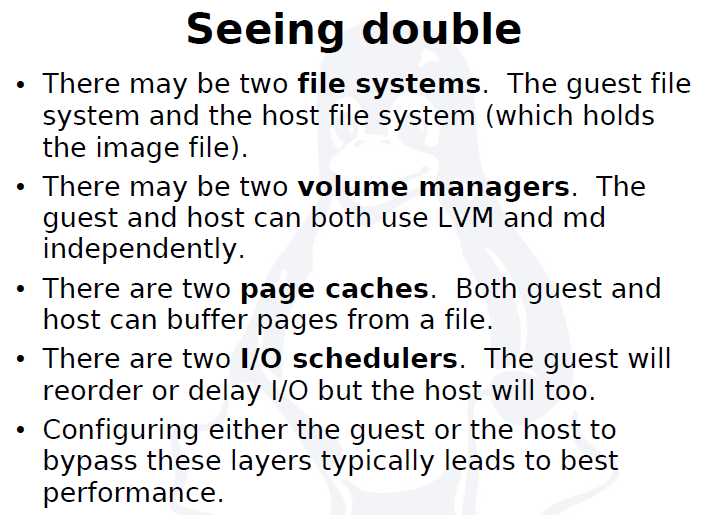
The operating system maintains a page cache to improve the storage I/O performance.
- With the page cache, write operations to the storage system are considered completed after the data has been copied to the page cache.
- Read operations can be satisfied from the page cache if the data requested is in the cache.
- The page cache is copied to permanent storage using fsync(2).
- Direct I/O requests bypass the page cache.
In the KVM environment, both the host and guest operating systems can maintain their own page caches, resulting in two copies of data in memory.
In general, it is better to bypass at least one of these page caches.
If the application running in the guest is using direct I/O operations, then the guest cache would be bypassed.
If the guest is set up with no caching, then the host page cache is bypassed, effectively turning all I/O operations from the guest into direct I/O operations on the host.
- writethrough
writethrough mode is the default caching mode. With caching set to writethrough mode, the host page cache is enabled, but the disk write cache is disabled for the guest. Consequently, this caching mode ensures data integrity even if the applications and storage stack in the guest do not transfer data to permanent storage properly (either through fsync operations or file system barriers). Because the host page cache is enabled in this mode, the read performance for applications running in the guest is generally better. However, the write performance might be reduced because the disk write cache is disabled.
- writeback
With caching set to writeback mode, both the host page cache and the disk write cache are enabled for the guest. Because of this, the I/O performance for applications running in the guest is good, but the data is not protected in a power failure. As a result, this caching mode is recommended only for temporary data where potential data loss is not a concern.
- none
With caching mode set to none, the host page cache is disabled, but the disk write cache is enabled for the guest. In this mode, the write performance in the guest is optimal because write operations bypass the host page cache and go directly to the disk write cache. If the disk write cache is battery-backed, or if the applications or storage stack in the guest transfer data properly (either through fsync operations or file system barriers), then data integrity can be ensured. However, because the host page cache is disabled, the read performance in the guest would not be as good as in the modes where the host page cache is enabled, such as writethrough mode.
- unsafe
Caching mode of unsafe ignores cache transfer operations completely. As its name implies, this caching mode should be used only for temporary data where data loss is not a concern. This mode can be useful for speeding up guest installations, but you should switch to another caching mode in production environments.
virtio-blk-data-plane
The virtio-blk-data-plane is a new performance feature for KVM. It enables a high-performance code path for I/O requests coming from VM Guests. More specifically, this feature introduces dedicated threads (one per virtual block device) to process I/O requests going through the virtio-blk driver. It makes use of Linux AIO (asynchronous I/O interface) support in the VM Host Server Kernel directly—without the need to go through the QEMU block layer. Therefore it can sustain very high I/O rates on storage setups.
The virtio-blk-data-plane feature can be enabled or disabled by the x-data-plane=on|off option on the qemu command line when starting the VM Guest:
qemu [...] -drive if=none,id=drive0,cache=none,aio=native,\

format=raw,file=filename -device virtio-blk-pci,drive=drive0,scsi=off,\

config-wce=off,x-data-plane=on [...]
As of now, the virtio-blk-data-plane has the following limitations:
Only raw image format is supported.
No support for live migration.
Block jobs and hot unplug operations fail with -EBUSY.
I/O throttling limits are ignored.
Only Linux VM Host Servers are supported because of the Linux AIO usage, but non-Linux VM Guests are supported.
Graphic Devices and Display Options
This section describes QEMU options affecting the type of the emulated video card and the way VM Guest graphical output is displayed.
Defining Video Cards
QEMU uses -vga to define a video card used to display VM Guest graphical output. The -vga option understands the following values:
- none
-
Disables video cards on VM Guest (no video card is emulated). You can still access the running VM Guest via the QEMU monitor and the serial console.
- std
-
Emulates a standard VESA 2.0 VBE video card. Use it if you intend to use high display resolution on VM Guest.
- cirrus
-
Emulates Cirrus Logic GD5446 video card. Good choice if you insist on high compatibility of the emulated video hardware.
-device cirrus-vga,id=video0,bus=pci.0,addr=0x2
Character Devices
Use -chardev to create a new character device. The option uses the following general syntax:
qemu-kvm [...] -chardev backend_type,id=id_string
where backend_type can be one of null, socket, udp, msmouse, vc, file, pipe, console, serial, pty, stdio, braille, tty, or parport.
All character devices must have a unique identification string up to 127 characters long. It is used to identify the device in other related directives.
A brief description of the available back-ends follows:
- null
-
Creates an empty device which outputs no data and drops any data it receives.
- stdio
-
Connects to QEMU's process standard input and standard output.
- socket
-
Creates a two-way stream socket. If path is specified, a Unix socket is created:
qemu-kvm [...] -chardev \

socket,id=unix_socket1,path=/tmp/unix_socket1,server
The server suboption specifies that the socket is a listening socket.
If port is specified, a TCP socket is created:
qemu-kvm [...] -chardev \

socket,id=tcp_socket1,host=localhost,port=7777,server,nowait
The command creates a local listening (server) TCP socket on port 7777. QEMU will not block waiting for a client to connect to the listening port (nowait).
-chardev socket,id=charmonitor,path=/var/lib/libvirt/qemu/instance-00000009.monitor,server,nowait
-mon chardev=charmonitor,id=monitor,mode=control
- udp
-
Sends all network traffic from VM Guest to a remote host over the UDP protocol.
qemu-kvm [...] -chardev udp,id=udp_fwd,host=mercury.example.com,port=7777
The command binds port 7777 on the remote host mercury.example.com and sends VM Guest network traffic there.
- vc
-
Creates a new QEMU text console. You can optionally specify the dimensions of the virtual console:
qemu-kvm [...] -chardev vc,id=vc1,width=640,height=480 -mon chardev=vc1
The command creates a new virtual console called vc1 of the specified size, and connects the QEMU monitor to it.
- file
-
Logs all traffic from VM Guest to a file on VM Host Server. The path is required and will be created if it does not exist.
qemu-kvm [...] -chardev file,id=qemu_log1,path=/var/log/qemu/guest1.log
-
-chardev file,id=charserial0,path=/var/lib/nova/instances/d4c576ec-c70e-4de1-95b1-0b99ec9c2b9b/console.log
-
-device isa-serial,chardev=charserial0,id=serial0
Create a new pseudo-terminal on the host and connect to it.
-chardev pty,id=charserial1
-device isa-serial,chardev=charserial1,id=serial1
A pseudoterminal (sometimes abbreviated "pty") is a pair of virtual

       character devices that provide a bidirectional communication channel.

       One end of the channel is called the master; the other end is called

       the slave.  The slave end of the pseudoterminal provides an interface

       that behaves exactly like a classical terminal.  A process that

       expects to be connected to a terminal, can open the slave end of a

       pseudoterminal and then be driven by a program that has opened the

       master end.  Anything that is written on the master end is provided

       to the process on the slave end as though it was input typed on a

       terminal.  For example, writing the interrupt character (usually

       control-C) to the master device would cause an interrupt signal

       (SIGINT) to be generated for the foreground process group that is

       connected to the slave.
By default QEMU creates a set of character devices for serial and parallel ports, and a special console for QEMU monitor. You can, however, create your own character devices and use them for just mentioned purposes. The following options will help you:
- -serial char_dev
-
Redirects the VM Guest's virtual serial port to a character device char_dev on VM Host Server. By default, it is a virtual console (vc) in graphical mode, and stdio in non-graphical mode. The -serial understands many suboptions. See the manual page man 1 qemu-kvm for their complete list.
You can emulate up to 4 serial ports. Use -serial none to disable all serial ports.
- -parallel device
-
Redirects the VM Guest's parallel port to a device. This option supports the same devices as -serial.
HINT: With SUSE Linux Enterprise Server as a VM Host Server, you can directly use the hardware parallel port devices /dev/parportN where N is the number of the port.
You can emulate up to 3 parallel ports. Use -parallel none to disable all parallel ports.
- -monitor char_dev
-
Redirects the QEMU monitor to a character device char_dev on VM Host Server. This option supports the same devices as -serial. By default, it is a virtual console (vc) in a graphical mode, and stdio in non-graphical mode.
QEMU KVM libvirt 手册(3) - Storage Media的更多相关文章
- QEMU KVM Libvirt手册(10):Managing Virtual Machines with libvirt
libvirt is a library that provides a common API for managing popular virtualization solutions, among ...
- QEMU KVM Libvirt手册(11): Managing Storage
When managing a VM Guest on the VM Host Server itself, it is possible to access the complete file sy ...
- QEMU KVM Libvirt手册(7): 硬件虚拟化
在openstack中,如果我们启动一个虚拟机,我们会看到非常复杂的参数 qemu-system-x86_64 -enable-kvm -name instance-00000024 -S -mach ...
- QEMU KVM libvirt手册(4) – images
RAW raw是默认的格式,格式简单,容易转换为其他的格式.需要文件系统的支持才能支持sparse file 创建image # qemu-img create -f raw flat.img 10G ...
- QEMU KVM Libvirt手册(10): KVM的各种限制
Overcommits KVM allows for both memory and disk space overcommit. However, hard errors resulting fro ...
- QEMU KVM libvirt手册(2): monitor
Administrating Virtual Machines with QEMU Monitor When QEMU is running, a monitor console is provide ...
- QEMU KVM Libvirt手册(8): 半虚拟化设备virtio
KVM本身并不提供半虚拟化功能,是通过virtio来实现的 The benefits of virtio drivers are of lower overhead and higher perfor ...
- QEMU KVM Libvirt手册(5) – snapshots
前面讲了QEMU的qcow2格式的internal snapshot和external snapshot,这都是虚拟机文件格式的功能. 这是文件级别的. 还可以是文件系统级别的,比如很多文件系统支持s ...
- QEMU KVM libvirt 手册(1): 安装
安装 对虚拟化的支持通常在BIOS中是禁掉的,必须开启才可以. 对于Intel CPU,我们可以通过下面的命令查看是否支持虚拟化. # grep "vmx" /proc/cpuin ...
随机推荐
- CentOS7编译安装mysql-5.6.43
Step 1:安装编译需要的软件和工具 [root@node-1 ~]# yum install gcc gcc-c++ cmake ncurses-devel bison Step 2:创建mysq ...
- 牛客小白月赛13 小A的最短路(lca+RMQ)
链接:https://ac.nowcoder.com/acm/contest/549/F来源:牛客网 题目描述 小A这次来到一个景区去旅游,景区里面有N个景点,景点之间有N-1条路径.小A从当前的一个 ...
- centos-1 nginx
常用命令 su #切换用户mkdir flodr #创建目录rm -r flodr #删除文件/目录,有提示rm -rf flodr #删除文件/目录,无提示pwd #查看当前路径 防火墙设置 ht ...
- VUEX报 “was assigned to but it has no setter”
如果有当前的变量(VUEX声名的)会发生改变的(change),刚绑定的值需要在data () 内进行声明 一个新的变量进行处理.
- Scania SDP3 2.38.2.37.0 Download, Install, Activate: Confirmed
Download: Scania Diagnos & Programmer SDP3 2.38.2.37.0 free version and tested version SDP3 2.38 ...
- 《C++实践之路.pdf》源码
> 源码下载方法 < >> 打开微信 >> 扫描下方二维码 >> 关注林哥私房菜 >> 输入对应编号获取百度网盘提取密码 全书源码[已更新完 ...
- Codeforces 1083C Max Mex
Description 一棵\(N\)个节点的树, 每个节点上都有 互不相同的 \([0, ~N-1]\) 的数. 定义一条路径上的数的集合为 \(S\), 求一条路径使得 \(Mex(S)\) 最大 ...
- Python建立时间事件引擎原理剖析
作为python小白,学习量化交易的曲线是非常陡峭的,唯一好的办法就是一点点啃代码.以下代码案例来自vnpy的引擎代码. # encoding: UTF-8 #定义时间事件 EVENT_TIMER = ...
- oracle中的日期函数的使用
TO_DATE格式(以时间:2007-11-02 13:45:25为例) Year: yy two digits 两位年 显示值:07 ...
- 【机器学习】支持向量机(SVM)的优化算法——序列最小优化算法(SMO)概述
SMO算法是一一种启发式算法,它的基本思路是如果所有变量的解的条件都满足最优化问题的KKT条件,那么这个最优化问题的解就得到了.因为KKT条件是该优化问题的充分必要条件. 整个SMO算法包括两个部分: ...