Django之views
一 URL补充
二 Views试图函数
一 URL补充
1 MTV模型
2 django建立流程(用命令版)
(1)django-admin startproject projectname
(2)python manage.py startapp appname
(3)python manage.py runserver IP PORT
3 url配置(urls.py)
功能:建立起URL与视图函数的映射关系。
url:http://127.0.0.1:8080/blog/articles/2003/05?a=1&b=2
url(正则表达式(规则),视图函数) 匹配字符串:用户输入的url对应的路径:“/blog/articles/2003/05”
注意点:
(1) 出现覆盖现象的情况,匹配第一个url
(2) 无名分组 url(r'^articles/(\d{4})/(\d{2})$', views.year_month), # year(requset,1990,12) 按位置传参数
(3) 有名分组 url(r'^articles/(?P<year>\d{4})/(?P<month>\d{2})$', views.year_month), # year (requset,year=1990,month=12) 按位置传参数
(4) url(r'^blog/', include('blog.urls'))分发
取值:request.POST.get("user")
获取form表单提交的方法:request.method=="POST"
有return 就不往下走 可以去掉else
模板语法两种{{}}
渲染了后再往前端发 render 函数 render函数可以检测模板语法
点击提交 走url 走views 走render函数接着渲染模板(看有无别名) 发往前端
二 视图函数
一定包含两个对象
request------->,请求信息
HttpResponse------->响应内容
render 一个HttpResponse函数也存在render函数里
get 请求的数据放在路径后面
重点 request 里面的哪些信息:
request.GET:GET请求的数据()
request.POST:POST请求的数据()
request.method:请求数据的方式()主要get或者post
request.path:请求路径()与数据无关
根目录 :/(判断根目录)
request.get_full_path()拿到路径后面所有的数据(包括路径)
取一个键下的多个值:request.POST.getlist("hobby")
render 函数 render(request, template_name[, context]) 第三个参数是上下文对象
redirect 函数
对比 render与redirect 的区别:
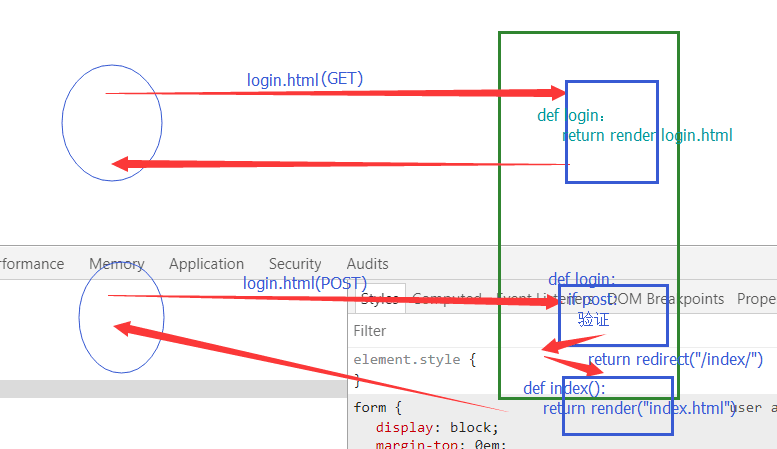
redirect:发送第二次请求,url更新啦
render: 直接返回一个页面内容但是url没有变化(未发送第二次请求)(涉及页面跳转时不用)

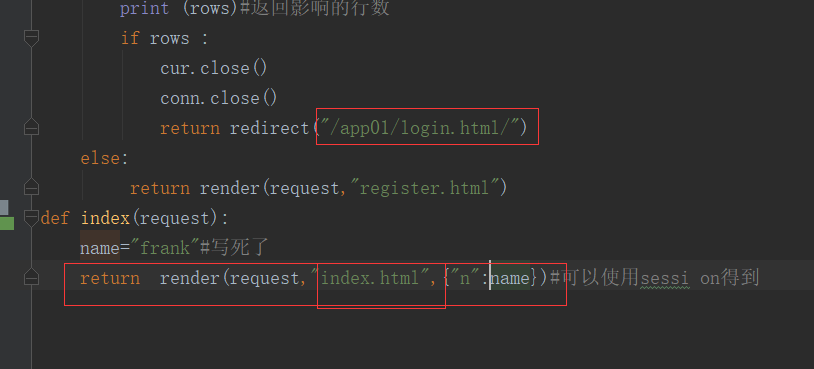
一个小例子:注:跳转是前后都要加/ ,返回时不用加/ 图片用到了分发 例子里没有用到分发

---Model
- from django.db import models
- # Create your models here.
- import pymysql
- conn = pymysql.connect(host='', port=3306, user='root', passwd='', db='day66')
- cur = conn.cursor()
- cur.executemany("insert into userinfo values(%s,%s)", [( "yuan", ""),
- ( "alex", ""),
- ("egon", "")])
- conn.commit()
- #关闭指针对象
- cur.close()
- #关闭连接对象
- conn.close()
model代码
---views
- from django.shortcuts import render,HttpResponse,redirect
- # Create your views here.
- def login(request):
- print(request.POST) # 这个是获取form表单的提交方法
- if request.method=="POST":
- print(request.POST)#这个是获取form表单的提交方法
- username=request.POST.get("user")
- password=request.POST.get("pwd")
- if username=="frank" and password=="":
- return redirect("/index.html/")#跳转到个人主页
- # else:#else 可以去掉啦
- # name="frank"
- return render(request, "login.html")
- def register(request):
- if request.method=="POST":
- username=request.POST.get("user")
- password=request.POST.get("pwd")
- # hobby=request.POST.getlist("hobby")#一个键获得多个值时用这种方法
- import pymysql
- conn = pymysql.connect(host='', port=3306, user='root', passwd='', db='day66')
- cur = conn.cursor()
- SQL = "insert into userinfo (name,pwd)values(%s,%s)";
- rows = cur.execute(SQL,(username, password))
- conn.commit()
- print (rows)#返回影响的行数
- if rows :
- cur.close()
- conn.close()
- return redirect("/login.html/")
- else:
- return render(request,"register.html")
- def index(request):
- name="frank"#写死了
- return render(request,"index.html",{"n":name})#可以使用session得到
视图函数
Template
- <!DOCTYPE html>
- <html lang="en">
- <head>
- <meta charset="UTF-8">
- <meta http-equiv="X-UA-Compatible" content="IE=edge">
- <meta name="viewport" content="width=device-width, initial-scale=1">
- <title>Title</title>
- <style>
- .cc{
- margin-left: 250px;
- margin-top: 200px;
- }
- </style>
- </head>
- <body>
- <div class="cc">
- <h1>注册页面</h1>
- <form action="{% url 'register' %}" method="post">
- <p> 姓名:<input type="text" name="user"></p>
- <p> 密码:<input type="password" name="pwd"></p>
- <!--<p> 爱好:-->
- <!--<input type="checkbox" name="hobby" value="basketball">篮球-->
- <!--<input type="checkbox" name="hobby" value="shuangseqiu ">双色球-->
- <!--<input type="checkbox" name="hobby" value="football">足球-->
- <!--</p>-->
- <p><input type="submit"></p></div>
- </form>
- </body>
- </html>
注册页面
- <!DOCTYPE html>
- <html lang="en">
- <head>
- <meta charset="UTF-8">
- <meta http-equiv="X-UA-Compatible" content="IE=edge">
- <meta name="viewport" content="width=device-width, initial-scale=1">
- <title>Title</title>
- <style>
- .cc{
- margin-top: 200px;
- margin-left: 300px;
- }
- </style>
- </head>
- <body>
- <div class="cc">
- <h1>登陆页面</h1>
- <form action="{% url "login" %}" method="post">
- <p>姓名:<input type="text" name="user"></p>
- <p>密码:<input type="password" name="pwd"></p>
- <p><input type="submit"></p>
- </form>
- </div>
- </body>
- </html>
登陆页面
- <!DOCTYPE html>
- <html lang="en">
- <head>
- <meta charset="UTF-8">
- <meta http-equiv="X-UA-Compatible" content="IE=edge">
- <meta name="viewport" content="width=device-width, initial-scale=1">
- <title>Title</title>
- <style>
- .cc{
- margin-right: 200px;
- }
- </style>
- </head>
- <body>
- <div class="cc">
- <h1>hello{{ n }} </h1>
- <h1>欢迎回来</h1>
- </div>
- </body>
- </html>
个人中心
Django之views的更多相关文章
- Python Django 之 Views HttpRequest HttpReponse
一.Python Django 之 Views 数据交互 http请求中产生两个人核心对象: http请求:HttpRequest对象 http响应:HttpReponse对象 所在位置django. ...
- [Django笔记] views.py 深入学习
views.py 是django MTV 中的主要逻辑层,相当于MVC中的 Controller 以下的实例都基于这样一个路由表: urlpatterns = [ url(r'^(index)?$', ...
- Django之views系统
Django的View(视图)简介 一个视图函数(类),简称视图,是一个简单的Python 函数(类),它接受Web请求并且返回Web响应. 响应可以是一张网页的HTML内容,一个重定向,一个404错 ...
- Django Class Views
一.Base views View class django.views.generic.base.View 主要的基于类的基本视图.所有其他基于类的视图都从这个基类继承而来.它不是一个通用的视图,因 ...
- Django中views笔记
reverse反解析 #路由中定义namespace.name,reverse可将其转换为url url = reverse('namespace:name') return redirect(url ...
- django中views中方法的request参数
知其然亦要知其所以然 views每个方法的参数都是request,那么问题来了,request为何物? 首先,几乎每个方法都是取数据(无论是从数据库,还是从第三方接口),然后进行一定的处理,之后传给前 ...
- Django之views视图函数
views视图函数属于MTV中逻辑处理的部分视图函数包含着两个对象,HttpRequest对象和HttpResponse对象 一.HttpRequest对象 HttpRequest对象在Django中 ...
- 关于django Class-based views的理解
django是mvt模式,其中v就是这个显示逻辑部分,简单来讲,view函数可以说是接收request,然后处理,返回response的主体函数. 对于一些简单的逻辑关系,可以用直接用函数模式来进行处 ...
- Django的views视图系统
老师的博客:http://www.cnblogs.com/liwenzhou/articles/8305104.html 以看老师的博客为主 一个视图函数(类),简称视图,是一个简单的Python 函 ...
随机推荐
- Python机器学习笔记:sklearn库的学习
网上有很多关于sklearn的学习教程,大部分都是简单的讲清楚某一方面,其实最好的教程就是官方文档. 官方文档地址:https://scikit-learn.org/stable/ (可是官方文档非常 ...
- 阿里云 Ubuntu16.04 apache2 ssl证书下载与安装(必须有域名)
阿里云申请免费SSL证书并下载(包含xxx.key|xxx._root_bundle.crt|xxx._public.crt三个文件) 用https是自己的网站收到保护,不易被攻克,所以保护自己的网站 ...
- Shell 实例:备份最后一天内所有修改过的文件
在一个"tarball"中(经过 tar 和 gzip 处理过的文件)备份最后 24 小时之内当前目录下所有修改的文件. 程序代码如下: #!/bin/bash BACKUPFIL ...
- SQL SERVER 如何声明一个变量
DECLARE @i AS INT; ; GO 或者 ; GO 表表达式形式 ); SET @empname = (SELECT firstname + N' ' + lastname FROM HR ...
- [android] 手机卫士自定义滚动控件
TextView控件设置单行显示 android:singleLine=”true” 设置TextView开始的位置显示省略号,android:ellipsize=”start” 设置滚动属性,and ...
- Java坦克大战(一)
接下来的几篇博客,想记录一下通过学习坦克大战项目来循序渐进的学习Java基础.主要是为了巩固基础知识,当然学习编程重要的还是多敲,问题通常是在敲代码的过程中发现的,积累也是在敲代码中寻求的经验.这个坦 ...
- Adding a struct into an array(stackoverflow)
Question: So lets say I have a struct like this: struct example_structure { int thing_one; int thing ...
- WCF Service 转换为Web Service 中字段属性
1.新建WCF服务,服务中包含对象 2.部署WCF服务,并将其转换为应用程序 3.通过添加服务引用,使用WCF服务 4.调用对应的对象时需要对应的值设置为True. 参考:https://cloud. ...
- canvas-4fillstyle.html
fillStyle color gradient pattern image canvas video strokeStyle
- 访问WEB-INF下的jsp页面
访问web-inf下的jsp文件, 1)使用springMVC,一般都会使用springMVC的视图解析器,大概会这样配置 <!--jsp视图解析器--> <bean class ...
