python接口自动化测试(三)-requests.post()
上一节介绍了 requests.get() 方法的基本使用,本节介绍 requests.post() 方法的使用:
本文目录:
一、方法定义
二、post方法简单使用
1、带数据的post
2、带header的post
3、带json的post
4、带参数的post
5、普通文件上传
6、定制化文件上传
7、多文件上传
一、方法定义:
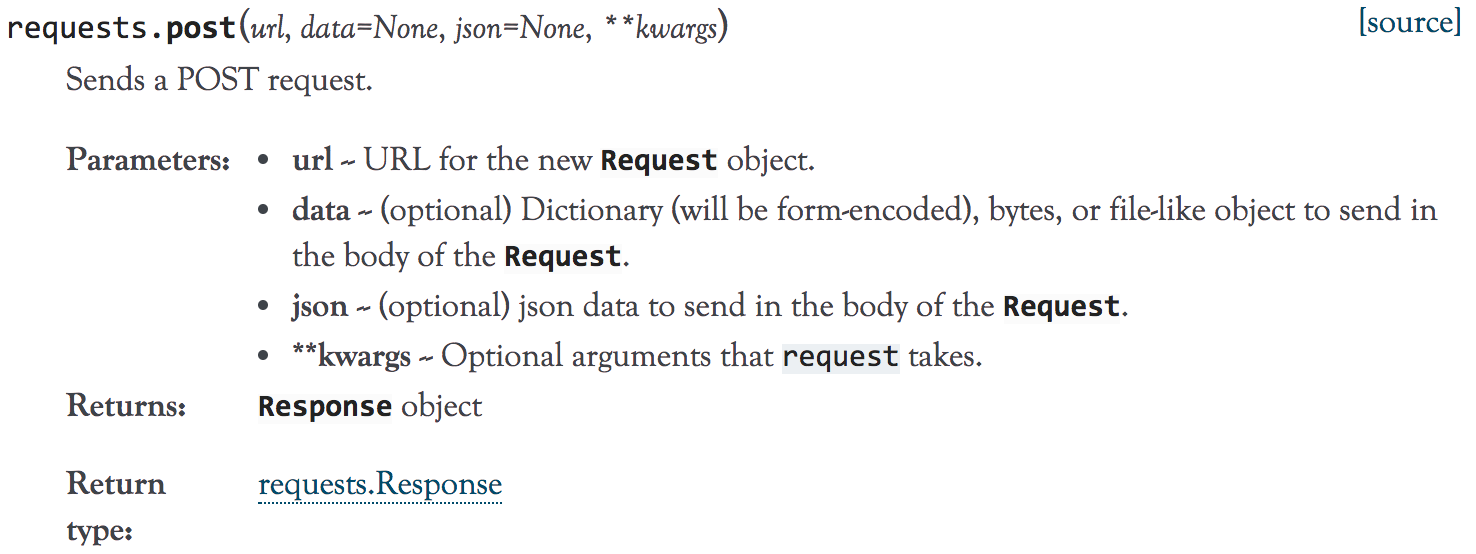
1、到官方文档去了下requests.post()方法的定义,如下:

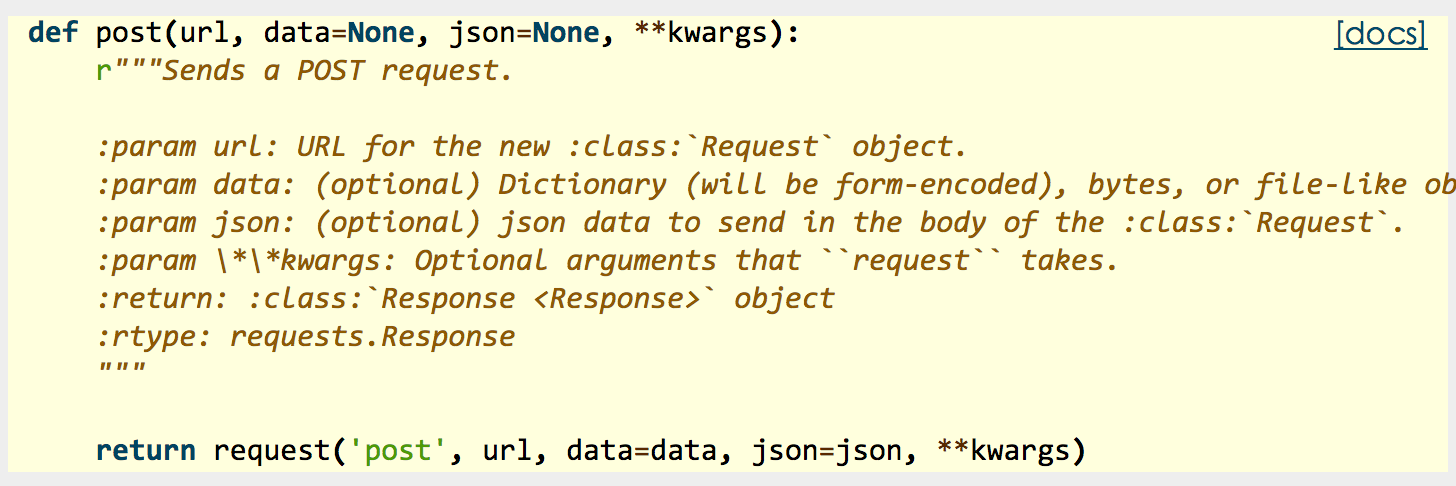
2、源码:

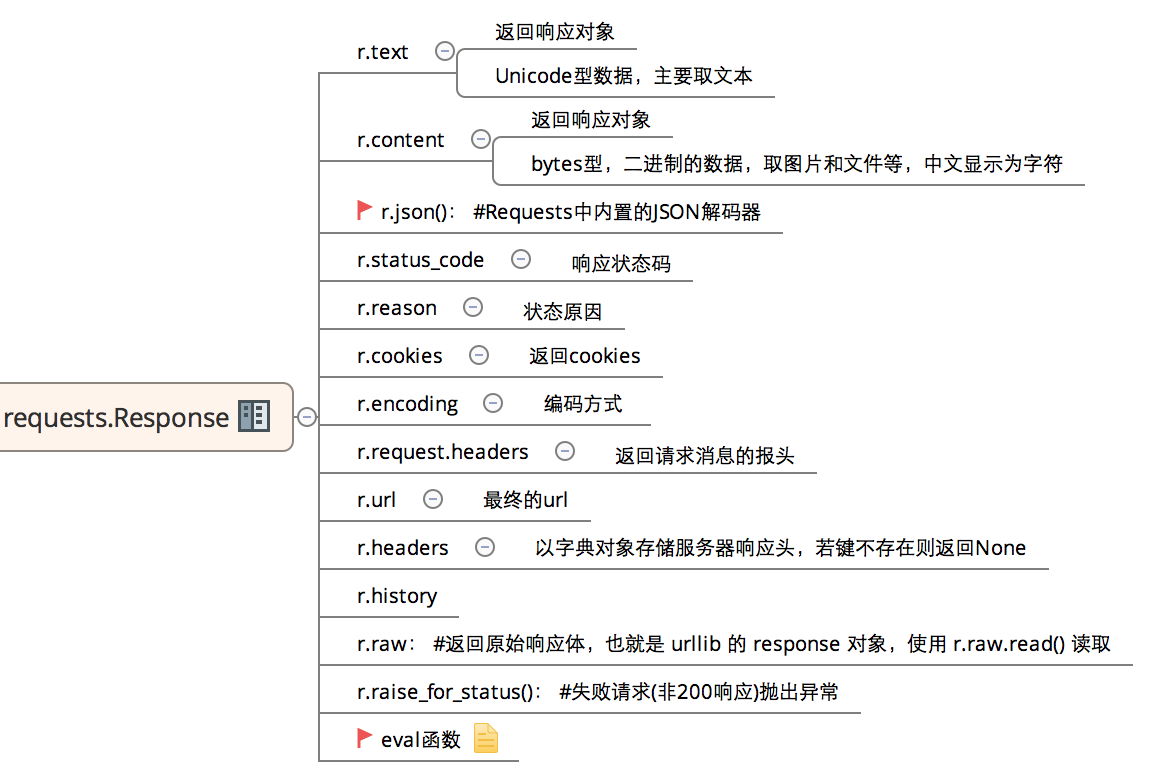
3、常用返回信息:

二、post方法简单使用:
1、带数据的post:
# -*- coding:utf-8 -*-

import requests

import json

host = "http://httpbin.org/"

endpoint = "post"

url = ''.join([host,endpoint])

data = {'key1':'value1','key2':'value2'}

r = requests.post(url,data=data)

#response = r.json()

print (r.text)
输出:
{

  "args": {},

  "data": "",

  "files": {},

  "form": {

    "key1": "value1",

    "key2": "value2"

  },

  "headers": {

    "Accept": "*/*",

    "Accept-Encoding": "gzip, deflate",

    "Connection": "close",

    "Content-Length": "",

    "Content-Type": "application/x-www-form-urlencoded",

    "Host": "httpbin.org",

    "User-Agent": "python-requests/2.18.1"

  },

  "json": null,

  "origin": "183.14.133.88",

  "url": "http://httpbin.org/post"

}
2、带header的post:
# -*- coding:utf-8 -*-

import requests

import json


host = "http://httpbin.org/"

endpoint = "post"

url = ''.join([host,endpoint])

headers = {"User-Agent":"test request headers"}

# r = requests.post(url)

r = requests.post(url,headers=headers)

#response = r.json()
输出:
{

  "args": {},

  "data": "",

  "files": {},

  "form": {},

  "headers": {

    "Accept": "*/*",

    "Accept-Encoding": "gzip, deflate",

    "Connection": "close",

    "Content-Length": "",

    "Host": "httpbin.org",

    "User-Agent": "test request headers"

  },

  "json": null,

  "origin": "183.14.133.88",

  "url": "http://httpbin.org/post"

}
3、带json的post:
# -*- coding:utf-8 -*-

import requests

import json

host = "http://httpbin.org/"

endpoint = "post"


url = ''.join([host,endpoint])

data = {

    "sites": [

                { "name":"test" , "url":"www.test.com" },

                { "name":"google" , "url":"www.google.com" },

                { "name":"weibo" , "url":"www.weibo.com" }

    ]

}

r = requests.post(url,json=data)

# r = requests.post(url,data=json.dumps(data))

response = r.json()
输出:
{

  "args": {},

  "data": "{\"sites\": [{\"url\": \"www.test.com\", \"name\": \"test\"}, {\"url\": \"www.google.com\", \"name\": \"google\"}, {\"url\": \"www.weibo.com\", \"name\": \"weibo\"}]}",

  "files": {},

  "form": {},

  "headers": {

    "Accept": "*/*",

    "Accept-Encoding": "gzip, deflate",

    "Connection": "close",

    "Content-Length": "",

    "Content-Type": "application/json",

    "Host": "httpbin.org",

    "User-Agent": "python-requests/2.18.1"

  },

  "json": {

    "sites": [

      {

        "name": "test",

        "url": "www.test.com"

      },

      {

        "name": "google",

        "url": "www.google.com"

      },

      {

        "name": "weibo",

        "url": "www.weibo.com"

      }

    ]

  },

  "origin": "183.14.133.88",

  "url": "http://httpbin.org/post"

}
4、带参数的post:
# -*- coding:utf-8 -*-

import requests

import json

host = "http://httpbin.org/"

endpoint = "post"

url = ''.join([host,endpoint])

params = {'key1':'params1','key2':'params2'}

# r = requests.post(url)

r = requests.post(url,params=params)

#response = r.json()

print (r.text)
输出:
{

  "args": {

    "key1": "params1",

    "key2": "params2"

  },

  "data": "",

  "files": {},

  "form": {},

  "headers": {

    "Accept": "*/*",

    "Accept-Encoding": "gzip, deflate",

    "Connection": "close",

    "Content-Length": "",

    "Host": "httpbin.org",

    "User-Agent": "python-requests/2.18.1"

  },

  "json": null,

  "origin": "183.14.133.88",

  "url": "http://httpbin.org/post?key2=params2&key1=params1"

}
5、普通文件上传:
# -*- coding:utf-8 -*-

import requests

import json

host = "http://httpbin.org/"

endpoint = "post"


url = ''.join([host,endpoint])

#普通上传

files = {

            'file':open('test.txt','rb')

        }

r = requests.post(url,files=files)

print (r.text)
输出:
{

  "args": {},

  "data": "",

  "files": {

    "file": "hello world!\n"

  },

  "form": {},

  "headers": {

    "Accept": "*/*",

    "Accept-Encoding": "gzip, deflate",

    "Connection": "close",

    "Content-Length": "",

    "Content-Type": "multipart/form-data; boundary=392865f79bf6431f8a53c9d56c62571e",

    "Host": "httpbin.org",

    "User-Agent": "python-requests/2.18.1"

  },

  "json": null,

  "origin": "183.14.133.88",

  "url": "http://httpbin.org/post"

}
6、定制化文件上传:
# -*- coding:utf-8 -*-

import requests

import json

host = "http://httpbin.org/"

endpoint = "post"

url = ''.join([host,endpoint])

#自定义文件名,文件类型、请求头

files = {

        'file':('test.png',open('test.png','rb'),'image/png')

}

r = requests.post(url,files=files)

print (r.text)heman793
输出比较在,就不帖了。
7、多文件上传:
# -*- coding:utf-8 -*-

import requests

import json

host = "http://httpbin.org/"

endpoint = "post"

url = ''.join([host,endpoint])

#多文件上传

files = [

    ('file1',('test.txt',open('test.txt', 'rb'))),

    ('file2', ('test.png', open('test.png', 'rb')))

    ]

r = requests.post(url,files=files)

print (r.text)
输出上,太多内容,不帖了。
8、流式上传:
# -*- coding:utf-8 -*-

import requests

import json

host = "http://httpbin.org/"

endpoint = "post"

url = ''.join([host,endpoint])

#流式上传

with open( 'test.txt' ) as f:

    r = requests.post(url,data = f)

print (r.text)
输出:
{

  "args": {},

  "data": "hello world!\n",

  "files": {},

  "form": {},

  "headers": {

    "Accept": "*/*",

    "Accept-Encoding": "gzip, deflate",

    "Connection": "close",

    "Content-Length": "",

    "Host": "httpbin.org",

    "User-Agent": "python-requests/2.18.1"

  },

  "json": null,

  "origin": "183.14.133.88",

  "url": "http://httpbin.org/post"

}
python接口自动化测试(三)-requests.post()的更多相关文章
- python接口自动化测试三十三:获取时间戳(10位和13位)
很多时候,在调用接口时,需要对请求进行签名.需要用到unix时间戳. 在python里,在网上介绍的很多方法,得到的时间戳是10位.而java里默认是13位(milliseconds,毫秒级的). 下 ...
- python接口自动化测试三:代码发送HTTP请求
get请求: 1.get请求(无参数): 2.get请求(带参数): 接口地址:http://japi.juhe.cn/qqevaluate/qq 返回格式:json 请求方式:get post 请求 ...
- python接口自动化测试(二)-requests.get()
环境搭建好后,接下来我们先来了解一下requests的一些简单使用,主要包括: requests常用请求方法使用,包括:get,post requests库中的Session.Cookie的使用 其它 ...
- python接口自动化测试三十六:数据驱动参数化之paramunittest
官方文档1.官方文档地址:https://pypi.python.org/pypi/ParamUnittest/2.github源码下载地址:https://github.com/rik0/Param ...
- python接口自动化测试三十五:用BeautifulReport生成报告
GitHub传送门:https://github.com/TesterlifeRaymond/BeautifulReport 配置BeautifulReport 下载.解压并修改名字为Beautifu ...
- python接口自动化测试三十四:github上某接口测试平台及配置
TeserHome地址:https://testerhome.com/opensource_projects/60前端:https://github.com/pencil1/ApiTestWeb 实现 ...
- Python接口自动化测试框架实战 从设计到开发
第1章 课程介绍(不要错过)本章主要讲解课程的详细安排.课程学习要求.课程面向用户等,让大家很直观的对课程有整体认知! 第2章 接口测试工具Fiddler的运用本章重点讲解如何抓app\web的htt ...
- 基于Python接口自动化测试框架+数据与代码分离(进阶篇)附源码
引言 在上一篇<基于Python接口自动化测试框架(初级篇)附源码>讲过了接口自动化测试框架的搭建,最核心的模块功能就是测试数据库初始化,再来看看之前的框架结构: 可以看出testcase ...
- python接口自动化测试二十七:密码MD5加密 ''' MD5加密 ''' # 由于MD5模块在python3中被移除 # 在python3中使用hashlib模块进行md5操作 import hashlib # 待加密信息 str = 'asdas89799,.//plrmf' # 创建md5对象 hl = hashlib.md5() # Tips # 此处必须声明encode # 若写法为
python接口自动化测试二十七:密码MD5加密 ''' MD5加密 '''# 由于MD5模块在python3中被移除# 在python3中使用hashlib模块进行md5操作import has ...
随机推荐
- log4j快速入门
转自:http://blog.csdn.net/yanwushu/article/details/7581255 1.引言 在应用程序中添加日志记录总的来说基于三个目的: .监视代码中变量的变化情况, ...
- mySql版本的相关问题:com.mysql.cj.jdbc.Driver和com.mysql.jdbc.Driver
Mysql版本的相关问题:com.mysql.cj.jdbc.Driver和com.mysql.jdbc.Driver 1. 在使用mysql时,控制台日志报错如下: Loading class `c ...
- Quratz的理解
一:公共术语 1.为什么使用Qurztz 在某一个有规律的时间点干某件事.并且时间的触发的条件可以非常复杂(比如每月最后一个工作日的17:50),复杂到需要一个专门的框架来干这个事. Quartz就是 ...
- JavaScript深拷贝实现原理简析
原文:http://www.cnblogs.com/xie-zhan/p/6020954.html JavaScript实现继承的时候,需要进行对象的拷贝:而为了不影响拷贝后的数据对原数据造成影响,也 ...
- P2279 [HNOI2003]消防局的设立
P2279 [HNOI2003]消防局的设立考场上想出了贪心策略,但是处理细节时有点问题,gg了.从(当前深度最大的节点)叶子节点往上跳k个,在这里设消防局,并从消防局遍历k个距离,标记上. #inc ...
- jarvis OJ WEB题目writeup
0x00前言 发现一个很好的ctf平台,题目感觉很有趣,学习了一波并记录一下 https://www.jarvisoj.com 0x01 Port51 题目要求是用51端口去访问该网页,注意下,要用具 ...
- 现阶段如何开始使用v-ray for unrealengine
如何安装 因为现阶段v-ray for unrealengine还处于beta测试阶段所以你必须去https://www.chaosgroup.com/vray/unreal 申请测试资格申请完之后就 ...
- 2017-10-5-Python
想学习Python很长时间了,工作中使用Python脚本解决问题真的很爽. 插入一张Python的py文件常见的结构图: if __name__ =="__main__" 这条语句 ...
- openssl可以实现:秘钥证书管理、对称加密和非对称加密
openssl enc -e -aes-128-cbc -iv 0102030405060708 -K 1234567890123456 -in input.xml -out output.xml( ...
- JS将日期转为距现在的时间长度
最近在弄一个回忆网站,其中有个一板块类似于情侣空间的纪念日. 照着弄了个类似的,效果如下: 在处理过程中需要把时间戳转为Date()对象,然后与本地时间相减获得时间差,通过运算转换成对应的年月日时长, ...
