JNI 记
Java Native Interface(JNI)从零开始详细教程
首先声明:文章非原创,看了很多关于JNI的介绍,只有这篇个人认为最好,并且附加本人探究过程中的一些见解。
文章来源:【原文】:https://www3.ntu.edu.sg/home/ehchua/programming/java/JavaNativeInterface.html
【译文】:https://blog.csdn.net/createchance/article/details/53783490
===================================================================================
引言
有的时候我们需要使用本地代码(C/C++)来克服Java中的内存管理和性能问题,Java通过JNI机制来支持内地代码的使用。
想要比较好地理解JNI是比较难的,因为它包含了两种语言和运行时机制。
在继续之前,我应该假设你具备以下知识点和技能:
1. java
2. C/C++和gcc编译器
3. 对于windows而言,熟悉Gygwin或者MinGW (可自行百度)
4. 对于IDE而言,熟悉Eclipse C/C++ Development Tool (CDT)
开始
使用C来实现JNI
步骤1,编写一个使用C实现函数的java类,HelloJNI.java:
public class HelloJNI {

   static {

      System.loadLibrary("hello"); // Load native library at runtime

                                   // hello.dll (Windows) or libhello.so (Unixes)

   }

   // Declare a native method sayHello() that receives nothing and returns void

   private native void sayHello();

   // Test Driver

   public static void main(String[] args) {

      new HelloJNI().sayHello();  // invoke the native method

   }

}
上面代码的静态代码块在这个类被类加载器加载的时候调用了System.loadLibrary()方法来加载一个native库“hello”(这个库中实现了sayHello函数)。这个库在windows品台上对应了“hello.dll”,而在类UNIX平台上对应了“libhello.so”。这个库应该包含在Java的库路径(使用java.library.path系统变量表示)上,否则这个上面的程序会抛出UnsatisfiedLinkError错误。你应该使用VM的参数-Djava.library.path=path_to_lib来指定包含native库的路径。
接下来,我们使用native关键字将sayHello()方法声明为本地实例方法,这就很明显地告诉JVM:这个方法实现在另外一个语言中(C/C++),请去那里寻找他的实现。注意,一个native方法不包含方法体,只有声明。上面代码中的main方法实例化了一个HelloJJNI类的实例,然后调用了本地方法sayHello()。
下面,我们编译HelloJNI.java成HelloJNI.class
javac HelloJNI.java
接下来,我们利用上面生成的class文件生成用于编写C/C++代码的头文件,使用jdk中的javah工具完成:
javah HelloJNI
上面的命令执行完之后生成了HelloJNI.h:
/* DO NOT EDIT THIS FILE - it is machine generated */

#include <jni.h>

/* Header for class HelloJNI */

#ifndef _Included_HelloJNI

#define _Included_HelloJNI

#ifdef __cplusplus

extern "C" {

#endif

/*

 * Class:     HelloJNI

 * Method:    sayHello

 * Signature: ()V

 */

JNIEXPORT void JNICALL Java_HelloJNI_sayHello(JNIEnv *, jobject);

#ifdef __cplusplus

}

#endif

#endif
我们看到,上面的头文件中生成了一个Java_HelloJNI_sayHello的C函数:
JNIEXPORT void JNICALL Java_HelloJNI_sayHello(JNIEnv *, jobject);
将java的native方法转换成C函数声明的规则是这样的:Java_{package_and_classname}_{function_name}(JNI arguments)。包名中的点换成单下划线。需要说明的是生成函数中的两个参数:
1. JNIEnv *:这是一个指向JNI运行环境的指针,后面我们会看到,我们通过这个指针访问JNI函数
2. jobject:这里指代java中的this对象
下面我们给出的例子中没有使用上面的两个参数,不过后面我们的例子会使用的。到目前为止,你可以先忽略JNIEXPORT和JNICALL这两个玩意。
上面头文件中有一个extern “C”,同时上面还有C++的条件编译语句,这么一来大家就明白了,这里的函数声明是要告诉C++编译器:这个函数是C函数,请使用C函数的签名协议规则去编译!因为我们知道C++的函数签名协议规则和C的是不一样的,因为C++支持重写和重载等面向对象的函数语法。
接下来,我们给出C语言的实现,以实现上面的函数:
C语言实现:
#include <jni.h>

#include <stdio.h>

#include "HelloJNI.h"

// Implementation of native method sayHello() of HelloJNI class

JNIEXPORT void JNICALL Java_HelloJNI_sayHello(JNIEnv *env, jobject thisObj) {

   printf("Hello World!\n");

   return;

}
将上面的代码保存为HelloJNI.c。jni.h头文件在 “\include” 和 “\include\win32”目录下,这里的JAVA_HOME是指你的JDK安装目录。
这段C代码的作用很简单,就是在终端上打印Hello Word!这句话。
下面我们编译这段代码,使用GCC编译器:
对于windows上的MinGW:
> set JAVA_HOME=C:\Program Files\Java\jdk1..0_{xx}

      // Define and Set environment variable JAVA_HOME to JDK installed directory

      // I recommend that you set JAVA_HOME permanently, via "Control Panel" ⇒ "System" ⇒ "Environment Variables"

> echo %JAVA_HOME%

      // In Windows, you can refer a environment variable by adding % prefix and suffix

> gcc -Wl,--add-stdcall-alias -I "%JAVA_HOME%\include" -I "%JAVA_HOME%\include\win32" -shared -o hello.dll HelloJNI.c

      // Compile HellJNI.c into shared library hello.dll
也可以分步编译:
// Compile-only with -c flag. Output is HElloJNI.o

> gcc -c -I "%JAVA_HOME%\include" -I "%JAVA_HOME%\include\win32" HelloJNI.c

// Link into shared library "hello.dll"

> gcc -Wl,--add-stdcall-alias -shared -o hello.dll HelloJNI.o
下面,我们使用nm命令来查看生成hello.dll中的函数:
> nm hello.dll | grep say

624011d8 T _Java_HelloJNI_sayHello@
对于windows上的Cygwin:
首先,你需要讲__int64定义成“long long”类型,通过-D _int64=”long long选项实现。
对于gcc-3,请包含选项-nmo -cygwin来编译dll库,这些库是不依赖于Cygwin dll的。
> gcc- -D __int64="long long" -mno-cygwin -Wl,--add-stdcall-alias

  -I"<JAVA_HOME>\include" -I"<JAVA_HOME>\include\win32" -shared -o hello.dll HelloJNI.c
对于gcc-4,我目前还没有找到正确的编译选项。
==================================这部分是笔者添加的==================================
原文中只给出了windows平台上编译方法,下面我给出Linux等类UNIX上编译方法:
gcc -fPIC --shared HelloJNI.c -o libhello.so -I /usr/lib/jvm/java--openjdk-amd64/include/
上面的命令编译生成一个libhello.so共享库在当前目录下
==================================这部分是笔者添加的==================================
接下来,让我们运行一下上面的代码吧:
> java HelloJNI

or

> java -Djava.library.path=. HelloJNI
有的时候,你可能需要使用-Djava.library.path来指定加载库的位置,因为可能报出java.lang.UnsatisfiedLinkError错误.
==================================这部分是笔者添加的==================================
我们首先使用nm命令(关于nm请自行Google或者man)查看libhello.so中都有那些函数:
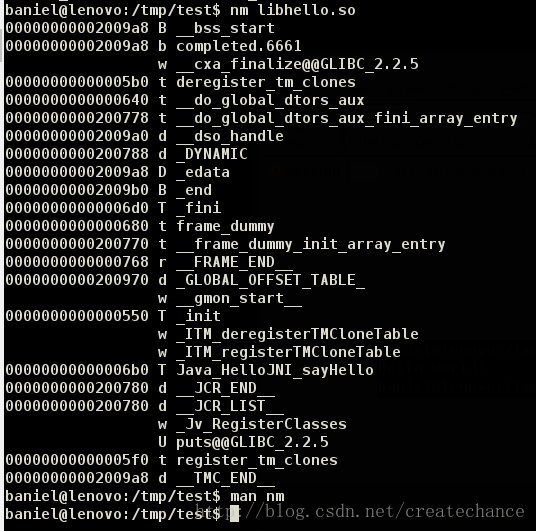
可以看到我们的sayHello函数已经在这个里面,这说明我们编译的基本没有问题。
下面,我给出在我电脑上运行的效果(原文作者没有给出):
首先我们执行java HelloJNI,看看能不能运行:
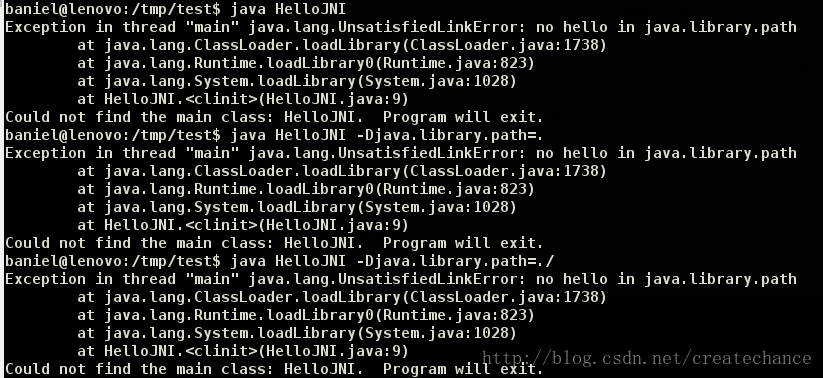
果然,出现了UnsatisfiedLinkError错误,原因是VM去标准路径下查找这个库,发现找不到,然后就挂了。因此我们还是需要使用-Djava.library.path来明确告诉VM我们的库在哪里(当然,你也可以将你编译出来的库放到系统标准路径中,比如/usr/lib目录下):

现在OK了,因为我们明确告诉VM,我们的libhello.so就在当前目录下,不用傻傻地去系统中找啦!!
==================================这部分是笔者添加的==================================
使用C/C++混合实现JNI
第一步:编写一个使用本地代码的java类:HelloJNICpp.java
public class HelloJNICpp {

   static {

      System.loadLibrary("hello"); // hello.dll (Windows) or libhello.so (Unixes)

   }

   // Native method declaration

   private native void sayHello();

   // Test Driver

   public static void main(String[] args) {

      new HelloJNICpp().sayHello();  // Invoke native method

   }

}
同样地,我们使用javac来编译这个代码:
> javac HelloJNICpp.java
步骤2:生成C/C++的头文件
> javah HelloJNICpp
上面命令会生成一个HelloJNICpp.h的文件,并且这个文件中声明了这个本地函数:
JNIEXPORT void JNICALL Java_HelloJNICpp_sayHello(JNIEnv *, jobject);
步骤3:C/C++编码实现,HelloJNICppImpl.h, HelloJNICppImpl.cpp, 和 HelloJNICpp.c
这里,我们使用C++来实现真正的函数(”HelloJNICppImpl.h” 和 “HelloJNICppImpl.cpp”),而使用C来和java进行交互。(译者注:这样就可以把JNI的代码逻辑和我们真正的业务逻辑分离开了!)
C++头文件:”HelloJNICppImpl.h”
#ifndef _HELLO_JNI_CPP_IMPL_H

#define _HELLO_JNI_CPP_IMPL_H

#ifdef __cplusplus

        extern "C" {

#endif

        void sayHello ();

#ifdef __cplusplus

        }

#endif

#endif
C++的代码实现:”HelloJNICppImpl.cpp”
#include "HelloJNICppImpl.h"

#include  <iostream>

using namespace std;

void sayHello () {

    cout << "Hello World from C++!" << endl;

    return;

}
C代码实现和Java的交互:”HelloJNICpp.c”
#include <jni.h>

#include "HelloJNICpp.h"

#include "HelloJNICppImpl.h"

JNIEXPORT void JNICALL Java_HelloJNICpp_sayHello (JNIEnv *env, jobject thisObj) {

    sayHello();  // invoke C++ function

    return;

}
讲上面的代码编译成一个共享库(在windows上是hello.dll)。
使用windows上的MinGW GCC:
> set JAVA_HOME=C:\Program Files\Java\jdk1..0_{xx}

> g++ -Wl,--add-stdcall-alias -I "%JAVA_HOME%\include" -I "%JAVA_HOME%\include\win32"

      -shared -o hello.dll HelloJNICpp.c HelloJNICppImpl.cpp
步骤4:运行java代码
> java HelloJNICpp

or

> java -Djava.library.path=. HelloJNICpp
java package中的JNI
在真正的产品化中,所有的java类都是有自己的包的,而不是一个默认的没有名字的包。下面我们说明一下java中的package怎么在JNI中使用。
步骤1:使用JNI的程序, myjni\HelloJNI.java
package myjni; // 多了包名定义

public class HelloJNI {

   static {

      System.loadLibrary("hello"); // hello.dll (Windows) or libhello.so (Unixes)

   }

   // A native method that receives nothing and returns void

   private native void sayHello();

   public static void main(String[] args) {

      new HelloJNI().sayHello();  // invoke the native method

   }

}
上面的这个类应该放在myjni目录下。然后我们编译这个代码:
// change directory to package base directory

> javac myjni\HelloJNI.java
步骤2:生成C/C++头文件
如果你的java代码是放在一个包中的,那么你需要使用完全限定名称来生成C/C++头文件的。你可能会需要使用-classpath选项来指定JNI程序的classpath路径,并且可能会使用-d选项来指定生成头文件的目标文件夹。
> javah --help

......

// Change directory to package base directory

> javah -d include myini.HelloJNI
在上面的例子中,我们选择将生层的头文件放在include目录下,因此,我们输出的就是:”include\myjni_HelloJNI.h”.这个头文件声明了这样的本地函数:
JNIEXPORT void JNICALL Java_myjni_HelloJNI_sayHello(JNIEnv *, jobject);
我们看到,和上面的例子相比,这里的名字规则是这样的:Java__methodName,同时,点号换成单下划线。
步骤3:C代码实现:HelloJNI.c
#include <jni.h>

#include <stdio.h>

#include "include\myjni_HelloJNI.h"

JNIEXPORT void JNICALL Java_myjni_HelloJNI_sayHello(JNIEnv *env, jobject thisObj) {

   printf("Hello World!\n");

   return;

}
编译C代码:
> gcc -Wl,--add-stdcall-alias -I <JAVA_HOME>\include -I <JAVA_HOME>\include\win32 -shared -o hello.dll HelloJNI.c
运行代码:
> java myjni.HelloJNI
JNI基础知识
上面我们简单演示了怎么使用JNI,现在我们来系统梳理一下JNI中涉及的基本知识。
JNI定义了以下数据类型,这些类型和Java中的数据类型是一致的:
1. Java原始类型:jint, jbyte, jshort, jlong, jfloat, jdouble, jchar, jboolean这些分别对应这java的int, byte, short, long, float, double, char and boolean。
2. Java引用类型:jobject用来指代java.lang.Object,除此之外,还定义了以下子类型:
a. jclass for java.lang.Class.
b. jstring for java.lang.String.
c. jthrowable for java.lang.Throwable.
d. jarray对java的array。java的array是一个指向8个基本类型array的引用类型。于是,JNI中就有8个基本类型的array:jintArray, jbyteArray, jshortArray, jlongArray, jfloatArray, jdoubleArray, jcharArray 和 jbooleanArray,还有一个就是指向Object的jobjectarray。
Native函数会接受上面类型的参数,并且也会返回上面类型的返回值。然而,本地函数(C/C++)是需要按照它们自己的方式处理类型的(比如C中的string,就是char *)。因此,需要在JNI类型和本地类型之间进行转换。通常来讲,本地函数需要:
1. 加收JNI类型的参数(从java代码中传来)
2. 对于JNI类型参数,需要讲这些数据转换或者拷贝成本地数据类型,比如讲jstring转成char *, jintArray转成C的int[]。需要注意的是,原始的JNI类型,诸如jint,jdouble之类的不用进行转换,可以直接使用,参与计算。
3. 进行数据操作,以本地的方式
4. 创建一个JNI的返回类型,然后讲结果数据拷贝到这个JNI数据中
5. returnJNI类型数据
这其中最麻烦的事莫过于在JNI类型(如jstring, jobject, jintArray, jobjectArray)和本地类型(如C-string, int[])之间进行转换这件事情了。不过所幸的是,JNI环境已经为我们定义了很多的接口函数来做这种烦人的转换。(译者注:这里就需要使用上面我们提到的JNIEnv*那个参数了!)
在Java和Native代码之间传递参数和返回值
传递基本类型
传递java的基本类型是非常简单而直接的,一个jxxx之类的类型已经定义在本地系统中了,比如:jint, jbyte, jshort, jlong, jfloat, jdouble, jchar 和 jboolean分别对应java的int, byte, short, long, float, double, char 和 boolean基本类型。
Java JNI 程序:TestJNIPrimitive.java
public class TestJNIPrimitive {

   static {

      System.loadLibrary("myjni"); // myjni.dll (Windows) or libmyjni.so (Unixes)

   }

   // Declare a native method average() that receives two ints and return a double containing the average

   private native double average(int n1, int n2);

   // Test Driver

   public static void main(String args[]) {

      System.out.println("In Java, the average is " + new TestJNIPrimitive().average(3, 2));

   }

}
这个JNI程序加载了myjni.dll(windows)库或者libmyjni.so(类UNIX)库。并且声明了一个native方法,这个方法接受两个int类型的参数,并且返回一个double类型的返回值,这个值是两个int型数的平均值。mian方法调用了average函数。
下面,我们将上面的java代码编译成TestJNIPrimitive.class,进而生成C/C++头文件TestJNIPrimitive.h:
> javac TestJNIPrimitive.java

> javah TestJNIPrimitive       // Output is TestJNIPrimitive.h
C实现:TestJNIPrimitive.c
头文件TestJNIPrimitive.h中包含了一个函数声明:
JNIEXPORT jdouble JNICALL Java_TestJNIPrimitive_average(JNIEnv *, jobject, jint, jint);
可以看到,这里的jint和jdouble分别表示java中的int和double。
jni.h(windows上是win32/jni_mh.h)头文件包含了这些数据类型的定义,同时多了一个jsize的定义:
// In "win\jni_mh.h" - machine header which is machine dependent

typedef long            jint;

typedef __int64         jlong;

typedef signed char     jbyte;

// In "jni.h"

typedef unsigned char   jboolean;

typedef unsigned short  jchar;

typedef short           jshort;

typedef float           jfloat;

typedef double          jdouble;

typedef jint            jsize;
有趣的是,jint对应到C的long类型(至少是32bit的),而不是C的int类型(至少是16bit的)。于是,在C代码中要使用jint而不是int是很重要的。同时,CygWin不支持__int64类型。
TestJNIPrimitive.c的实现如下:
#include <jni.h>

#include <stdio.h>

#include "TestJNIPrimitive.h"

JNIEXPORT jdouble JNICALL Java_TestJNIPrimitive_average

          (JNIEnv *env, jobject thisObj, jint n1, jint n2) {

   jdouble result;

   printf("In C, the numbers are %d and %d\n", n1, n2);

   result = ((jdouble)n1 + n2) / 2.0;

   // jint is mapped to int, jdouble is mapped to double

   return result;

}
然后,我们编译代码成一个共享库:
// MinGW GCC under Windows

> set JAVA_HOME={jdk-installed-directory}

> gcc -Wl,--add-stdcall-alias -I"%JAVA_HOME%\include" -I"%JAVA_HOME%\include\win32" -shared -o myjni.dll TestJNIPrimitive.c
最后,我们运行这个java代码:
> java TestJNIPrimitive
C++实现 TestJNIPrimitive.cpp
代码如下:
#include <jni.h>

#include <iostream>

#include "TestJNIPrimitive.h"

using namespace std;

JNIEXPORT jdouble JNICALL Java_TestJNIPrimitive_average

          (JNIEnv *env, jobject obj, jint n1, jint n2) {

   jdouble result;

   cout << "In C++, the numbers are " << n1 << " and " << n2 << endl;

   result = ((jdouble)n1 + n2) / 2.0;

   // jint is mapped to int, jdouble is mapped to double

   return result;

}
使用g++来编译上面的代码:
// MinGW GCC under Windows

> g++ -Wl,--add-stdcall-alias -I"%JAVA_HOME%\include" -I"%JAVA_HOME%\include\win32" -shared -o myjni.dll TestJNIPrimitive.cpp
传递字符串
Java JNI 程序:TestJNIString.java
public class TestJNIString {

   static {

      System.loadLibrary("myjni"); // myjni.dll (Windows) or libmyjni.so (Unixes)

   }

   // Native method that receives a Java String and return a Java String

   private native String sayHello(String msg);

   public static void main(String args[]) {

      String result = new TestJNIString().sayHello("Hello from Java");

      System.out.println("In Java, the returned string is: " + result);

   }

}
上面的代码声明了一个native函数sayHello,这个函数接受一个java的String,然后返回一个Java string,main方法调用了sayHello函数。
然后,我们编译上面的代码,并且生成C/C++的头文件:
> javac TestJNIString.java

> javah TestJNIString
C代码实现:TestJNIString.c
上面的头文件TestJNIString.h声明了这样的一个函数:
JNIEXPORT jstring JNICALL Java_TestJNIString_sayHello(JNIEnv *, jobject, jstring);
JNI定义了jstring类型应对java的String类型。上面声明中的最后一个参数jstring就是来自Java代码中的String参数,同时,返回值也是一个jstring类型。
传递一个字符串比传递基本类型要复杂的多,因为java的String是一个对象,而C的string是一个NULL结尾的char数组。因此,我们需要将Java的String对象转换成C的字符串表示形式:char *。
前面我们提到,JNI环境指针JNIEnv *已经为我们定义了非常丰富的接口函数用来处理数据的转换:
1. 调用const char* GetStringUTFChars(JNIEnv*, jstring, jboolean*)来将JNI的jstring转换成C的char *
2. 调用jstring NewStringUTF(JNIEnv*, char*)来将C的char *转换成JNI的jstring
因此我们的C程序基本过程如下:
1. 使用GetStringUTFChars()函数来将jstring转换成char *
2. 然后进行需要的数据处理
3. 使用NewStringUTF()函数来将char *转换成jstring,并且返回
#include <jni.h>

#include <stdio.h>

#include "TestJNIString.h"

JNIEXPORT jstring JNICALL Java_TestJNIString_sayHello(JNIEnv *env, jobject thisObj, jstring inJNIStr) {

   // Step 1: Convert the JNI String (jstring) into C-String (char*)

   const char *inCStr = (*env)->GetStringUTFChars(env, inJNIStr, NULL);

   if (NULL == inCSt) return NULL;

   // Step 2: Perform its intended operations

   printf("In C, the received string is: %s\n", inCStr);

   (*env)->ReleaseStringUTFChars(env, inJNIStr, inCStr);  // release resources

   // Prompt user for a C-string

   char outCStr[];

   printf("Enter a String: ");

   scanf("%s", outCStr);    // not more than 127 characters

   // Step 3: Convert the C-string (char*) into JNI String (jstring) and return

   return (*env)->NewStringUTF(env, outCStr);

}
将上面的代码编译成共享库:
// MinGW GCC under Windows

> gcc -Wl,--add-stdcall-alias -I"<JAVA_HOME>\include" -I"<JAVA_HOME>\include\win32" -shared -o myjni.dll TestJNIString.c
最后,运行代码:
> java TestJNIString

In C, the received string is: Hello from Java

Enter a String: test

In Java, the returned string is: test
JNI中的string转换函数
上面我们展示了两个函数,现在我们全面梳理下JNI为我们提供的函数。JNI支持Unicode(16bit字符)和UTF-8(使用1~3字节的编码)转化。一般而言,我们应该在C/C++中使用UTF-8的编码方式。
JNI系统提供了如下关于字符串处理的函数(一共两组,UTF8和Unicode):
// UTF-8 String (encoded to 1-3 byte, backward compatible with 7-bit ASCII)

// Can be mapped to null-terminated char-array C-string

const char * GetStringUTFChars(JNIEnv *env, jstring string, jboolean *isCopy);

   // Returns a pointer to an array of bytes representing the string in modified UTF-8 encoding.

void ReleaseStringUTFChars(JNIEnv *env, jstring string, const char *utf);

   // Informs the VM that the native code no longer needs access to utf.

jstring NewStringUTF(JNIEnv *env, const char *bytes);

   // Constructs a new java.lang.String object from an array of characters in modified UTF-8 encoding.

jsize GetStringUTFLength(JNIEnv *env, jstring string);

   // Returns the length in bytes of the modified UTF-8 representation of a string.

void GetStringUTFRegion(JNIEnv *env, jstring str, jsize start, jsize length, char *buf);

   // Translates len number of Unicode characters beginning at offset start into modified UTF-8 encoding

   // and place the result in the given buffer buf.

// Unicode Strings (16-bit character)

const jchar * GetStringChars(JNIEnv *env, jstring string, jboolean *isCopy);

   // Returns a pointer to the array of Unicode characters

void ReleaseStringChars(JNIEnv *env, jstring string, const jchar *chars);

   // Informs the VM that the native code no longer needs access to chars.

jstring NewString(JNIEnv *env, const jchar *unicodeChars, jsize length);

   // Constructs a new java.lang.String object from an array of Unicode characters.

jsize GetStringLength(JNIEnv *env, jstring string);

   // Returns the length (the count of Unicode characters) of a Java string.

void GetStringRegion(JNIEnv *env, jstring str, jsize start, jsize length, jchar *buf);

   // Copies len number of Unicode characters beginning at offset start to the given buffer buf
GetStringUTFChars()函数可以将jstring转成char *,这个函数会返回NULL,如果系统的内容分配失败的话。因此,好的做法是检查这个函数的返回是不是NULL。第三个参数是isCopy,这个参数是一个in-out参数,传进去的是一个指针,函数结束的时候指针的内容会被修改。如果内容是JNI_TRUE的话,那么代表返回的数据是jstring数据的一个拷贝,反之,如果是JNI_FALSE的话,就说明返回的字符串就是直接指向那个String对象实例的。在这种情况下,本地代码不应该随意修改string中的内容,因为修改会代码Java中的修改。JNI系统会尽量保证返回的是直接引用,如果不能的话,那就返回一个拷贝。通常,我们很少关心修改这些string ,因此我们这里一般传递NULL给isCopy参数。
必须要注意的是,当你不在需要GetStringUTFChars返回的字符串的时候,一定记得调用ReleaseStringUTFChars()函数来将内存资源释放!否则会内存泄露!并且上层java中的GC也不能进行!
另外,在GetStringUTFChars和ReleaseStringUTFChars不能block!
NewStringUTF()函数可以从char *字符串得到jstring。
C++实现:TestJNIString.cpp
#include <jni.h>

#include <iostream>

#include <string>

#include "TestJNIString.h"

using namespace std;

JNIEXPORT jstring JNICALL Java_TestJNIString_sayHello(JNIEnv *env, jobject thisObj, jstring inJNIStr) {

   // Step 1: Convert the JNI String (jstring) into C-String (char*)

   const char *inCStr = env->GetStringUTFChars(inJNIStr, NULL);

   if (NULL == inCStr) return NULL;

   // Step 2: Perform its intended operations

   cout << "In C++, the received string is: " << inCStr << endl;

   env->ReleaseStringUTFChars(inJNIStr, inCStr);  // release resources

   // Prompt user for a C++ string

   string outCppStr;

   cout << "Enter a String: ";

   cin >> outCppStr;

   // Step 3: Convert the C++ string to C-string, then to JNI String (jstring) and return

   return env->NewStringUTF(outCppStr.c_str());

}
使用g++编译上面的代码:
// MinGW GCC under Windows

> g++ -Wl,--add-stdcall-alias -I"<JAVA_HOME>\include" -I"<JAVA_HOME>\include\win32" -shared -o myjni.dll TestJNIString.cpp
需要注意的是,在C++中,本地string类的函数调用语法不一样。在C++中,我们使用env->来调用,而不是(env*)->。同时,在C++函数中不需要JNIEnv*这个参数了。
传递基本类型的数组
JNI 代码:TestJNIPrimitiveArray.java
public class TestJNIPrimitiveArray {

   static {

      System.loadLibrary("myjni"); // myjni.dll (Windows) or libmyjni.so (Unixes)

   }

   // Declare a native method sumAndAverage() that receives an int[] and

   //  return a double[2] array with [0] as sum and [1] as average

   private native double[] sumAndAverage(int[] numbers);

   // Test Driver

   public static void main(String args[]) {

      int[] numbers = {22, 33, 33};

      double[] results = new TestJNIPrimitiveArray().sumAndAverage(numbers);

      System.out.println("In Java, the sum is " + results[0]);

      System.out.println("In Java, the average is " + results[1]);

   }

}
C语言实现:TestJNIPrimitiveArray.c
头文件TestJNIPrimitiveArray.h包含以下函数声明:
JNIEXPORT jdoubleArray JNICALL Java_TestJNIPrimitiveArray_average (JNIEnv *, jobject, jintArray);
在Java中,array是指一种类型,类似于类。一共有9种java的array,8个基本类型的array和一个object的array。JNI针对java的基本类型都定义了相应的array:jintArray, jbyteArray, jshortArray, jlongArray, jfloatArray, jdoubleArray, jcharArray, jbooleanArray,并且也有面向object的jobjectArray。
同样地,你需要在JNI array和Native array之间进行转换,JNI系统已经为我们提供了一系列的接口函数:
1. 使用jint* GetIntArrayElements(JNIEnv *env, jintArray a, jboolean *iscopy)将jintarray转换成C的jint[]
2. 使用jintArray NewIntArray(JNIEnv *env, jsize len)函数来分配一个len字节大小的空间,然后再使用void SetIntArrayRegion(JNIEnv *env, jintArray a, jsize start, jsize len, const jint *buf)函数讲jint[]中的数据拷贝到jintArray中去。
一共有8对类似上面的函数,分别对应java的8个基本数据类型。
因此,native程序需要:
1. 接受来自java的JNI array,然后转换成本地array
2. 进行需要的数据操作
3. 将需要返回的数据转换成jni的array,然后返回
下面是C代码实现的TestJNIPrimitiveArray.c:
#include <jni.h>

#include <stdio.h>

#include "TestJNIPrimitiveArray.h"

JNIEXPORT jdoubleArray JNICALL Java_TestJNIPrimitiveArray_sumAndAverage

          (JNIEnv *env, jobject thisObj, jintArray inJNIArray) {

   // Step 1: Convert the incoming JNI jintarray to C's jint[]

   jint *inCArray = (*env)->GetIntArrayElements(env, inJNIArray, NULL);

   if (NULL == inCArray) return NULL;

   jsize length = (*env)->GetArrayLength(env, inJNIArray);

   // Step 2: Perform its intended operations

   jint sum = ;

   int i;

   for (i = ; i < length; i++) {

      sum += inCArray[i];

   }

   jdouble average = (jdouble)sum / length;

   (*env)->ReleaseIntArrayElements(env, inJNIArray, inCArray, ); // release resources

   jdouble outCArray[] = {sum, average};

   // Step 3: Convert the C's Native jdouble[] to JNI jdoublearray, and return

   jdoubleArray outJNIArray = (*env)->NewDoubleArray(env, );  // allocate

   if (NULL == outJNIArray) return NULL;

   (*env)->SetDoubleArrayRegion(env, outJNIArray,  , , outCArray);  // copy

   return outJNIArray;

}
JNI 中char *p 与jbyteArray之间的转换
本人没有进行更细致的库方法研究,但此处给与成功转化的案例,细节在于,char *p 的最终的‘\0’
jbyteArray decrypt(JNIEnv *env, const char *filePath)

{

    char *p;

    FILE *fp = fopen(filePath,"rb");

    if(NULL == fp){

        printf("file is null!\n");

        return NULL;

    }

    fseek(fp,,SEEK_END);

    int size = ftell(fp);

    fseek(fp,,SEEK_SET);

    if(size < ){

        printf("file size < 0 !!!\n");

        return NULL;

    }

    printf("file size : %d\n",size);

    p = (char*)calloc(size+,sizeof(char));

    fread(p,size,,fp);

    fclose(fp);

    p[size] = '\0';

    jbyte bytes[size];

    for(int i=;i<size;i++){

        p[i] = (char)(p[i] - );

        bytes[i] = p[i];

    }

    jbyteArray data = (*env)->NewByteArray(env,size);

    if(NULL == data){

        printf("data init error!!\n");

        return NULL;

    }

    (*env)->SetByteArrayRegion(env,data,,size,bytes);

    return data;

}
JNI基本类型的array函数
JNI基本类型的array(jintArray, jbyteArray, jshortArray, jlongArray, jfloatArray, jdoubleArray, jcharArray 和 jbooleanArray)函数如下:
// ArrayType: jintArray, jbyteArray, jshortArray, jlongArray, jfloatArray, jdoubleArray, jcharArray, jbooleanArray

// PrimitiveType: int, byte, short, long, float, double, char, boolean

// NativeType: jint, jbyte, jshort, jlong, jfloat, jdouble, jchar, jboolean

NativeType * Get<PrimitiveType>ArrayElements(JNIEnv *env, ArrayType array, jboolean *isCopy);

void Release<PrimitiveType>ArrayElements(JNIEnv *env, ArrayType array, NativeType *elems, jint mode);

void Get<PrimitiveType>ArrayRegion(JNIEnv *env, ArrayType array, jsize start, jsize length, NativeType *buffer);

void Set<PrimitiveType>ArrayRegion(JNIEnv *env, ArrayType array, jsize start, jsize length, const NativeType *buffer);

ArrayType New<PrimitiveType>Array(JNIEnv *env, jsize length);

void * GetPrimitiveArrayCritical(JNIEnv *env, jarray array, jboolean *isCopy);

void ReleasePrimitiveArrayCritical(JNIEnv *env, jarray array, void *carray, jint mode);
同样地,在get函数和release函数之间也不能always block。
访问Java对象变量和回调Java方法
访问Java对象实例的变量
JNI程序:TestJNIInstanceVariable.java
public class TestJNIInstanceVariable {

   static {

      System.loadLibrary("myjni"); // myjni.dll (Windows) or libmyjni.so (Unixes)

   }

   // Instance variables

   private int number = 88;

   private String message = "Hello from Java";

   // Declare a native method that modifies the instance variables

   private native void modifyInstanceVariable();

   // Test Driver

   public static void main(String args[]) {

      TestJNIInstanceVariable test = new TestJNIInstanceVariable();

      test.modifyInstanceVariable();

      System.out.println("In Java, int is " + test.number);

      System.out.println("In Java, String is " + test.message);

   }

}
这个类包含了两个private实例变量,一个int,一个String对象。然后我们在main中调用本地函数modifyInstanceVariable来修改这两个变量。
C代码实现:TestJNIInstanceVariable.c
#include <jni.h>

#include <stdio.h>

#include "TestJNIInstanceVariable.h"

JNIEXPORT void JNICALL Java_TestJNIInstanceVariable_modifyInstanceVariable

          (JNIEnv *env, jobject thisObj) {

   // Get a reference to this object's class

   jclass thisClass = (*env)->GetObjectClass(env, thisObj);

   // int

   // Get the Field ID of the instance variables "number"

   jfieldID fidNumber = (*env)->GetFieldID(env, thisClass, "number", "I");

   if (NULL == fidNumber) return;

   // Get the int given the Field ID

   jint number = (*env)->GetIntField(env, thisObj, fidNumber);

   printf("In C, the int is %d\n", number);

   // Change the variable

   number = ;

   (*env)->SetIntField(env, thisObj, fidNumber, number);

   // Get the Field ID of the instance variables "message"

   jfieldID fidMessage = (*env)->GetFieldID(env, thisClass, "message", "Ljava/lang/String;");

   if (NULL == fidMessage) return;

   // String

   // Get the object given the Field ID

   jstring message = (*env)->GetObjectField(env, thisObj, fidMessage);

   // Create a C-string with the JNI String

   const char *cStr = (*env)->GetStringUTFChars(env, message, NULL);

   if (NULL == cStr) return;

   printf("In C, the string is %s\n", cStr);

   (*env)->ReleaseStringUTFChars(env, message, cStr);

   // Create a new C-string and assign to the JNI string

   message = (*env)->NewStringUTF(env, "Hello from C");

   if (NULL == message) return;

   // modify the instance variables

   (*env)->SetObjectField(env, thisObj, fidMessage, message);

}
为了访问对象中的变量,我们需要:
1. 调用GetObjectClass()获得目标对象的类引用
2. 从上面获得的类引用中获得Field ID来访问变量,你需要提供这个变量的名字,变量的描述符(也称为签名)。对于java类而言,描述符是这样的形式:“Lfully-qualified-name;”(注意最后有一个英文半角分号),其中的包名点号换成斜杠(/),比如java的Stirng类的描述符就是“Ljava/lang/String;”。对于基本类型而言,I代表int,B代表byte,S代表short,J代表long,F代表float,D代表double,C代表char,Z代表boolean。对于array而言,使用左中括号”[“来表示,比如“[Ljava/lang/Object;”表示Object的array,“[I”表示int型的array。
3. 基于上面获得的Field ID,使用GetObjectField() 或者 Get_primitive-type_Field()函数来从中解析出我们想要的数据
4. 使用SetObjectField() 或者 Set_primitive-type_Field()函数来修改变量
JNI中用来访问实例变量的函数有:
jclass GetObjectClass(JNIEnv *env, jobject obj);

   // Returns the class of an object.

jfieldID GetFieldID(JNIEnv *env, jclass cls, const char *name, const char *sig);

  // Returns the field ID for an instance variable of a class.

NativeType Get<type>Field(JNIEnv *env, jobject obj, jfieldID fieldID);

void Set<type>Field(JNIEnv *env, jobject obj, jfieldID fieldID, NativeType value);

  // Get/Set the value of an instance variable of an object

  // <type> includes each of the eight primitive types plus Object.
访问类中的static变量
访问类中的static变量类似于上面访问普通的实例变量,只是我们这里使用的函数是GetStaticFieldID(), Get|SetStaticObjectField(), Get|SetStatic_Primitive-type_Field()。
JNI 程序: TestJNIStaticVariable.java
public class TestJNIStaticVariable {

   static {

      System.loadLibrary("myjni"); // nyjni.dll (Windows) or libmyjni.so (Unixes)

   }

   // Static variables

   private static double number = 55.66;

   // Declare a native method that modifies the static variable

   private native void modifyStaticVariable();

   // Test Driver

   public static void main(String args[]) {

      TestJNIStaticVariable test = new TestJNIStaticVariable();

      test.modifyStaticVariable();

      System.out.println("In Java, the double is " + number);

   }

}
C语言实现:C Implementation - TestJNIStaticVariable.c
#include <jni.h>

#include <stdio.h>

#include "TestJNIStaticVariable.h"

JNIEXPORT void JNICALL Java_TestJNIStaticVariable_modifyStaticVariable

          (JNIEnv *env, jobject thisObj) {

   // Get a reference to this object's class

   jclass cls = (*env)->GetObjectClass(env, thisObj);

   // Read the int static variable and modify its value

   jfieldID fidNumber = (*env)->GetStaticFieldID(env, cls, "number", "D");

   if (NULL == fidNumber) return;

   jdouble number = (*env)->GetStaticDoubleField(env, cls, fidNumber);

   printf("In C, the double is %f\n", number);

   number = 77.88;

   (*env)->SetStaticDoubleField(env, cls, fidNumber, number);

}
JNI中用来访问类中的static变量的函数如下:
jfieldID GetStaticFieldID(JNIEnv *env, jclass cls, const char *name, const char *sig);

  // Returns the field ID for a static variable of a class.

NativeType GetStatic<type>Field(JNIEnv *env, jclass clazz, jfieldID fieldID);

void SetStatic<type>Field(JNIEnv *env, jclass clazz, jfieldID fieldID, NativeType value);

  // Get/Set the value of a static variable of a class.

  // <type> includes each of the eight primitive types plus Object.
回调实例的普通和static方法
你可以在native代码中回调java中的普通或者static的方法。下面是实例:
JNI程序:TestJNICallBackMethod.java
public class TestJNICallBackMethod {

   static {

      System.loadLibrary("myjni"); // myjni.dll (Windows) or libmyjni.so (Unixes)

   }

   // Declare a native method that calls back the Java methods below

   private native void nativeMethod();

   // To be called back by the native code

   private void callback() {

      System.out.println("In Java");

   }

   private void callback(String message) {

      System.out.println("In Java with " + message);

   }

   private double callbackAverage(int n1, int n2) {

      return ((double)n1 + n2) / 2.0;

   }

   // Static method to be called back

   private static String callbackStatic() {

      return "From static Java method";

   }

   // Test Driver

   public static void main(String args[]) {

      new TestJNICallBackMethod().nativeMethod();

   }

}
这个类中声明了一个native函数nativeMethod(),并且在main方法中调用了这个函数。nativeMethod()这个函数会回调这个类中定义的各种方法。
C语言实现:TestJNICallBackMethod.c
#include <jni.h>

#include <stdio.h>

#include "TestJNICallBackMethod.h"

JNIEXPORT void JNICALL Java_TestJNICallBackMethod_nativeMethod

          (JNIEnv *env, jobject thisObj) {

   // Get a class reference for this object

   jclass thisClass = (*env)->GetObjectClass(env, thisObj);

   // Get the Method ID for method "callback", which takes no arg and return void

   jmethodID midCallBack = (*env)->GetMethodID(env, thisClass, "callback", "()V");

   if (NULL == midCallBack) return;

   printf("In C, call back Java's callback()\n");

   // Call back the method (which returns void), baed on the Method ID

   (*env)->CallVoidMethod(env, thisObj, midCallBack);

   jmethodID midCallBackStr = (*env)->GetMethodID(env, thisClass,

                               "callback", "(Ljava/lang/String;)V");

   if (NULL == midCallBackStr) return;

   printf("In C, call back Java's called(String)\n");

   jstring message = (*env)->NewStringUTF(env, "Hello from C");

   (*env)->CallVoidMethod(env, thisObj, midCallBackStr, message);

   jmethodID midCallBackAverage = (*env)->GetMethodID(env, thisClass,

                                  "callbackAverage", "(II)D");

   if (NULL == midCallBackAverage) return;

   jdouble average = (*env)->CallDoubleMethod(env, thisObj, midCallBackAverage, , );

   printf("In C, the average is %f\n", average);

   jmethodID midCallBackStatic = (*env)->GetStaticMethodID(env, thisClass,

                                 "callbackStatic", "()Ljava/lang/String;");

   if (NULL == midCallBackStatic) return;

   jstring resultJNIStr = (*env)->CallStaticObjectMethod(env, thisClass, midCallBackStatic);

   const char *resultCStr = (*env)->GetStringUTFChars(env, resultJNIStr, NULL);

   if (NULL == resultCStr) return;

   printf("In C, the returned string is %s\n", resultCStr);

   (*env)->ReleaseStringUTFChars(env, resultJNIStr, resultCStr);

}
为了能够回调实例中的方法,我们需要:
1. 通过GetObjectClass()函数获得这个实例的类对象
2. 从上面获得类对象中,调用GetMethodID()函数来获得Method ID,Method ID表示了实例中的某个方法的抽象。你需要提供这个方法的名字和签名信息,签名规则和变量类似。签名的格式是这样的:(parameters)return-type。如果我们实在觉得jni的签名不好记忆的话,我们可以是用JDK为我们提供的工具javap来获得某个class类中的所有方法的签名,使用-s选项表示打印签名,-p表示显示private成员:
> javap --help

> javap -s -p TestJNICallBackMethod

  .......

  private void callback();

    Signature: ()V

  private void callback(java.lang.String);

    Signature: (Ljava/lang/String;)V

  private double callbackAverage(int, int);

    Signature: (II)D

  private static java.lang.String callbackStatic();

    Signature: ()Ljava/lang/String;

  .......
从上面的输出我们可以清楚地看到类中每一个方法的签名。
3. 基于上面我们获得的Method ID,我们可以调用_Primitive-type_Method() 或者 CallVoidMethod() 或者 CallObjectMethod()来调用这个方法。如果某个方法需要参数的话,就在后面跟上参数即可。
4. 如果想要调用一个static方法的话,使用GetMethodID(), CallStatic_Primitive-type_Method(), CallStaticVoidMethod() 或者 CallStaticObjectMethod()。
JNI中用来回调实例和static方法的所有函数(两类,普通的和static的):
jmethodID GetMethodID(JNIEnv *env, jclass cls, const char *name, const char *sig);

   // Returns the method ID for an instance method of a class or interface.

NativeType Call<type>Method(JNIEnv *env, jobject obj, jmethodID methodID, ...);

NativeType Call<type>MethodA(JNIEnv *env, jobject obj, jmethodID methodID, const jvalue *args);

NativeType Call<type>MethodV(JNIEnv *env, jobject obj, jmethodID methodID, va_list args);

   // Invoke an instance method of the object.

   // The <type> includes each of the eight primitive and Object.

jmethodID GetStaticMethodID(JNIEnv *env, jclass cls, const char *name, const char *sig);

   // Returns the method ID for an instance method of a class or interface.

NativeType CallStatic<type>Method(JNIEnv *env, jclass clazz, jmethodID methodID, ...);

NativeType CallStatic<type>MethodA(JNIEnv *env, jclass clazz, jmethodID methodID, const jvalue *args);

NativeType CallStatic<type>MethodV(JNIEnv *env, jclass clazz, jmethodID methodID, va_list args);

   // Invoke an instance method of the object.

   // The <type> includes each of the eight primitive and Object.
回调复写的父类实例方法
JNI提供了一系列的形如 CallNonvirtual_Type_Method()之类的函数来调用父类实例的方法:
1. 首先获得Method ID,使用GetMethodID()
2. 基于上获得的Method ID,通过调用 CallNonvirtual_Type_Method()函数来调用相应的方法,并且在参数中给出object,父类和参数列表。
JNI中用来访问父类方法的函数:
NativeType CallNonvirtual<type>Method(JNIEnv *env, jobject obj, jclass cls, jmethodID methodID, ...);

NativeType CallNonvirtual<type>MethodA(JNIEnv *env, jobject obj, jclass cls, jmethodID methodID, const jvalue *args);

NativeType CallNonvirtual<type>MethodV(JNIEnv *env, jobject obj, jclass cls, jmethodID methodID, va_list args);
创建Object和Object arrays
你可以在native代码中构造jobject和jobjectarray,通过调用NewObject() 和 newObjectArray()函数,然后讲它们返回给java代码。
回调Java构造器来创建一个新的java对象
回调一个构造器和回调其他的方法是类似的,首先通过init作为方法名,V作为返回值来获得Method ID,然后通过NewObject()函数来构建一个java类对象。
JNI程序:TestJavaConstructor.java
public class TestJNIConstructor {

   static {

      System.loadLibrary("myjni"); // myjni.dll (Windows) or libmyjni.so (Unixes)

   }

   // Native method that calls back the constructor and return the constructed object.

   // Return an Integer object with the given int.

   private native Integer getIntegerObject(int number);

   public static void main(String args[]) {

      TestJNIConstructor obj = new TestJNIConstructor();

      System.out.println("In Java, the number is :" + obj.getIntegerObject(9999));

   }

}
这个类声明了一个getIntegerObject的native方法,这个方法接受一个int的数据,然后在native代码中创建一个Integer类型的对象,其中的值就是这个值。
C代码实现:TestJavaConstructor.c
#include <jni.h>

#include <stdio.h>

#include "TestJNIConstructor.h"

JNIEXPORT jobject JNICALL Java_TestJNIConstructor_getIntegerObject

          (JNIEnv *env, jobject thisObj, jint number) {

   // Get a class reference for java.lang.Integer

   jclass cls = (*env)->FindClass(env, "java/lang/Integer");

   // Get the Method ID of the constructor which takes an int

   jmethodID midInit = (*env)->GetMethodID(env, cls, "<init>", "(I)V");

   if (NULL == midInit) return NULL;

   // Call back constructor to allocate a new instance, with an int argument

   jobject newObj = (*env)->NewObject(env, cls, midInit, number);

   // Try runnning the toString() on this newly create object

   jmethodID midToString = (*env)->GetMethodID(env, cls, "toString", "()Ljava/lang/String;");

   if (NULL == midToString) return NULL;

   jstring resultStr = (*env)->CallObjectMethod(env, newObj, midToString);

   const char *resultCStr = (*env)->GetStringUTFChars(env, resultStr, NULL);

   printf("In C: the number is %s\n", resultCStr);

   return newObj;

}
JNI中用于创建对象(jobject)的函数有:
jclass FindClass(JNIEnv *env, const char *name);

jobject NewObject(JNIEnv *env, jclass cls, jmethodID methodID, ...);

jobject NewObjectA(JNIEnv *env, jclass cls, jmethodID methodID, const jvalue *args);

jobject NewObjectV(JNIEnv *env, jclass cls, jmethodID methodID, va_list args);

   // Constructs a new Java object. The method ID indicates which constructor method to invoke

jobject AllocObject(JNIEnv *env, jclass cls);

  // Allocates a new Java object without invoking any of the constructors for the object.
对象(object)的array
JNI程序:TestJNIObjectArray.java
import java.util.ArrayList;

public class TestJNIObjectArray {

   static {

      System.loadLibrary("myjni"); // myjni.dll (Windows) or libmyjni.so (Unixes)

   }

   // Native method that receives an Integer[] and

   //  returns a Double[2] with [0] as sum and [1] as average

   private native Double[] sumAndAverage(Integer[] numbers);

   public static void main(String args[]) {

      Integer[] numbers = {11, 22, 32};  // auto-box

      Double[] results = new TestJNIObjectArray().sumAndAverage(numbers);

      System.out.println("In Java, the sum is " + results[0]);  // auto-unbox

      System.out.println("In Java, the average is " + results[1]);

   }

}
为了简单起见,这个类声明了一个native方法,这个方法接受一个Integer类型的array,然后在本地代码中计算这个array中的数的和与平均数,然后讲这两个数以Double array的形式返回。
C代码实现:TestJNIObjectArray.c
#include <jni.h>

#include <stdio.h>

#include "TestJNIObjectArray.h"

JNIEXPORT jobjectArray JNICALL Java_TestJNIObjectArray_sumAndAverage

          (JNIEnv *env, jobject thisObj, jobjectArray inJNIArray) {

   // Get a class reference for java.lang.Integer

   jclass classInteger = (*env)->FindClass(env, "java/lang/Integer");

   // Use Integer.intValue() to retrieve the int

   jmethodID midIntValue = (*env)->GetMethodID(env, classInteger, "intValue", "()I");

   if (NULL == midIntValue) return NULL;

   // Get the value of each Integer object in the array

   jsize length = (*env)->GetArrayLength(env, inJNIArray);

   jint sum = ;

   int i;

   for (i = ; i < length; i++) {

      jobject objInteger = (*env)->GetObjectArrayElement(env, inJNIArray, i);

      if (NULL == objInteger) return NULL;

      jint value = (*env)->CallIntMethod(env, objInteger, midIntValue);

      sum += value;

   }

   double average = (double)sum / length;

   printf("In C, the sum is %d\n", sum);

   printf("In C, the average is %f\n", average);

   // Get a class reference for java.lang.Double

   jclass classDouble = (*env)->FindClass(env, "java/lang/Double");

   // Allocate a jobjectArray of 2 java.lang.Double

   jobjectArray outJNIArray = (*env)->NewObjectArray(env, , classDouble, NULL);

   // Construct 2 Double objects by calling the constructor

   jmethodID midDoubleInit = (*env)->GetMethodID(env, classDouble, "<init>", "(D)V");

   if (NULL == midDoubleInit) return NULL;

   jobject objSum = (*env)->NewObject(env, classDouble, midDoubleInit, (double)sum);

   jobject objAve = (*env)->NewObject(env, classDouble, midDoubleInit, average);

   // Set to the jobjectArray

   (*env)->SetObjectArrayElement(env, outJNIArray, , objSum);

   (*env)->SetObjectArrayElement(env, outJNIArray, , objAve);

   return outJNIArray;

}
不像基本数据类型的array那样,你需要使用Get|SetObjectArrayElement()函数来处理每一个元素。
JNI提供了创建对象array(jobjectArray)的函数如下:
jobjectArray NewObjectArray(JNIEnv *env, jsize length, jclass elementClass, jobject initialElement);

   // Constructs a new array holding objects in class elementClass.

   // All elements are initially set to initialElement.

jobject GetObjectArrayElement(JNIEnv *env, jobjectArray array, jsize index);

   // Returns an element of an Object array.

void SetObjectArrayElement(JNIEnv *env, jobjectArray array, jsize index, jobject value);

   // Sets an element of an Object array.
本地和全局引用
管理引用是编写高效程序的关键。比如,我们会在本地代码中经常使用FindClass(), GetMethodID(), GetFieldID()来会的一个jclass,jmethodID和jfieldID。其实这些变量应该只是在第一次的时候获取,之后直接使用就可以了,而不用每次都去获取一遍,这样可以提高程序执行效率。
JNI讲本地代码中的对象引用分为了两种类型: 本地和全局引用:
1. 本地引用是在本地代码中创建的,并且当函数退出或者返回的时候就被free了。它的有效范围只是这个native函数的内部。你也可以调用DeleteLocalRef()来显式地将某个本地引用作废,这样可以让垃圾回收时能够将这部分回收。作为参数传递到本地函数中的对象引用是本地引用,所有的从JNI函数返回的java对象(jobject)都是本地引用。
2. 全局引用会保留直到程序员调用DeleteGlobalRef()手动free掉他们,你可以使用NewGlobalRef()函数从本地引用创建一个全局引用。
下面我们给出一个例子。
public class TestJNIReference {

   static {

      System.loadLibrary("myjni"); // myjni.dll (Windows) or libmyjni.so (Unixes)

   }

   // A native method that returns a java.lang.Integer with the given int.

   private native Integer getIntegerObject(int number);

   // Another native method that also returns a java.lang.Integer with the given int.

   private native Integer anotherGetIntegerObject(int number);

   public static void main(String args[]) {

      TestJNIReference test = new TestJNIReference();

      System.out.println(test.getIntegerObject(1));

      System.out.println(test.getIntegerObject(2));

      System.out.println(test.anotherGetIntegerObject(11));

      System.out.println(test.anotherGetIntegerObject(12));

      System.out.println(test.getIntegerObject(3));

      System.out.println(test.anotherGetIntegerObject(13));

   }

}
上面的JNI程序声明了两个native函数,这两个都创建并且返回java.lang.Integer对象。在C代码实现中,我们需要获得java.lang.Integer的类引用,然后我们从中找到构造器的method ID,然后调用构造器。然而,我们希望,将我们获得的class引用和Method ID缓存起来,这样我们下次在使用的时候就不用再次去获取了。
下面是我们的C代码,我们希望这样可以OK(然而事实是不行!!!):
#include <jni.h>

#include <stdio.h>

#include "TestJNIReference.h"

// Global Reference to the Java class "java.lang.Integer"

static jclass classInteger;

static jmethodID midIntegerInit;

jobject getInteger(JNIEnv *env, jobject thisObj, jint number) {

   // Get a class reference for java.lang.Integer if missing

   if (NULL == classInteger) {

      printf("Find java.lang.Integer\n");

      classInteger = (*env)->FindClass(env, "java/lang/Integer");

   }

   if (NULL == classInteger) return NULL;

   // Get the Method ID of the Integer's constructor if missing

   if (NULL == midIntegerInit) {

      printf("Get Method ID for java.lang.Integer's constructor\n");

      midIntegerInit = (*env)->GetMethodID(env, classInteger, "<init>", "(I)V");

   }

   if (NULL == midIntegerInit) return NULL;

   // Call back constructor to allocate a new instance, with an int argument

   jobject newObj = (*env)->NewObject(env, classInteger, midIntegerInit, number);

   printf("In C, constructed java.lang.Integer with number %d\n", number);

   return newObj;

}

JNIEXPORT jobject JNICALL Java_TestJNIReference_getIntegerObject

          (JNIEnv *env, jobject thisObj, jint number) {

   return getInteger(env, thisObj, number);

}

JNIEXPORT jobject JNICALL Java_TestJNIReference_anotherGetIntegerObject

          (JNIEnv *env, jobject thisObj, jint number) {

   return getInteger(env, thisObj, number);

}
在上面的程序中,我们调用FindClass()获得了java.lang.Integer类引用,然后把它保存在一个全局静态的变量中。然而,在第二次调用中这个引用却无效了(并不是NULL)。这是因为FindClass()返回的是本地类引用,一旦当getInteger函数返回的时候,这个局部引用就失效了。
为了解决这个问题,我们需要从局部引用中创建一个全局引用,然后再赋值给全局static变量:
// Get a class reference for java.lang.Integer if missing

if (NULL == classInteger) {

   printf("Find java.lang.Integer\n");

   // FindClass returns a local reference

   jclass classIntegerLocal = (*env)->FindClass(env, "java/lang/Integer");

   // Create a global reference from the local reference

   classInteger = (*env)->NewGlobalRef(env, classIntegerLocal);

   // No longer need the local reference, free it!

   (*env)->DeleteLocalRef(env, classIntegerLocal);

}
需要注意的是,jmethodID和jfieldID并不是jobject,因此他们不能创建一个全局引用!!
附加:
调用 (*.dll) 库中定义的方法
之前看过一篇可以带来某些灵感的文章:C++加载jvm实现 https://blog.csdn.net/sf0407/article/details/53924174,如下逻辑与原博文相同,但代码有所不同,经过了一定的修改,变得复杂(建议按原博文操作):
C++加载jvm实现
以前由于忙一直没有时间静下心来把学到的东西进行归纳整理,最近由于某些原因,总算可以总结一下了。
该小功能为大功能的前置部分,整个小功能需要用到windowService,主体逻辑主要使用java,故需要使用到C++加载jvm的技术,下面进入正题。
一,创建一个简单的java程序
package test;

public class HelloWorld {

    public static void main(String[] args) {

         System.out.println("Hello world");

     }

}
导出成Helloworld.jar
二,收集必要的一些资源文件
1,找到jvm,windows平台下jdk的java虚拟机动态库为jvm.dll,位于:
%JAVA_HOME%/jre/bin/client/jvm.dll
%JAVA_HOME%/jre/bin/server/jvm.dll
注:64x系统下没有client路径下的jvm。
2,获得jni.h和jni_md.h,位于
%JAVA_HOME%/include/jni.h
%JAVA_HOME%/include/win32/jni_md.h
配置环境可以不用导入 jni.h等。。。。
三,创建一个简单的C++工程,将上面的文件都放入编译目录下

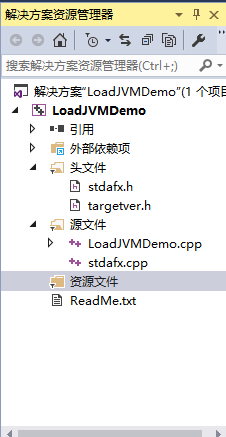
工程的编码如下:
#include "stdafx.h"

#include "jni.h"

#include <iostream>

#include <Windows.h>

using namespace std;

bool startJVM();

JNIEnv *env;

int main()

{

    cout << "haha" << endl;
   system("pause");
   startJVM();//启动java虚拟机

    return ;

}

typedef jint(JNICALL *JNICREATEPROC)(JavaVM **, void **, void *);

//设置输出流

bool setStream(JNIEnv *env, const char* fileName, const char* method);

//启动java虚拟机

bool startJVM() {

    //获取jvm动态库的路径

    TCHAR* jvmPath = _T("D://java//jre1.8.0_171//bin//server//jvm.dll");

    //java虚拟机启动时接收的参数,每个参数单独一项

    int nOptionCount = ;

    JavaVMOption vmOption[];

    //设置JVM最大允许分配的堆内存,按需分配

    vmOption[].optionString = "-Xmx256M";

    //设置classpath

    vmOption[].optionString = "-Djava.class.path=./Hello.jar";

    JavaVMInitArgs vmInitArgs;

    vmInitArgs.version = JNI_VERSION_1_6;

    vmInitArgs.options = vmOption;

    vmInitArgs.nOptions = nOptionCount;

    //忽略无法识别jvm的情况

    vmInitArgs.ignoreUnrecognized = JNI_TRUE;

    //设置启动类,注意分隔符为"/"

    const char startClass[] = "Hello";

    //启动方法,一般是main函数,当然可以设置成其他函数

    const char startMethod[] = "main";

    //加载JVM,注意需要传入的字符串为LPCWSTR,指向一个常量Unicode字符串的32位指针,相当于const wchar_t*

    HINSTANCE jvmDLL = LoadLibrary(jvmPath);

    if (jvmDLL == NULL) {

        cout << "加载JVM动态库错误" + ::GetLastError() << endl;

        return false;

    }

    system("pause");

    //初始化jvm物理地址

    JNICREATEPROC jvmProcAddress = (JNICREATEPROC)GetProcAddress(jvmDLL, "JNI_CreateJavaVM");

    if (jvmDLL == NULL) {

        FreeLibrary(jvmDLL);

        cout << "加载JVM动态库错误" + ::GetLastError() << endl;

        return false;

    }

    system("pause");

    //创建JVM

    JNIEnv *env;

    JavaVM *jvm;

    cout << " ..................... " << endl;

    jint jvmProc = (jvmProcAddress)(&jvm, (void **)&env, &vmInitArgs);

    cout << " ------------- " << endl;

    if (jvmProc <  || jvm == NULL || env == NULL) {

        FreeLibrary(jvmDLL);

        cout << "创建JVM错误" + ::GetLastError() << endl;

        return false;

    }

    cout << " ========================== " << endl;

    system("pause");

    //加载启动类

    jclass mainclass = env->FindClass(startClass);

    if (env->ExceptionCheck() == JNI_TRUE || mainclass == NULL) {

        env->ExceptionDescribe();

        env->ExceptionClear();

        FreeLibrary(jvmDLL);

        cout << "加载启动类失败" << endl;

        return false;

    }

    system("pause");

    //加载启动方法

    jmethodID methedID = env->GetStaticMethodID(mainclass, startMethod, "([Ljava/lang/String;)V");

    if (env->ExceptionCheck() == JNI_TRUE || methedID == NULL) {

        env->ExceptionDescribe();

        env->ExceptionClear();

        FreeLibrary(jvmDLL);

        cout << "加载启动方法失败" << endl;

        return false;

    }

    system("pause");

    cout << "开始执行" << endl;

    env->CallStaticVoidMethod(mainclass, methedID, NULL);

    cout << "执行结束" << endl;

    system("pause");

    //jvm释放

    jvm->DestroyJavaVM();

    return true;

}
编译的过程中需要注意的是,如果是64位的系统需要将工程的解决方案改成64x的,不然无法加载jvm,在
HINSTANCE jvmDLL = LoadLibrary(jvmPath);
这一步取不到结果。
四,运行结果如下
一直点确定,中间可能出现错误,点击继续即可。

C++加载jvm实现中核心在于如下几步:
//1. 定义函数指针,用于指向待调用函数,参数类型、个数要统一

typedef jint(JNICALL *JNICREATEPROC)(JavaVM **, void **, void *);

//2. 获取jvm动态库的路径,可能需要导入<tchar.h>的支持

TCHAR* jvmPath = _T("D://java//jre1.8.0_171//bin//server//jvm.dll");

//3. 加载JVM,注意需要传入的字符串为LPCWSTR,指向一个常量Unicode字符串的32位指针,相当于const wchar_t*

 HINSTANCE jvmDLL = LoadLibrary(jvmPath);

//4. 初始化函数指针指向待调用函数的物理地址,函数名称一定要准确

JNICREATEPROC jvmProcAddress = (JNICREATEPROC)GetProcAddress(jvmDLL, "JNI_CreateJavaVM");

//调用获取的函数

(jvmProcAddress)(&jvm, (void **)&env, &vmInitArgs);
【注】:可能需要导入<tchar.h>头文件
自行百度 输出 *.dll 库中的方法列表,找到要调用函数的 准确名称
同理,在本地方法中调用 *.dll 中的方法也可使用以上几步。
JNI 错误
在开发本地代码时比较容易发生错误,并且出现错误信息非常有限或很难分析。
这里介绍比较常见的一种错误:
#

# A fatal error has been detected by the Java Runtime Environment:

#

#  EXCEPTION_ACCESS_VIOLATION (0xc0000005) at pc=0x0000000057441b5f, pid=, tid=0x0000000000004534

#           信号名称             信号码         程序计数器的值       进程号     线程号

# JRE version: Java(TM) SE Runtime Environment (.0_171-b11) (build 1.8.0_171-b11)

# Java VM: Java HotSpot(TM) -Bit Server VM (25.171-b11 mixed mode windows-amd64 compressed oops)

# Problematic frame:

# V  [jvm.dll+0xc1b5f]

  问题帧信息(和pc等价,但表达方式为 本地库+偏移量)

#

# Failed to write core dump. Minidumps are not enabled by default on client versions of Windows

#

# If you would like to submit a bug report, please visit:

#   http://bugreport.java.com/bugreport/crash.jsp

#
在我的其他两篇博文中详细介绍了该种错误的分析与解决:
***********************************************************************************************
============= over ==============
JNI 记的更多相关文章
- android studio使用ndk,jni随记
1.下载ndk(会下载到sdk目录下) 2.配置 3.配置build.gradle(app) android { defaultConfig { ndk { moduleName "JniD ...
- jni调试3(线程调试env变量问题)
jni层调试线程死机原因 一,导致死机原因: jni层中 线程函数中 只要添加调用env 的函数 ,,就会死机 二,解决方法 第一我们应该理解: ①(独立性) JNIEnv 是一个与线 ...
- JAVA使用JNI调用C++动态链接库
JAVA使用JNI调用C++动态链接库 使用JNI连接DLL动态链接库,并调用其中的函数 首先 C++中写好相关函数,文件名为test.cpp,使用g++编译为DLL文件,指令如下: g++ -sha ...
- jni相关
封装 jni 的 java 层 Integer.Long 对象使用时必须用 new 对象的形式,防止修改 128>x x>-128 之间缓存的对象,一定要谨记 配置 在 eclipse 环 ...
- 【转】Android 源码下利用jni编译自己的项目(参考系统development/samples/SimpleJNI)
原文网址:http://blog.csdn.net/qiuxiaolong007/article/details/7860481 记于正文前:环境是ubuntu10.10,android 源码是2.0 ...
- Android项目开发填坑记-so文件引发的攻坚战
故事的最初 我负责的项目A要求有播放在线视频的功能,当时从别人的聊天记录的一瞥中发现百度有相关的SDK,当时找到的是Baidu-T5Player-SDK-Android-1.4s,项目中Demo的so ...
- 解析Java的JNI编程中的对象引用与内存泄漏问题
JNI,Java Native Interface,是 native code 的编程接口.JNI 使 Java 代码程序可以与 native code 交互——在 Java 程序中调用 native ...
- Java-GC-标记清除算法
## 前置知识 静态变量在类被加载的时候分配内存.当我们启动一个App的时候,系统会创建一个进程,此进程会加载一个JVM的实例,然后代码就运行在JVM之上.也就是说类在被加载的时候,静态变量 --- ...
- JNI线程、Linux常用命令、权限、防火墙配置
JNI_OnLoad: 调用System.loadLibrary()函数时, 内部就会去查找so中的 JNI_OnLoad 函数,如果存在此函数则调用. JNI_OnLoad会: 告诉 VM 此 na ...
随机推荐
- 如何让Excel单元格中的名字分散对齐
1 操作方式 开始->对齐方式->对齐->水平对齐->分散对齐(缩进) 2 优势 不会破坏数据的有效性
- Ali流量控制中间件Sentinel
原文链接: https://blog.csdn.net/u012190514/article/details/81383698 Sentinel 是什么 随着微服务的流行,服务和服务之间的稳定性变得越 ...
- 知识点:Mysql 基本用法之视图
视图 视图是一个虚拟表(非真实存在),其本质是[根据SQL语句获取动态的数据集,并为其命名],用户使用时只需使用[名称]即可获取结果集,可以将该结果集当做表来使用. 使用视图我们可以把查询过程中的临时 ...
- Alpha阶段项目规划
Alpha阶段任务 概述 我们团队采访学长并听从学长的意见之后,决定根据第一版的phylab项目进行重构.但由于第一版的phylab项目在github上的代码仅仅只有alpha版本,我们接手之后进行了 ...
- Problem C: 重复子串(string)
/* 一个性质? right集合中只有相邻的位置才会有用 那么考虑set启发式合并, 能够求出大概nlogn个有用的对 那么将这些对按照右端点排序, 查询也按照右端点排序就可以离线维护信息 然后需要维 ...
- Error during artifact deployment. See server log for details.
Error during artifact deployment. See server log for details. 这两个地方要一样.不然.就报 Error during artifact d ...
- 作着玩:登录页(纯css,不支持ie9以下)
支持chrome FireFox 和 IE10+,(IE9也能显示,IE9以下不支持) <style type="text/css"> body{position:re ...
- spring 之 类型转换 2
spring内置的转换器 在spring xml 文件中,配置属性的时候, 不管实际是 list 还是map ,还是Date, 或者原生的java 类型, 我们只能配置xml 给它们. 那么 spri ...
- css学习1
1.标签的权值为1,类选择符的权值为10,ID选择符的权值最高为100 注意:还有一个权值比较特殊--继承也有权值但很低,有的文献提出它只有0.1,所以可以理解为继承的权值最低.
- 获取cxgrid footer内容
cxGridDBTableView1.DataController.Summary.FooterSummaryValues[4];