ELK基础原理
搜索引擎
索引组件: 获取数据-->建立文档-->文档分析-->文档索引(倒排索引)
搜索组件: 用户搜索接口-->建立查询(将用户键入的信息转换为可处理的查询对象)-->搜索查询-->展现结果
索引组件:Lucene 核心组件
索引(index):数据库(database)
类型(type):表(table)
文档(Document):行(row)
映射(Mapping):
Lucene只负责文档分析 不负责获取数据和建立文档 必须借助其它工具建立文档后才能发挥Lucene的作用
文档分析最重要的就是切词 把整个文档切分成一个一个单词
搜索组件:
Solr 基于单机运行
ElasticSearch 基于分布式运行(弹性搜索引擎) 分散的运行到多个节点
一个搜索引擎是由两个部分组成:
1.search 搜索组件
面向用户的接口 接入用户的请求 把用户的请求转换成适合搜索算法执行搜索的形式 把搜索结果返回给用户
2.index 索引组件
分析原始数据 改造原始数据 把原始数据结构变成适合搜索算法搜索的结构
3.倒排索引的实现
1.首先把原始数据构建成文档
1 winter is coming
2 our is the big
3 the pig is big
2.把文档创建出倒排索引
term freg documents
winter 1 1
big 2 2,3
is 3 1,2,3
our 1 2
通过hash算法在倒排索引中把包含关键字的文档编号返回给客户端
ELK的两种使用场景:
1.整站的日志存储分析 2.全站搜索
ELK和Hadoop的区别:
Hadoop 只能实现离线计算
文件系统 HDFS
数据存储 HBase
分布式计算 MapReduce
Elasticsearch安装和配置
修改相关配置
1.修改jvm初始化内存分配大小 /etc/elasticsearch/jvm.options
2.主配置文件段 /etc/elasticsearch/elasticsearch.yml
Cluster配置段 标识某个节点是否属于当前集群的成员
Node配置段 集群中当前节点的唯一标识
Paths配置段 设置日志和数据的存放路径
Memory配置段 内存管理设置
Network配置段 网络接口的设置
Discovery配置段 成员关系判定的相关协议
Gateway配置段 网关设置
Various配置段 其他可变参数设置
测试安装成功
[root@wi]# curl -XGET http://192.168.74.128:9200
{
"name" : "192.168.74.128",
"cluster_name" : "myels",
"cluster_uuid" : "Qq0ms0ncQle85Wm27STTHg",
"version" : {
"number" : "5.6.10",
"build_hash" : "b727a60",
"build_date" : "2018-06-06T15:48:34.860Z",
"build_snapshot" : false,
"lucene_version" : "6.6.1"
},
"tagline" : "You Know, for Search"
}
创建索引
[root@192 logs]# curl -XPUT http://192.168.74.128:9200/myindex
{"acknowledged":true,"shards_acknowledged":true,"index":"myindex"}
查看索引的分片信息
[root@192 logs]# curl -XGET http://192.168.74.128:9200/_cat/shards
myindex 4 p STARTED 0 162b 192.168.74.128 192.168.74.128
myindex 4 r STARTED 0 162b 192.168.74.129 192.168.74.129
myindex 1 r STARTED 0 162b 192.168.74.128 192.168.74.128
myindex 1 p STARTED 0 162b 192.168.74.129 192.168.74.129
myindex 3 r STARTED 0 162b 192.168.74.128 192.168.74.128
myindex 3 p STARTED 0 162b 192.168.74.129 192.168.74.129
myindex 2 p STARTED 0 162b 192.168.74.128 192.168.74.128
myindex 2 r STARTED 0 162b 192.168.74.129 192.168.74.129
myindex 0 p STARTED 0 162b 192.168.74.128 192.168.74.128
myindex 0 r STARTED 0 162b 192.168.74.129 192.168.74.129
Logstash安装和配置
集中,转发并存储数据 高度插件化
1. 数据输入插件(日志,redis)
2. 数据过滤插件
3. 数据输出插件
logstash既可以做agent从本地收集数据信息 把数据文档化输出到elasticsearch
logstash也可以做server收集各个logstash agent收集的数据并对agent提交的数据统一做格式化,文档化再发送给easticsearch
logstash安装的默认目录在/usr/share/logstash中 此目录并没有在系统环境变量中 启动服务的时候需要指明绝对路径
ip地址数据库 maxmind geolite2
[root@ bin]# ./logstash -f /etc/logstash/conf.d/test1.conf

jjjj

{

      "@version" => "",

          "host" => "192.168.1.4",

    "@timestamp" => --19T08::.449Z,

       "message" => "jjjj"

}

logstash配置文件格式

 input{ } filter { } output{ }

logstash 内建pattern

less /usr/share/logstash/vendor/bundle/jruby/1.9/gems/logstash-patterns-core-4.1./patterns/

input {

   file{

       start_position => "end"

       path => ["/var/log/httpd/access_log"]

   }

}

filter {

    grok {

      match => {"message" => "%{IP:client}"  }

    }

}

output {

  stdout {

    codec => rubydebug

  }

}

filter {

    logstash内建很多插件模块

    grok {

      match => {"message" => "%{HTTPD_COMBINEDLOG}"  }

    }

}
配置文件基础框架
input {

   file{

       start_position => "end"

       path => ["/var/log/httpd/access_log"]

   }

}

filter {

    grok {

      match => {"message" => "%{HTTPD_COMBINEDLOG}"  }

      remove_field => "message"

    }

   date {

      match => ["timestamp","dd/MMM/YYYY:H:m:s Z"]

      remove_field => "timestamp"

   }

   geoip {

         source   => "clientip"

         target   => "geoip"

         database => "/etc/logstash/geoip/GeoLite2-City.mmdb"

  }

}

output {

  elasticsearch {

      hosts => ["http://192.168.74.128:9200","http://192.168.74.129:9200"]

      index => "logstash-%{+YYYY.MM.dd}"

      document_type => "apache_logs"

  }

}
logstash收集文件
input {

   beats {

       port =>

   }

}

filter {

  grok {

       match => { "message" => "%{HTTPD_COMBINEDLOG}" }

       remove_field => "message"

  }

 date {

     match => ["timestamp","dd/MMM/YYYY:H:m:s Z"]

     remove_field => "timestamp"

 }

 geoip {

    source  => "clientip"

    target  => "geoip"

    database => "/etc/logstash/geoip/GeoLite2-City.mmdb"

 }

}

output {

  elasticsearch {

      hosts => ["http://192.168.74.128:9200/","http://192.168.74.129:9200/"]

      index => "logstash-%{+YYYY.MM.dd}-33"

      document_type => "apache_logs"

  }

}
logstash收集filebeats数据
input {

  redis {

     data_type => "list"

     db =>

     host => "192.168.74.129"

     port =>

     key => "filebeat"

     password => "food"

  }

}

filter {

  grok {

       match => { "message" => "%{HTTPD_COMBINEDLOG}" }

       remove_field => "message"

  }

 date {

     match => ["timestamp","dd/MMM/YYYY:H:m:s Z"]

     remove_field => "timestamp"

 }

 geoip {

    source  => "clientip"

    target  => "geoip"

    database => "/etc/logstash/geoip/GeoLite2-City.mmdb"

 }

}

output {

  elasticsearch {

      hosts => ["http://192.168.74.128:9200/","http://192.168.74.129:9200/"]

      index => "logstash-%{+YYYY.MM.dd}"

      document_type => "apache_logs"

  }

}
logstash读取redis
logstashserver 配置文件支持if条件判断设置
filter {

    if [path]  =~ "access" {

      grok {

         match => {"message" => "%{IP:client}"  }

      }

    }

    if [geo][city] = "bj" {

    }

}
if条件判断设置
FileBeat安装和配置
filebeat支持的所有插件实例文件存放在: /etc/filebeat/filebeat.full.yml
#-------------------------- Elasticsearch output ------------------------------

#output.elasticsearch:

  # Array of hosts to connect to.

  #hosts: ["192.168.74.128:9200","192.168.74.129:9200"]

  # Optional protocol and basic auth credentials.

  #protocol: "https"

  #username: "elastic"

  #password: "changeme"

#----------------------------- Logstash output --------------------------------

#output.logstash:

  # The Logstash hosts

  #hosts: ["192.168.74.128:5044"]

  # Optional SSL. By default is off.

  # List of root certificates for HTTPS server verifications

  #ssl.certificate_authorities: ["/etc/pki/root/ca.pem"]

  # Certificate for SSL client authentication

  #ssl.certificate: "/etc/pki/client/cert.pem"

  # Client Certificate Key

  #ssl.key: "/etc/pki/client/cert.key"

#----------- Redis output -------------------

output.redis:

  # Boolean flag to enable or disable the output module.

  enabled: true

  # The list of Redis servers to connect to. If load balancing is enabled, the

  # events are distributed to the servers in the list. If one server becomes

  # unreachable, the events are distributed to the reachable servers only.

  hosts: ["192.168.74.129:6379"]

  # The Redis port to use if hosts does not contain a port number. The default

  # is .

  port:

  # The name of the Redis list or channel the events are published to. The

  # default is filebeat.

  key: filebeat

  # The password to authenticate with. The default is no authentication.

  password: food

  # The Redis database number where the events are published. The default is .

  db:

  # The Redis data type to use for publishing events. If the data type is list,

  # the Redis RPUSH command is used. If the data type is channel, the Redis

  # PUBLISH command is used. The default value is list.

  datatype: list

  # The number of workers to use for each host configured to publish events to

  # Redis. Use this setting along with the loadbalance option. For example, if

  # you have  hosts and  workers, in total  workers are started ( for each

  # host).

  worker:

  # If set to true and multiple hosts or workers are configured, the output

  # plugin load balances published events onto all Redis hosts. If set to false,

  # the output plugin sends all events to only one host (determined at random)

  # and will switch to another host if the currently selected one becomes

  # unreachable. The default value is true.

  loadbalance: true

  # The Redis connection timeout in seconds. The default is  seconds.

  timeout: 5s

  # The number of times to retry publishing an event after a publishing failure.

  # After the specified number of retries, the events are typically dropped.

  # Some Beats, such as Filebeat, ignore the max_retries setting and retry until

  # all events are published. Set max_retries to a value less than  to retry

  # until all events are published. The default is .

  #max_retries:

  # The maximum number of events to bulk in a single Redis request or pipeline.

  # The default is .

  #bulk_max_size:

  # The URL of the SOCKS5 proxy to use when connecting to the Redis servers. The

  # value must be a URL with a scheme of socks5://.

  #proxy_url:

  # This option determines whether Redis hostnames are resolved locally when

  # using a proxy. The default value is false, which means that name resolution

  # occurs on the proxy server.

  #proxy_use_local_resolver: false

  # Enable SSL support. SSL is automatically enabled, if any SSL setting is set.

  #ssl.enabled: true

  # Configure SSL verification mode. If `none` is configured, all server hosts

  # and certificates will be accepted. In this mode, SSL based connections are

  # susceptible to man-in-the-middle attacks. Use only for testing. Default is

  # `full`.

  #ssl.verification_mode: full

  # List of supported/valid TLS versions. By default all TLS versions 1.0 up to

  # 1.2 are enabled.

  #ssl.supported_protocols: [TLSv1., TLSv1., TLSv1.]

  # Optional SSL configuration options. SSL is off by default.

  # List of root certificates for HTTPS server verifications

  #ssl.certificate_authorities: ["/etc/pki/root/ca.pem"]

  # Certificate for SSL client authentication

  #ssl.certificate: "/etc/pki/client/cert.pem"

  # Client Certificate Key

  #ssl.key: "/etc/pki/client/cert.key"

  # Optional passphrase for decrypting the Certificate Key.

  #ssl.key_passphrase: ''

  # Configure cipher suites to be used for SSL connections

  #ssl.cipher_suites: []

  # Configure curve types for ECDHE based cipher suites

  #ssl.curve_types: []

  # Configure what types of renegotiation are supported. Valid options are

  # never, once, and freely. Default is never.

  #ssl.renegotiation: never
Filebeat收集数据到redis
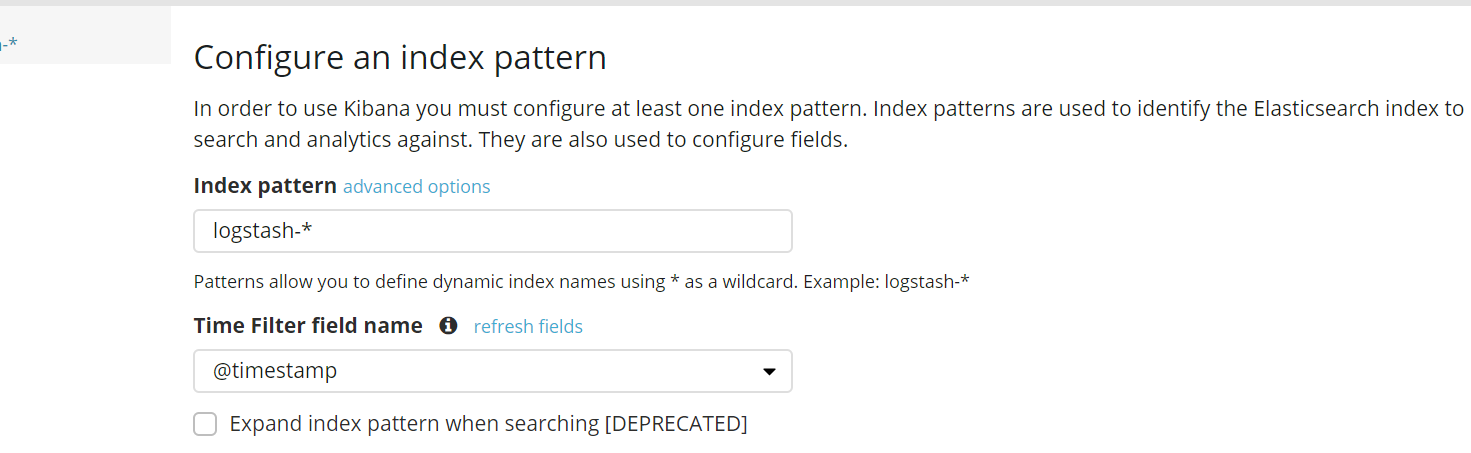
Kibana安装配置
kibana是一个独立的web服务器 可以单独安装在任何一台主机上
kibana首次打开页面手动指定加载elasticsearch集群中的哪些索引(数据库) 》 index pattern
@timestamp 获取记录的生成时间按照这列的值来进行排序
查看进程是否启动 ps aux
查看端口是否正确监听 ss -tnl
logstash正则匹配实例
\[[A-Z ]*\]\[(?<logtime>[-]{,}\/[-]{}\/[-]{} [-]{}\:[-]{}\:[-]{}\.[-]{})\].*\[rid:(?<rid>[a-z0-9A-Z\s.]*),sid:(?<sid>[a-z0-9A-Z\s.]*),uid:(?<uid>[a-z0-9A-Z\s.]*),tid:(?<tid>[a-z0-9A-Z\s.]*),swjg:(?<swjg>[a-z0-9A-Z\s.]*)\] (?:timecost:(?<timecost>[-]*)){,},(?:url:(?<url>(.*?[^,]),)).*

"url": "http://99.13.82.233:8080/api/common/basecode/datamapinvalues,",

\[[A-Z ]*\]\[(?<logtime>[-]{,}\/[-]{}\/[-]{} [-]{}\:[-]{}\:[-]{}\.[-]{})\].*\[rid:(?<rid>[a-z0-9A-Z\s.]*),sid:(?<sid>[a-z0-9A-Z\s.]*),uid:(?<uid>[a-z0-9A-Z\s.]*),tid:(?<tid>[a-z0-9A-Z\s.]*),swjg:(?<swjg>[a-z0-9A-Z\s.]*)\] (?:timecost:(?<timecost>[-]*)){,},(?:url:(?<url>(.*?[^,])),).*

"url": "http://99.13.82.233:8080/api/common/basecode/datamapinvalues",

\[[A-Z ]*\]\[(?<logtime>[-]{,}\/[-]{}\/[-]{} [-]{}\:[-]{}\:[-]{}\.[-]{})\].*\[rid:(?<rid>[a-z0-9A-Z\s.]*),sid:(?<sid>[a-z0-9A-Z\s.]*),uid:(?<uid>[a-z0-9A-Z\s.]*),tid:(?<tid>[a-z0-9A-Z\s.]*),swjg:(?<swjg>[a-z0-9A-Z\s.]*)\] (?:timecost:(?<timecost>[-]*)){,},(((?:resturl):(?<resturl>(.*?[^,])),)|((?:url):(?<url>(.*?[^,])),)).*

"url": "http://99.13.82.233:8080/api/common/basecode/datamapinvalues",

"resturl": "http://99.13.82.233:8080/api/common/basecode/datamapinvalues",

\[[A-Z ]*\]\[(?<logtime>[-]{,}\/[-]{}\/[-]{} [-]{}\:[-]{}\:[-]{}\.[-]{})\].*\[rid:(?<rid>[a-z0-9A-Z\s.]*),sid:(?<sid>[a-z0-9A-Z\s.]*),uid:(?<uid>[a-z0-9A-Z\s.]*),tid:(?<tid>[a-z0-9A-Z\s.]*),swjg:(?<swjg>[a-z0-9A-Z\s.]*)\] (?:timecost:(?<timecost>[-]*)){,},(((?:resturl):(?<resturl>(.*?[^,])),)|((?:url):(?<url>(.*?[^,])),)|.*).*

"url": "http://99.13.82.233:8080/api/common/basecode/datamapinvalues",

"resturl": "http://99.13.82.233:8080/api/common/basecode/datamapinvalues",

如果没有url或者resturl

{

  "uid": "b1133",

  "swjg": "3232.2",

  "rid": "",

  "logtime": "2018/09/19 11:39:00.098",

  "tid": "nh3211111.2",

  "timecost": "",

  "sid": ""

}
ELK基础原理的更多相关文章
- I2C 基础原理详解
今天来学习下I2C通信~ I2C(Inter-Intergrated Circuit)指的是 IC(Intergrated Circuit)之间的(Inter) 通信方式.如上图所以有很多的周边设备都 ...
- C#基础原理拾遗——引用类型的值传递和引用传递
C#基础原理拾遗——引用类型的值传递和引用传递 以前写博客不深动,只搭个架子,像做笔记,没有自己的思考,也没什么人来看.这个毛病得改,就从这一篇开始… 最近准备面试,深感基础之重要,奈何我不是计算机科 ...
- OpenStack的基础原理
OpenStack的基础原理 作者:尹正杰 版权声明:原创作品,谢绝转载!否则将追究法律责任. OpenStack既是一个社区,也是一个项目和一个开源软件,它提供了一个部署云的操作平台或工具集.其 ...
- DNS服务基础原理介绍
FQDN 全称域名 localhost(主机名或者是别名).localdomain(域名) FQDN=主机名.域名 根域 . 顶级域名 .com .n ...
- Sql注入基础原理介绍
说明:文章所有内容均截选自实验楼教程[Sql注入基础原理介绍]~ 实验原理 Sql 注入攻击是通过将恶意的 Sql 查询或添加语句插入到应用的输入参数中,再在后台 Sql 服务器上解析执行进行的攻击, ...
- Macaca 基础原理浅析
导语 前面几篇文章介绍了在Macaca实践中的一些实用技巧与解决方案,今天简单分析一下Macaca的基础原理.这篇文章将以前面所分享的UI自动化Macaca-Java版实践心得中的demo为基础,进行 ...
- JVM知识(一):基础原理
学过java知识和技术人,都应该听说过jvm,jvm一直是java知识里面晋级阶段的重要部分,如果想要在java技术领域更深入一步,jvm是必须需要明白的知识点. 本篇来讲解jvm的基础原理,先来熟悉 ...
- Hadoop基础原理
Hadoop基础原理 作者:尹正杰 版权声明:原创作品,谢绝转载!否则将追究法律责任. 业内有这么一句话说:云计算可能改变了整个传统IT产业的基础架构,而大数据处理,尤其像Hadoop组件这样的技术出 ...
- hashmap的一些基础原理
本文来源于翁舒航的博客,点击即可跳转原文观看!!!(被转载或者拷贝走的内容可能缺失图片.视频等原文的内容) 若网站将链接屏蔽,可直接拷贝原文链接到地址栏跳转观看,原文链接:https://www.cn ...
随机推荐
- Android Api 27 在 Android 8.0 上出现 Only fullscreen opaque activities can request orientation 的解决情况
刚上班,没有业务开发,对 App 的 Api 由 26 升级到了 27, 结果在 Android 8.0 的设备上会出现 crash . Log 如下: java java.lang.IllegalS ...
- H3C Comware V3 端口聚合
通常链路聚合有三种模式:手工汇聚.静态LACP汇聚和动态LACP汇聚. 但是V3版本下只提供了 手工聚合模式 manual 和 静态LACP聚合模式 static 两种 V3版本配置链路聚合 1,创建 ...
- Oracle 傻瓜式数据归档
推荐用方法二 方法一 [本库备份,分区表需要另写CREATE TABLE方法] ----------------------------------------------- ; ; ; ; RENA ...
- C语言 · 滑动解锁
题目:滑动解锁 滑动解锁是智能手机一项常用的功能.你需要在3x3的点阵上,从任意一个点开始,反复移动到一个尚未经过的"相邻"的点.这些划过的点所组成的有向折线,如果与预设的折线在图 ...
- 解决MAMP启动mysql服务 但是Navicat连接不上
问题重现 错误信息 2003 - Can't connect to MySQL server on '127.0.0.1' (61 "Connection refused") 解决 ...
- js 时间戳转时间工具类 js时间戳与时间互转
/** * 时间戳格式化函数 * @param {string} format 格式 * @param {int} timestamp 要格式化的时间 默认为当前时间 * @return {strin ...
- VS2017 配置glfw3
直接下载源码使用VS进行编译. 1. 源码下载地址http://www.glfw.org/download.html, 点击Source Package 2. 打开cmake-3.12.1-win32 ...
- Python判断列表是否已排序的各种方法及其性能分析
目录 Python判断列表是否已排序的各种方法及其性能分析 声明 一. 问题提出 二. 代码实现 2.1 guess 2.2 sorted 2.3 for-loop 2.4 all 2.5 numpy ...
- 3D Object Classification With Point Convolution —— 点云卷积网络
今天刚刚得到消息,之前投给IROS 2017的文章收录了.很久很久没有写过博客,今天正好借这个机会来谈谈点云卷积网络的一些细节. 1.点云与三维表达 三维数据后者说空间数据有很多种表达方式,比如:RG ...
- 三维计算机视觉 —— 中层次视觉 —— RCNN Family
RCNN是从图像中检测物体位置的方法,严格来讲不属于三维计算机视觉.但是这种方法却又非常非常重要,对三维物体的检测非常有启发,所以在这里做个总结. 1.RCNN - the original idea ...