graphql 数据增删改查分页及关联操作(三)
说明:
- 接第二篇文章,代码也是在第二篇文章之上
- 本文只是针对mondodb来操作
一、添加相关的包
- yarn add Mongoose
二、初始化Mongodb
- 修改server.ts
- 导入 import * as Mongoose from 'mongoose';
- 添加了方法 mongodbInit()
- 全部代码如下 :
- import * as express from 'express';
- const { graphqlExpress, graphiqlExpress } = require('apollo-server-express')
- const expressPlayground = require('graphql-playground-middleware-express').default;
- import * as Mongoose from 'mongoose';
- var bodyParser = require('body-parser');
- import schema from './schema';
- class Server {
- public app: express.Application;
- constructor() {
- this.app = express();
- this.routes();
- this.mongodbInit();
- }
- private routes(): void {
- this.app.use('/graphql',bodyParser.json(), graphqlExpress({ schema }));
- this.app.get('/playground', expressPlayground({ endpoint: '/graphql' }));
- }
- private mongodbInit() {
- const MONGO_URI = "mongodb://localhost/gqlServer";
- Mongoose.connect(MONGO_URI || process.env.MONGO_URI);
- this.app.use(bodyParser.urlencoded({ extended: false }));
- this.app.use(bodyParser.json());
- }
- }
- export default new Server().app;
- import * as express from 'express';
三、修改user文件
- 添加user.ts代码如下:
- import { model, Schema, Document } from 'mongoose';
- export interface IUserModel extends Document {
- id:string,
- name: String,
- password: String,
- }
- let UserSchema: Schema = new Schema({
- name: String,
- password: String,
- createAt: {
- type: Date,
- default: new Date(),
- required: true
- },
- updateAt: {
- type: Date,
- default: new Date(),
- required: true
- },
- })
- export default model<IUserModel>('User', UserSchema);
- 修改resolver.ts代码如下:
- import UserSchema, { IUserModel } from './user';
- export class User {
- constructor() {
- }
- static Query: any = {
- getUsers(parent, { }, context) {
- return UserSchema.find();
- }
- }
- static Mutation: any = {
- saveUser(parent, { user }, context) {
- return UserSchema.create(user)
- }
- }
- }
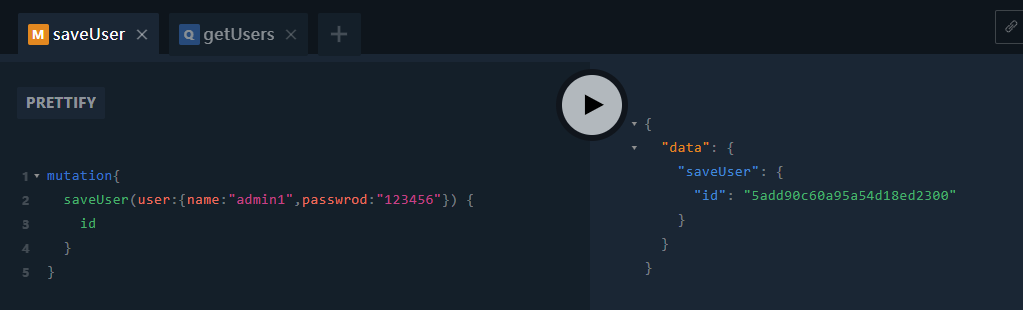
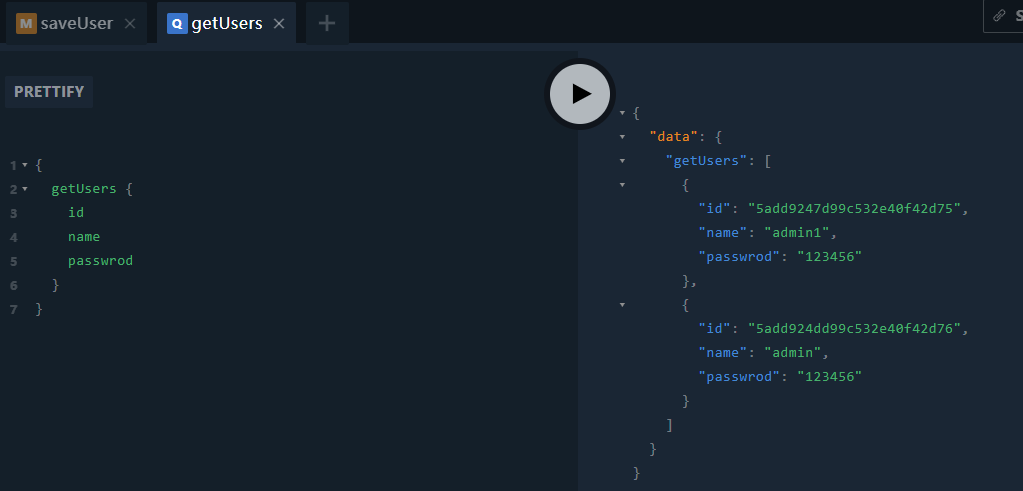
四、运行项目 yarn start 打开地址http://localhost:8080/playground应该可以添加用户和查找用户了效果如下:
五、增删改查相关的方法可以自己去扩展
六、关联
- 添加角色文件夹role/role.gql,role/resolve,role/resolver.ts
- 代码基本可以复制user里面的代码改相关的名字
- 项目结构

- role.gql代码
- type Role{
- id:String
- roleName:String
- }
- extend type Query {
- # 查找所有角色
- getRoles: [Role]
- }
- extend type Mutation {
- # 创建角色| 修改角色
- saveRole(role:inputRole):Role
- }
- input inputRole{
- id:String
- roleName:String
- }
- type Role{
- role.ts代码
- import { model, Schema, Document } from 'mongoose';
- export interface IRoleModel extends Document {
- id:string,
- roleMame: String,
- }
- let RoleSchema: Schema = new Schema({
- roleMame: String,
- createAt: {
- type: Date,
- default: new Date(),
- required: true
- },
- updateAt: {
- type: Date,
- default: new Date(),
- required: true
- },
- })
- export default model<IRoleModel>('Role', RoleSchema);
- resolver.ts 代码
- import RoleSchema, { IRoleModel } from './role';
- export class Role {
- constructor() {
- }
- static Query: any = {
- getRoles(parent, { }, context) {
- return RoleSchema.find();
- }
- }
- static Mutation: any = {
- saveRole(parent, { role }, context) {
- return RoleSchema.create(role)
- }
- }
- }
- 导入resolver到resolvers.ts代码如下:
- import { User } from "./user/resolver";
- import { Role } from "./role/resolver";
- export default {
- Query: {
- ...User.Query,
- ...Role.Query
- },
- Mutation: {
- ...User.Mutation,
- ...Role.Mutation
- },
- };
- import { User } from "./user/resolver";
- 导入role.gql 到src/schema.ts 代码如下:
- import { makeExecutableSchema } from 'graphql-tools';
- import resolver from "./resolvers";
- var requireText = require('require-text');
- var Base = requireText('./base.gql', require);
- var User = requireText('./user/user.gql', require);
- var Role = requireText('./role/role.gql', require); //添加了角色
- //基础信息
- var typeDefs = [Base];
- typeDefs = typeDefs.concat(User);
- typeDefs = typeDefs.concat(Role);
- const schema = makeExecutableSchema({
- typeDefs: typeDefs,
- resolvers: resolver
- })
- export default schema;
- import { makeExecutableSchema } from 'graphql-tools';
- 运行可以看到相关表,尝试添加一个角色,和查找一下
七、关联用户与角色,基本关系,每一个用户有一个角色1对1
- 修改文件user.gql代码如下:
- type User{
- id:String
- name:String
- passwrod:String
- # 添加了role字段
- Role:Role
- }
- extend type Query {
- # 查找所有用户
- getUsers: [User]
- }
- extend type Mutation {
- # 创建用户|修改用户
- saveUser(user:inputUser):User
- }
- input inputUser{
- id:String
- name:String
- passwrod:String
- # 添加了roleid
- roleId:String
- }
- type User{
- 修改user.ts文件代码如下:
- import { model, Schema, Document } from 'mongoose';
- export interface IUserModel extends Document {
- id:string,
- name: String,
- passwrod: String,
- roleId: String,//只是添加了这里
- }
- let UserSchema: Schema = new Schema({
- name: String,
- passwrod: String,
- roleId: String, //只是添加了这里
- createAt: {
- type: Date,
- default: new Date(),
- required: true
- },
- updateAt: {
- type: Date,
- default: new Date(),
- required: true
- },
- })
- export default model<IUserModel>('User', UserSchema);
- 修改user/resolver.ts文件代码如下:
- import UserSchema, { IUserModel } from './user';
- import RoleSchema from '../role/role';
- export class User {
- constructor() {
- }
- //只是添加用户的角色
- static User: any = {
- Role(model) {
- return RoleSchema.findById(model.roleId);
- },
- }
- static Query: any = {
- getUsers(parent, { }, context) {
- return UserSchema.find();
- }
- }
- static Mutation: any = {
- saveUser(parent, { user }, context) {
- return UserSchema.create(user)
- }
- }
- }
- import UserSchema, { IUserModel } from './user';
- 导入用户角色到resolver.ts代码如下:
- import { User } from "./user/resolver";
- import { Role } from "./role/resolver";
- export default {
- Query: {
- ...User.Query,
- ...Role.Query
- },
- Mutation: {
- ...User.Mutation,
- ...Role.Mutation
- },
- User:User.User //只是添加了这一行
- };
- import { User } from "./user/resolver";
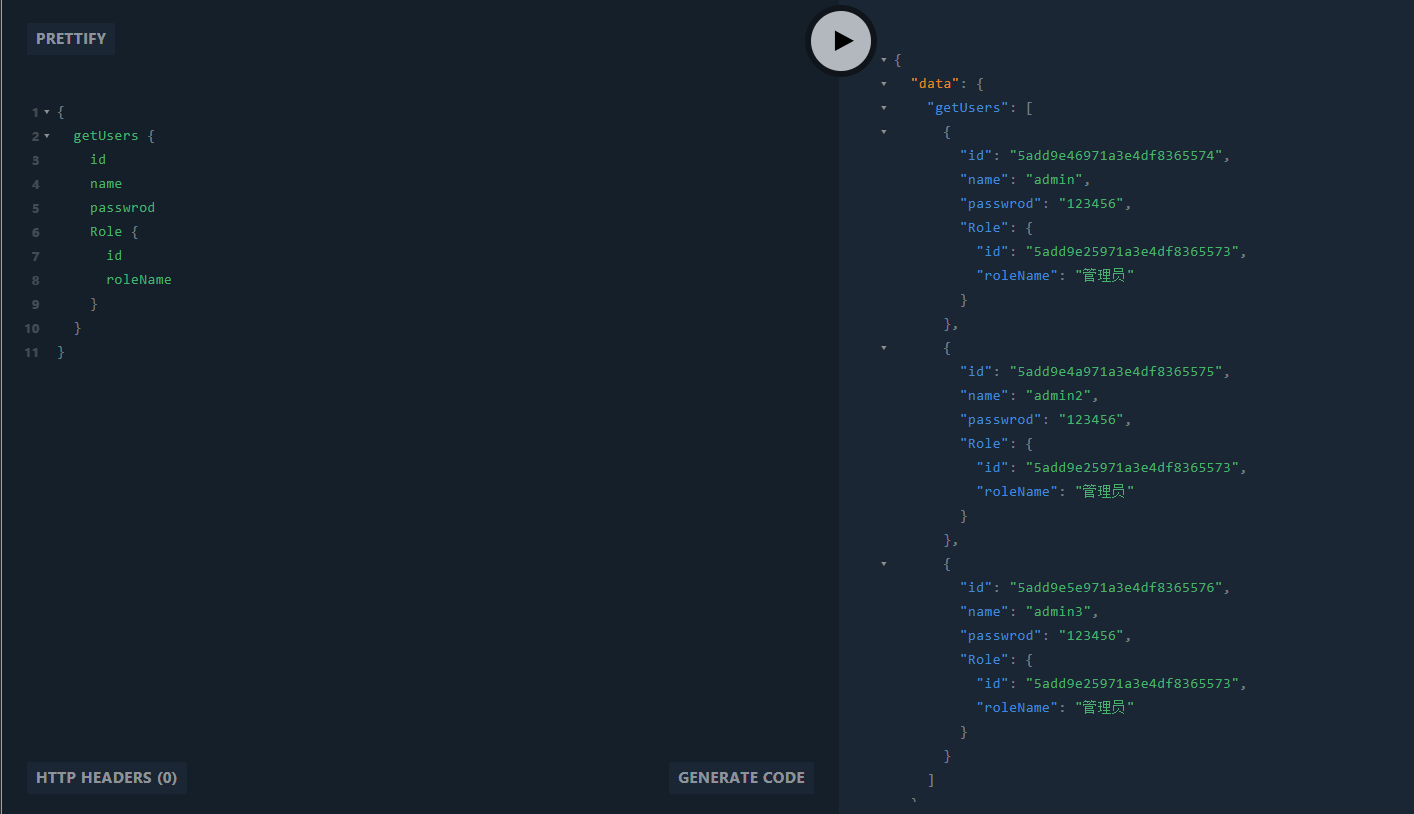
- 运行,添加一个角色,根据角色id添加用户,页面查询应该可以看到以下结果:
八,相关的增加修改删除分页代码参考下面代码:
- user.gql
- # 系统用户表
- type User {
- id: ID!
- # 用户登录名
- username: String
- # 姓名
- name: String
- # 邮件
- email:String
- # 密码
- password:String
- # 创建时间
- createAt:Date
- # 修改时间
- updateAt:Date
- #用户角色
- Role:Role
- #是否有效
- isValid:Boolean
- #用户资料
- Profile:Profile
- }
- extend type Query {
- # 查找所有用户
- getUsers: [User]
- # 根据ID查找用户
- getUserById(id:String):User
- # 分页查找
- getUserPage(pageIndex: Int, pageSize: Int,user:searchUser): [User]
- # 查找分页总数
- getUserCount(user:searchUser):Int
- # 根据条件查找
- getUserWhere(user:searchUser): [User]
- # 用户登录
- login (username:String!,password:String!): User
- # 用户退出
- logOut:Boolean,
- #当前登录用户
- currentUser:User
- }
- extend type Mutation {
- # 创建用户|修改用户
- saveUser(user:inputUser):User
- # 删除用户
- deleteUser(id:String):Boolean
- }
- input inputUser{
- id:String
- username: String
- name: String
- email:String
- password:String
- roleId:String
- profileId:String
- isValid:Boolean
- }
- input searchUser{
- username:Json
- roleId:Json
- email:Json
- name:Json
- }
- # 系统用户表
- resolver.ts
- import UserSchema, { IUserModel } from './user';
- import RoleSchema from '../role/role';
- import ProfileSchema from '../profile/profile';
- import { DocumentQuery, MongoosePromise } from 'mongoose';
- export class User {
- constructor() {
- }
- static User: any = {
- Role(model) {
- return RoleSchema.findById(model.roleId);
- },
- Profile(model) {
- return ProfileSchema.findOne({ userId: model.id });
- }
- }
- static Query: any = {
- getUsers(parent, __, context): Promise<Array<IUserModel>> {
- //if (!context.user) return null;
- let promise = new Promise<Array<IUserModel>>((resolve, reject) => {
- UserSchema.find().then(res => {
- resolve(res);
- }).catch(err => resolve(null));
- });
- return promise;
- },
- getUserById(parent, { id }, context): Promise<IUserModel> {
- //if (!context.user) return null;
- let promise = new Promise<IUserModel>((resolve, reject) => {
- UserSchema.findById(id).then(res => {
- resolve(res);
- }).catch(err => resolve(null));
- });
- return promise;
- },
- getUserPage(parent, { pageIndex = 1, pageSize = 10, user }, context) {
- //if (!context.user) return null;
- var skip = (pageIndex - 1) * pageSize
- var userInfo = UserSchema.find(user).skip(skip).limit(pageSize)
- return userInfo;
- },
- getUserWhere(parent, { user }, context) {
- //if (!context.user) return null;
- console.log(user);
- var users = UserSchema.find(user);
- return users;
- },
- getUserCount(parent, { user }, context) {
- //if (!context.user) return 0;
- var count = UserSchema.count(user);
- return count;
- },
- login(parent, { username, password }, context) {
- return new Promise<any>((resolve, reject) => {
- UserSchema.find({ username, password }).then(data => {
- if (data.length > 0) {
- var user=data[0];
- context.session.user = user;
- resolve(user);
- } else {
- context.session.user = null;
- resolve(null);
- }
- })
- })
- },
- logOut(parent, { }, context) {
- context.user = null;
- context.session.user = null;
- return true;
- },
- currentUser(parent, { }, context) {
- //if (!context.user) return null;
- let promise = new Promise<IUserModel>((resolve, reject) => {
- let user = context.user;
- if (user) {
- UserSchema.findById(user._id).then(res => {
- resolve(res);
- }).catch(err => resolve(null));
- } else {
- resolve(null);
- }
- });
- return promise;
- },
- }
- static Mutation: any = {
- saveUser(parent, { user }, context) {
- //正式运行时请取消注释
- // if (!context.user) return null;
- if (user.id && user.id != "0") {
- return new Promise<IUserModel>((resolve, reject) => {
- UserSchema.findByIdAndUpdate(user.id, user, (err, res) => {
- Object.assign(res, user);
- resolve(res);
- })
- });
- }
- return UserSchema.create(user)
- },
- deleteUser(parent, { id }, context): Promise<Boolean> {
- //if (!context.user) return null;
- let promise = new Promise<Boolean>((resolve, reject) => {
- UserSchema.findByIdAndRemove(id, (err, res) => {
- resolve(res != null)
- }).catch(err => reject(err));
- });
- return promise;
- }
- }
- }
- import UserSchema, { IUserModel } from './user';
graphql 数据增删改查分页及关联操作(三)的更多相关文章
- IOS-CoreData(增删改查、表关联、分页和模糊查询、多个数据库)
1>什么是CoreData Core Data是iOS5之后才出现的一个框架,它提供了对象-关系映射(ORM)的功能,即能够将OC对象转化成数据,保存在SQLite数据库文件中,也能够将保存在数 ...
- OracleHelper(对增删改查分页查询操作进行了面向对象的封装,对批量增删改操作的事务封装)
公司的一个新项目使用ASP.NET MVC开发,经理让我写个OracleHelper,我从网上找了一个比较全的OracleHelper类,缺点是查询的时候返回DataSet,数据增删改要写很多代码(当 ...
- salesforce 零基础开发入门学习(六)简单的数据增删改查页面的构建
VisualForce封装了很多的标签用来进行页面设计,本篇主要讲述简单的页面增删改查.使用的内容和设计到前台页面使用的标签相对简单,如果需要深入了解VF相关知识以及标签, 可以通过以下链接查看或下载 ...
- node-express项目的搭建并通过mongoose操作MongoDB实现增删改查分页排序(四)
最近写了一个用node来操作MongoDB完成增.删.改.查.排序.分页功能的示例,并且已经放在了服务器上地址:http://39.105.32.180:3333. Mongoose是在node.js ...
- 【转载】salesforce 零基础开发入门学习(六)简单的数据增删改查页面的构建
salesforce 零基础开发入门学习(六)简单的数据增删改查页面的构建 VisualForce封装了很多的标签用来进行页面设计,本篇主要讲述简单的页面增删改查.使用的内容和设计到前台页面使用的 ...
- C#操作Excel数据增删改查(转)
C#操作Excel数据增删改查. 首先创建ExcelDB.xlsx文件,并添加两张工作表. 工作表1: UserInfo表,字段:UserId.UserName.Age.Address.CreateT ...
- C#操作Excel数据增删改查示例
Excel数据增删改查我们可以使用c#进行操作,首先创建ExcelDB.xlsx文件,并添加两张工作表,接下按照下面的操作步骤即可 C#操作Excel数据增删改查. 首先创建ExcelDB.xlsx文 ...
- SpringMVC4+MyBatis3+SQLServer 2014 整合(包括增删改查分页)
前言 说起整合自然离开ssm,我本身并不太喜欢ORM,尤其是MyBatis,把SQL语句写在xml里,尤其是大SQL,可读性不高,出错也不容易排查. 开发环境 idea2016.SpringMVC4. ...
- C#在winform中操作数据库,实现数据增删改查
1.前言: 运行环境:VS2013+SQL2008+Windows10 程序界面预览: 使用的主要控件:dataGridview和menuStrip等. 2.功能具体介绍: 1.首先,我们要先实现基本 ...
随机推荐
- Codeforces Round #532 (Div. 2)- B(思维)
Arkady coordinates rounds on some not really famous competitive programming platform. Each round fea ...
- 权限知识中的AIX ACL
Aix ACL是对标准权限位的扩展.通过修改分配给个人或组的标准权限,对每个文件或目录进行更精细的控制. 对每个组或用户,有3种权限分配情况: PERMIT : 准许对文件或目录的特定权限. DEMY ...
- django中关于静态文件的引入(这边是指边主要是jquery和bootstrap
一. 创建文件夹 首先在项目的根目录中新建一个文件夹,这个文件夹的名称最好以static命名 二. 修改配置 在项目的settings文件中,拉倒最下面,可以看到 STATICFILES_DIR ...
- Go语言学习包(1)之bufio包
参考网址: https://blog.csdn.net/wangshubo1989/article/details/70177928
- VS2015+NUnit+OpenCover 完成单元测试代码覆盖率测试
1.VS2015+NUnit+OpenCover 完成单元测试代码覆盖率测试 https://download.csdn.net/download/qq_39441918/10522539 2.*注意 ...
- VMware 无法连接虚拟设备ide1:0,主机上没有相对应的设备,您 要在每次开启此虚拟机时都尝试连接此虚拟设备吗?
无法连接虚拟设备ide1:0,主机上没有相对应的设备,您 要在每次开启此虚拟机时都尝试连接此虚拟设备吗? 运行VMware,出现以上错误. ide1:0一般是虚拟机的光驱,配置默认选项是“使用物理驱动 ...
- Callable,Runnable的区别及用法
编写多线程程序一般有三种方法,Thread,Runnable,Callable. Runnable和Callable的区别是: (1)Callable规定的方法是call(),Runnable规定的方 ...
- FIR IIR数字滤波器特点简介
FIR:有限脉冲滤波器,线性较好,用非递归算法,可用FFT,计算速度快,不用四舍五入,适合于对相位敏感的线性应用场合,设计灵活没有现成公式可用. 输出与现在和过去的输入有关. IIR:无限脉冲滤波器, ...
- js监听dom元素内容变化
$("#divid").bind('DOMNodeInserted', function(e) { alert('element now contains: ' + $(e.tar ...
- BuildAssetBundles文件打包
BuildAssetBundles文件打包: public class BuildAssetBundlesTest : Editor { //定义打包文件路径 public static string ...