路由器配置——基于区域的OSPF简单认证
一、实验目的:掌握区域的OSPF简单认证
二、拓扑图:

三、具体步骤配置:
(1)R1路由器配置
Router>enable
Router#configure terminal
Enter configuration commands, one per line. End with CNTL/Z.
Router(config)#hostname R1
R1(config)#interface s0/0/0
R1(config-if)#ip address 192.168.1.1 255.255.255.0
R1(config-if)#clock rate 64000
R1(config-if)#no shutdown
%LINK-5-CHANGED: Interface Serial0/0/0, changed state to down
R1(config-if)#exit
R1(config)#interface l0
R1(config-if)#ip address 1.1.1.1 255.255.255.0
R1(config-if)#no shutdown
R1(config-if)#exit
R1(config)#router ospf 1
R1(config-router)#router-id 1.1.1.1
R1(config-router)#network 192.168.1.0 0.0.0.255 area 0
R1(config-router)#network 1.1.1.0 0.0.0.255 area 0
R1(config-router)#area 0 authentication
R1(config-router)#interface s0/0/0
R1(config-if)#ip ospf authentication-key 123
R1(config-if)#end
(2)R2路由器配置
Router>enable
Router#configure terminal
Enter configuration commands, one per line. End with CNTL/Z.
Router(config)#hostname R2
R2(config)#interface s0/0/0
R2(config-if)#ip address 192.168.1.2 255.255.255.0
R2(config-if)#clock rate 64000
This command applies only to DCE interfaces
R2(config-if)#no shutdown
R2(config-if)#exit
R2(config)#interface l0
R2(config-if)#ip address 2.2.2.2 255.255.255.0
R2(config-if)#no shutdown
R2(config-if)#exit
R2(config)#router ospf 1
R2(config-router)#router-id 2.2.2.2
R2(config-router)#network 192.168.1.0 0.0.0.255 area 0
R2(config-router)#network 2.2.2.0 0.0.0.255 area 0
R2(config-router)#area 0 authentication
R2(config-router)#interface s0/0/0
R2(config-if)#ip ospf authentication-key 123
R2(config-if)#end
四、验证测试:
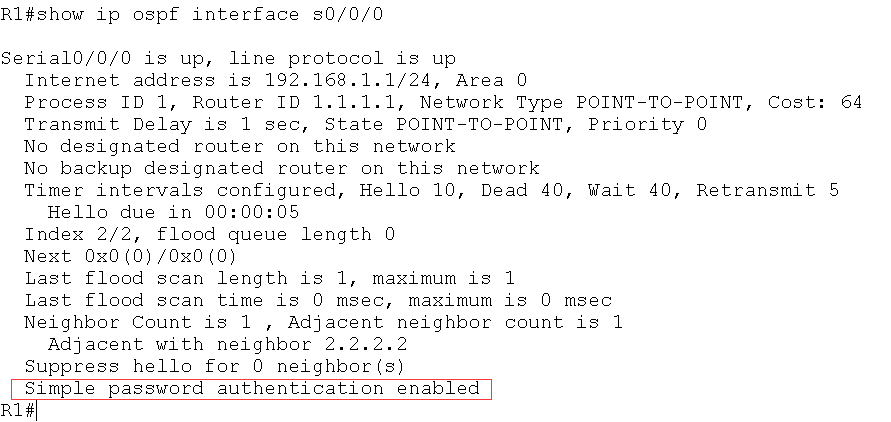
1、检查端口是否启用了简单口令认证

图中红色标记处信息表明端口启用了简单口令认证
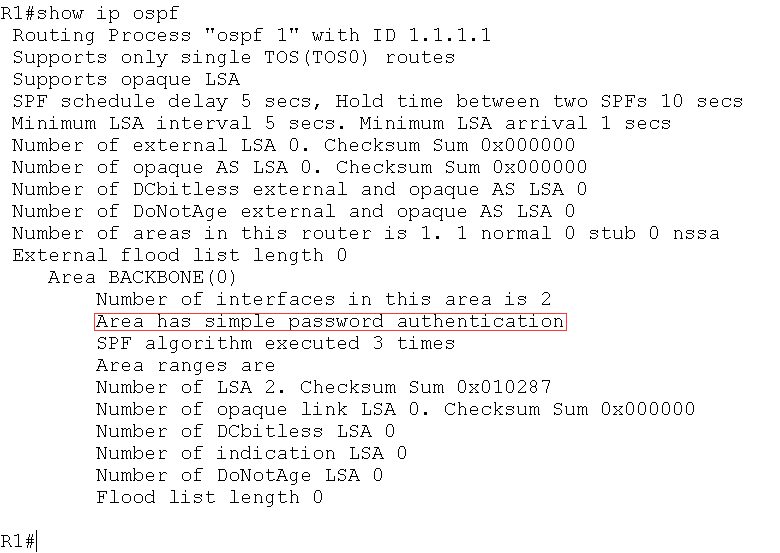
(2)检查区域是否采用了简单口令认证

图中红色标记处表明区域0采用了简单口令认证
(3)如果R1区域0没有启动认证,而R2区域0启动简单口令认证,则R2上出现下面
的信息
*Feb 10 11:03:03.071: OSPF: Rcv pkt from 192.168.12.1, Serial0/0/0 : Mismatch
Authentication type. Input packet specified type 0, we use type 1
(4)如果R1 和R2 的区域0 都启动简单口令认证,但是R2 的接口下没有配置密码或密
码错误,则R2 上出现下面的信息:
*Feb 10 10:55:53.071: OSPF: Rcv pkt from 192.168.12.1, Serial0/0/0 : Mismatch
Authentication Key - Clear Text
路由器配置——基于区域的OSPF简单认证的更多相关文章
- 路由器配置——基于链路的OSPF简单口令认证
一.实验目的:掌握基于链路的OSPF简单口令认证 二.拓扑图: 三.具体步骤配置: (1)R1路由器配置 Router>enable Router#configure terminal Ente ...
- 路由器配置——基于区域的OSPF,MD5认证
一.实验目的:掌握OSPF基于区域的MD5认证 二.拓扑图: 三.具体步骤配置 (1)R1路由器配置 Router>enable Router#configure terminal Enter ...
- 基于区域的OSPF简单认证
实验要求:掌握OSPF区域简单认证配置 拓扑如下: 配置如下: R1enable configure terminal interface s0/0/0ip address 192.168.1.1 2 ...
- 路由器配置——基于链路的OSPF的MD5口令认证
一.实验目的:掌握基于链路的OSPFMD5口令认证 二.拓扑图: 三.具体步骤配置: (1)R1路由器的配置 Router>enable Router#configure terminal En ...
- 基于链路的OSPF简单口令认证
实验要求:掌握基于链路的OSPF简单口令认证 拓扑如下: 配置如下: R1enable configure terminal interface s0/0/0ip address 192.168.1. ...
- SharePoint 2013 配置基于表单的身份认证
前 言 这里简单介绍一下为SharePoint 2013 配置基于表单的身份认证,简单的说,就是用Net提供的工具创建数据库,然后配置SharePoint 管理中心.STS服务.Web应用程序的三处w ...
- 基于区域的OSPF的MD5认证
实验要求:掌握OSPF基于区域的MD5认证 拓扑如下: 配置如下: R1enable configure terminal interface s0/0/0ip address 192.168.1.1 ...
- 神州数码OSPF基于区域认证(简单、MD5认证)
实验要求:掌握基于区域的简单认证及MD5认证 拓扑如下 简单认证 R1 enable 进入特权模式 config 进入全局模式 hostname R1 修改名称 interface l0 进入端口 i ...
- 神州数码OSPF基于端口认证(简单认证、MD5认证)
实验要求:掌握OSPF基于端口认证方式 拓扑如下 简单认证 R1 enable 进入特权模式 config 进入全局模式 hostname R1 修改名称 interface s0/1 进入端口 i ...
随机推荐
- hadoop 》》 django 简单操作hdfs 语句
>> from django.shortcuts import render # Create your views here. from hdfs.client import Clien ...
- 训练技巧详解【含有部分代码】Bag of Tricks for Image Classification with Convolutional Neural Networks
训练技巧详解[含有部分代码]Bag of Tricks for Image Classification with Convolutional Neural Networks 置顶 2018-12-1 ...
- System.Data.EntityException: The underlying provider failed on Open.
场景:IIS默认站点建立程序,使用Windows集成身份验证方式,连接SQLServer数据库也是采用集成身份验证.我报“System.Data.EntityException: The underl ...
- hdu 2609 字符串最小表示法 虽然不是很懂 还是先贴上来吧。/,。/
还需要再消化一下这个算法.. 今天没有时间了,, 六级过了 就有大把时间 快活啊!#include<iostream> #include<cstdio> #include< ...
- postman中传参说明
1.form-data 表单传递,对应multipart/form-data, 2.x-www-form-urlencoded 默认传递,对应application/x-www-from-urlenc ...
- Springboot 使用pageHelper实现分页查询
本文链接:https://blog.csdn.net/qq_35387940/article/details/91530234
- ztree入门
ztree入门 ztree可用于权限管理,机构部门等有层次的数据 准备工作 ztree官网 点击右上角的GitHub或者码云的地址将demo下载到本地 在本地新建一个项目,将下载的文件中zTreeSt ...
- 错误:The following error occurred attempting to run the DNX design time process (dnx-clr-win-x86.1.0.0-rc1-final)
其实这个错误很容易解决.设置一个startup工程即可.
- 08 redis缓存穿透、缓存雪崩、缓存击穿
Redis缓存的使用,极大的提升了应用程序的性能和效率,特别是数据查询方面.但同时,它也带来了一些问题.其中,最要害的问题,就是数据的一致性问题,从严格意义上讲,这个问题无解.如果对数据的一致性要求很 ...
- VUE实现简单的全选/全不选
<!DOCTYPE html> <html> <head lang="en"> <meta charset="UTF-8&quo ...
