【spring Boot】spring boot获取资源文件的三种方式【两种情况下】
首先声明一点,springboot获取资源文件,需要看是
1》从spring boot默认的application.properties资源文件中获取
2》还是从自定义的资源文件中获取
带着这个想法去看下面几种方式
===============================================================================================
1》从spring boot默认的application.properties资源文件中获取
先给出来application.properties的内容
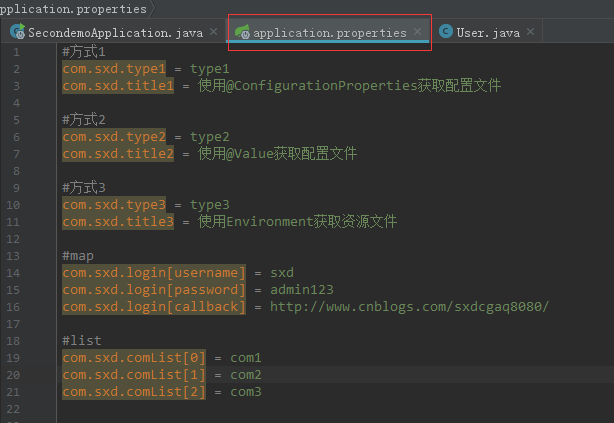
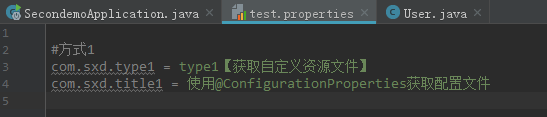
#方式1

com.sxd.type1 = type1

com.sxd.title1 = 使用@ConfigurationProperties获取配置文件

#方式2

com.sxd.type2 = type2

com.sxd.title2 = 使用@Value获取配置文件

#方式3

com.sxd.type3 = type3

com.sxd.title3 = 使用Environment获取资源文件

#map

com.sxd.login[username] = sxd

com.sxd.login[password] = admin123

com.sxd.login[callback] = http://www.cnblogs.com/sxdcgaq8080/

#list

com.sxd.comList[0] = com1

com.sxd.comList[1] = com2

com.sxd.comList[2] = com3
①===第一种方式:使用@ConfigurationProperties获取配置文件
先搞一个绑定资源文件的bean
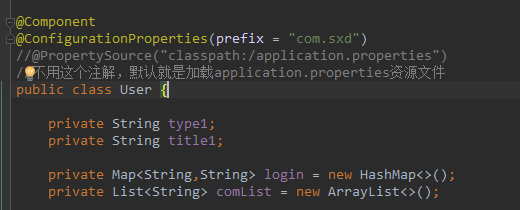
注意属性名和资源文件中的属性名相一致。
package com.sxd.beans;

import org.springframework.boot.context.properties.ConfigurationProperties;

import org.springframework.context.annotation.PropertySource;

import org.springframework.stereotype.Component;

import java.util.ArrayList;

import java.util.HashMap;

import java.util.List;

import java.util.Map;

@Component

@ConfigurationProperties(prefix = "com.sxd")

//@PropertySource("classpath:/application.properties")

//不用这个注解,默认就是加载application.properties资源文件

public class User {

    private String type1;

    private String title1;

    private Map<String,String> login = new HashMap<>();

    private List<String> comList = new ArrayList<>();

    public String getType1() {

        return type1;

    }

    public void setType1(String type1) {

        this.type1 = type1;

    }

    public String getTitle1() {

        return title1;

    }

    public void setTitle1(String title1) {

        this.title1 = title1;

    }

    public Map<String, String> getLogin() {

        return login;

    }

    public void setLogin(Map<String, String> login) {

        this.login = login;

    }

    public List<String> getComList() {

        return comList;

    }

    public void setComList(List<String> comList) {

        this.comList = comList;

    }

}
然后在启动类中使用
package com.sxd.secondemo; import com.sxd.beans.User;
import org.springframework.beans.factory.annotation.Autowired;
import org.springframework.boot.SpringApplication;
import org.springframework.boot.autoconfigure.SpringBootApplication;
import org.springframework.boot.context.properties.EnableConfigurationProperties;
import org.springframework.web.bind.annotation.RequestMapping;
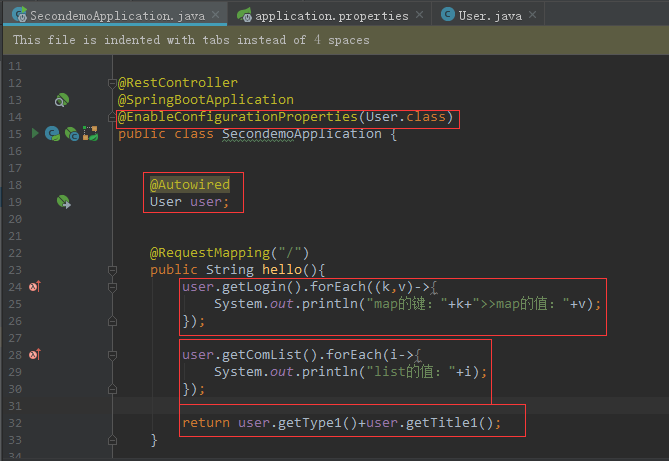
import org.springframework.web.bind.annotation.RestController; @RestController
@SpringBootApplication
@EnableConfigurationProperties(User.class)
public class SecondemoApplication { @Autowired
User user; @RequestMapping("/")
public String hello(){
user.getLogin().forEach((k,v)->{
System.out.println("map的键:"+k+">>map的值:"+v);
}); user.getComList().forEach(i->{
System.out.println("list的值:"+i);
}); return user.getType1()+user.getTitle1();
} public static void main(String[] args) {
SpringApplication.run(SecondemoApplication.class, args);
}
}
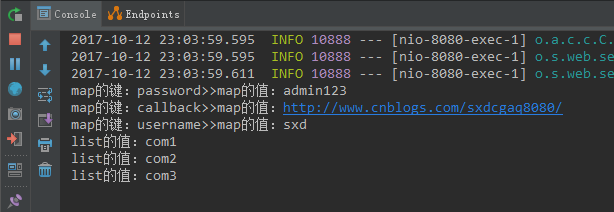
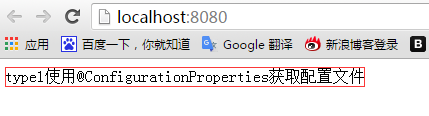
结果如下:
控制台打印:
访问地址:
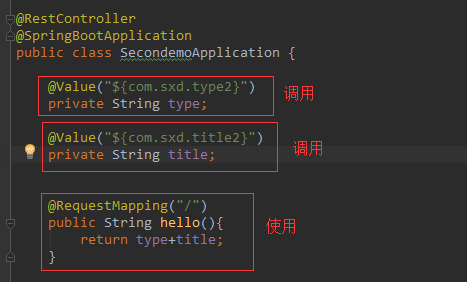
②===第二种方式:使用@Value获取配置文件
这里不用搞一个绑定资源文件的bean了。
只需要在你想用的地方使用@Value调用你想要的属性名对应的值即可。
package com.sxd.secondemo;

import com.sxd.beans.User;

import org.springframework.beans.factory.annotation.Autowired;

import org.springframework.beans.factory.annotation.Value;

import org.springframework.boot.SpringApplication;

import org.springframework.boot.autoconfigure.SpringBootApplication;

import org.springframework.boot.context.properties.EnableConfigurationProperties;

import org.springframework.web.bind.annotation.RequestMapping;

import org.springframework.web.bind.annotation.RestController;

@RestController

@SpringBootApplication

public class SecondemoApplication {

    @Value("${com.sxd.type2}")

    private String type;

    @Value("${com.sxd.title2}")

    private String title;

    @RequestMapping("/")

    public String hello(){

        return type+title;

    }

    public static void main(String[] args) {

        SpringApplication.run(SecondemoApplication.class, args);

    }

}
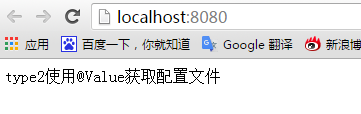
访问结果:
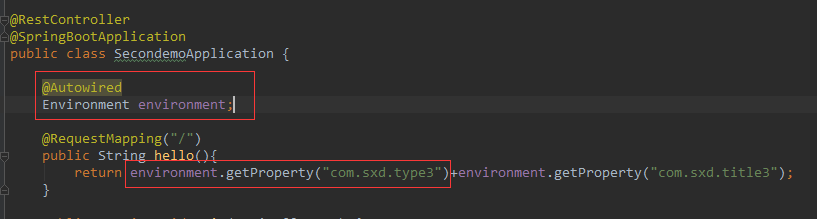
③===第三种方式:使用Environment获取资源文件
也不用提前做什么使用,Environment就是一个全局的资源池,application.properties中的属性值都可以从这里获取到。
package com.sxd.secondemo;

import com.sxd.beans.User;

import org.springframework.beans.factory.annotation.Autowired;

import org.springframework.beans.factory.annotation.Value;

import org.springframework.boot.SpringApplication;

import org.springframework.boot.autoconfigure.SpringBootApplication;

import org.springframework.boot.context.properties.EnableConfigurationProperties;

import org.springframework.core.env.Environment;

import org.springframework.web.bind.annotation.RequestMapping;

import org.springframework.web.bind.annotation.RestController;

@RestController

@SpringBootApplication

public class SecondemoApplication {

    @Autowired

    Environment environment;

    @RequestMapping("/")

    public String hello(){

        return environment.getProperty("com.sxd.type3")+environment.getProperty("com.sxd.title3");

    }

    public static void main(String[] args) {

        SpringApplication.run(SecondemoApplication.class, args);

    }

}
运行结果:
================================================================================================
2》从自定义的资源文件中获取属性值
①===第一种方式:使用@ConfigurationProperties获取配置文件
自定义资源文件如下:
然后指定绑定自定义资源文件
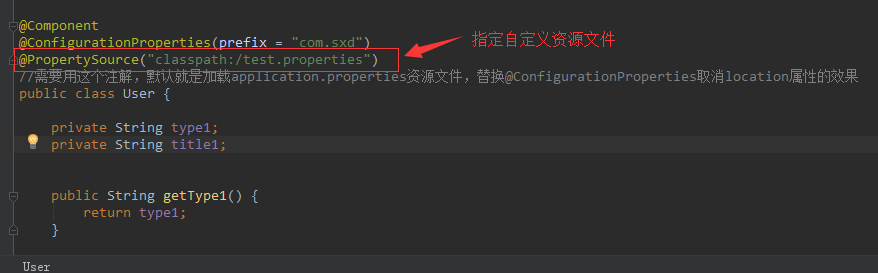
package com.sxd.beans;

import org.springframework.boot.context.properties.ConfigurationProperties;

import org.springframework.context.annotation.PropertySource;

import org.springframework.stereotype.Component;

@Component

@ConfigurationProperties(prefix = "com.sxd")

@PropertySource("classpath:/test.properties")

//需要用这个注解,默认就是加载application.properties资源文件,替换@ConfigurationProperties取消location属性的效果

public class User {

    private String type1;

    private String title1;

    public String getType1() {

        return type1;

    }

    public void setType1(String type1) {

        this.type1 = type1;

    }

    public String getTitle1() {

        return title1;

    }

    public void setTitle1(String title1) {

        this.title1 = title1;

    }

}
最后在启动类中使用一下

package com.sxd.secondemo; import com.sxd.beans.User;
import org.springframework.beans.factory.annotation.Autowired;
import org.springframework.beans.factory.annotation.Value;
import org.springframework.boot.SpringApplication;
import org.springframework.boot.autoconfigure.SpringBootApplication;
import org.springframework.boot.context.properties.EnableConfigurationProperties;
import org.springframework.core.env.Environment;
import org.springframework.web.bind.annotation.RequestMapping;
import org.springframework.web.bind.annotation.RestController; @RestController
@SpringBootApplication
@EnableConfigurationProperties(User.class)
public class SecondemoApplication { @Autowired
User user; @RequestMapping("/")
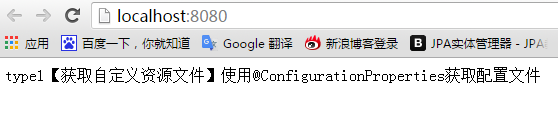
public String hello(){
return user.getType1()+user.getTitle1();
} public static void main(String[] args) {
SpringApplication.run(SecondemoApplication.class, args);
}
}
运行结果:
②===第二种方式:使用@Value获取配置文件
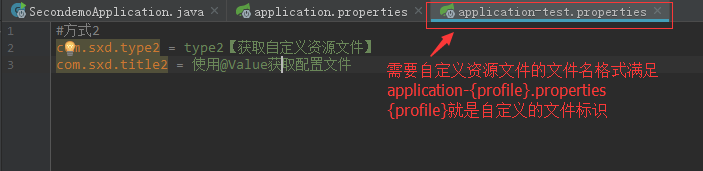
先设定一个自定义资源文件
如下,自定义资源文件需要满足application-{profile}.properties格式
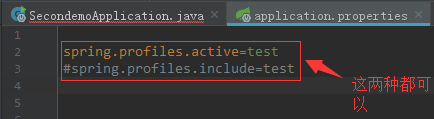
然后在application.properties文件中指明加载这个资源文件
spring.profiles.active=test

#spring.profiles.include=test
这两种哪种都可以加载上自定义的资源文件,后面的test就是上面{profile}的值
最后在启动类中使用@Value获取自定义资源文件中的属性,这个时候自定义的资源文件已经在application,properties文件中被指明要被加载了,因此是可以被获取到的
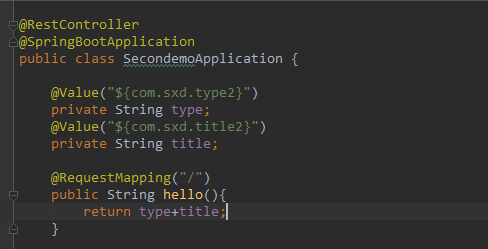
package com.sxd.secondemo;

import org.springframework.beans.factory.annotation.Value;

import org.springframework.boot.SpringApplication;

import org.springframework.boot.autoconfigure.SpringBootApplication;

import org.springframework.boot.context.properties.EnableConfigurationProperties;

import org.springframework.web.bind.annotation.RequestMapping;

import org.springframework.web.bind.annotation.RestController;

@RestController

@SpringBootApplication

public class SecondemoApplication {

    @Value("${com.sxd.type2}")

    private String type;

    @Value("${com.sxd.title2}")

    private String title;

    @RequestMapping("/")

    public String hello(){

        return type+title;

    }

    public static void main(String[] args) {

        SpringApplication.run(SecondemoApplication.class, args);

    }

}
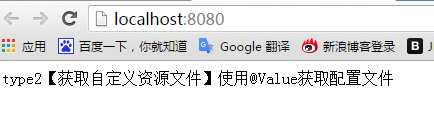
运行结果:
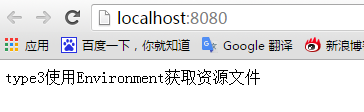
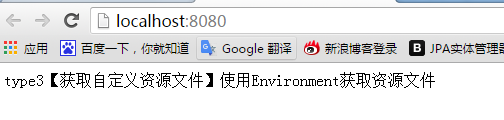
③===第三种方式:使用Environment获取资源文件
首先还是写一个自定义的资源文件,文件命名同上面第二种方式一样
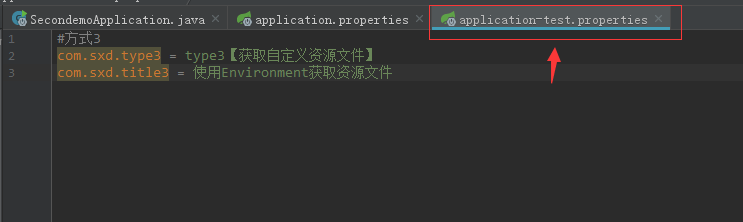
接着,在application.properties中声明加载这个自定义的资源文件

最后在启动类中,也就是哪里使用就在那里自动注入Environment.

package com.sxd.secondemo;

import org.springframework.beans.factory.annotation.Autowired;

import org.springframework.boot.SpringApplication;

import org.springframework.boot.autoconfigure.SpringBootApplication;

import org.springframework.core.env.Environment;

import org.springframework.web.bind.annotation.RequestMapping;

import org.springframework.web.bind.annotation.RestController;

@RestController

@SpringBootApplication

public class SecondemoApplication {

    @Autowired

    Environment environment;

    @RequestMapping("/")

    public String hello(){

        return environment.getProperty("com.sxd.type3")+environment.getProperty("com.sxd.title3");

    }

    public static void main(String[] args) {

        SpringApplication.run(SecondemoApplication.class, args);

    }

}
运行结果:
==================================================================================================================
===================================================完成============================================================
【spring Boot】spring boot获取资源文件的三种方式【两种情况下】的更多相关文章
- Spring Boot中的静态资源文件
Spring Boot中的静态资源文件 1.SSM中的配置 2.Spring Boot 中的配置 2.1 整体规划 2.2 源码解读 2.3 自定义配置 2.3.1 application.prope ...
- 【Spring】获取资源文件+从File+从InputStream对象获取正文数据
1.获取资源文件或者获取文本文件等,可以通过Spring的Resource的方式获取 2.仅有File对象即可获取正文数据 3.仅有InputStream即可获取正文数据 package com.sx ...
- wpf 前台获取资源文件路径问题
1 <ImageBrush ImageSource="YT.CM.CommonUI;component/Resource/FloadwindowImage/middle.png&quo ...
- JavaWeb基础: 获取资源文件
Web工程在编译构建完毕以后,需要部署到Tomcat上运行,资源的硬盘路径也会随着改变.要想对资源文件进行读写操作需要获取其硬盘地址,在Web工程中通常通过ServletContext/ClassLo ...
- java基础知识3--如何获取资源文件(Java中获取资源文件的url)
java开发中,常见的resource文件有:.xml,.properties,.txt文件等,后台开发中经常用到读取资源文件,处理业务逻辑,然后返回结果. 获取资源文件的方法说明getResourc ...
- 关于获取资源文件,Class.getResource和ClassLoader.getResource的区别
原文同步发表至个人博客[夜月归途] 原文链接:http://www.guitu18.com/se/java/2019-02-22/29.html 作者:夜月归途 出处:http://www.guitu ...
- Java中获取资源文件的方法总结
这里总结3中方法获取资源文件的 ServletContext Class ClassLoader 文件的位置 1. ServletContext public void doGet(HttpServl ...
- Java 获取资源文件路径
1 问题描述 通过源码运行时,一般使用如下方式读取资源文件: String str = "1.jpg"; 资源文件与源码文件放在同一目录下,或者拥有同一父级目录: String s ...
- 对比MFC资源文件谈谈WPF布局方式
对比MFC资源文件谈谈WPF布局方式 MFC方式 对于传统的MFC基于UI的应用程序设计通常分两步走,首先是设计UI,使用的是RC文件,然后是代码文件,对RC文件进行操作,如下面Figure 1 的基 ...
随机推荐
- C#_实现Hello Word!
1:代码如下: using System;//using关键字可以引用MIcrosoft.NET框架类库中的现有资源. //System命名空间提供了对构建应用程序所需的所有系统功能的访问,包括本例中 ...
- Leetcode题目279.完全平方数(动态规划-中等)
题目描述: 给定正整数 n,找到若干个完全平方数(比如 1, 4, 9, 16, ...)使得它们的和等于 n.你需要让组成和的完全平方数的个数最少. 示例 1: 输入: n = 12 输出: 3 解 ...
- IntelliJ IDEA-配置文件位置
关于配置文件的位置 一旦开始使用IDEA之后,就需要做很多的配置相关工作,使得IDEA越来越符合你的个人习惯,让你使用起来得心应手.而这些配置信息,都保存在C盘,比如我的就会默认保存在如图所示的位置 ...
- 状压dp,松鼠从起点出发,拿到所有坚果,然后返回起点,求最短时间。
UVA10944 松鼠从起点出发,拿到所有坚果,然后返回起点,求最短时间. #include<iostream> #include<cstdio> #include<al ...
- [JDBC]批量提交插入语句以提高数据插入速度(效率提升不明显)
// Initialize conn&stmt Connection conn=null; Statement stmt=null; ... conn=dataSource.getConnec ...
- 修改Visual Studio的默认模板
如果我在Visual Studio创建的项目中每次新建一个文件,自动生成注释或者是结构的话,那么就需要改下默认的模板了.下面以vs2013为例 我们添加的文件有很多种,这里就举例3种,CSharp类文 ...
- druid 参数配置详解
druid 参数配置详解 */--> druid 参数配置详解 Table of Contents 1. 初始化连接 2. 参数配置及说明 3. 注意事项 3.1. 底层连接 3.2. 空闲检查 ...
- easuUI之datebox日期选择框
<!DOCTYPE HTML PUBLIC "-//W3C//DTD HTML 4.01 Transitional//EN"> <html> <hea ...
- k8s创建资源的两种方式(5)
一.创建方式分类: 命令 vs 配置文件 Kubernetes 支持两种方式创建资源: 1.用 kubectl 命令直接创建,比如: kubectl run httpd-app --image=reg ...
- CPU-内存-IO-网络调优
一.关于CPU 中央处理器调优 1. CPU处理方式: 批处理,顺序处理请求.(切换次数少,吞吐量大) 分时处理.(如同"独占",吞吐量小)(时间片,把请求分为一个一个的时间片,一 ...