android 开发 实现一个自定义布局的AlertDialog对话框
对话框有很多实现方法,最常见的是在一个点击事件中代码直接写出对话框。如下:
package com.example.lenovo.mydemo2;

import android.content.DialogInterface;

import android.support.v7.app.AlertDialog;

import android.support.v7.app.AppCompatActivity;

import android.os.Bundle;

import android.view.View;

import android.widget.Button;

public class MainActivity extends AppCompatActivity {

    private Button mButton;

    @Override

    protected void onCreate(Bundle savedInstanceState) {

        super.onCreate(savedInstanceState);

        setContentView(R.layout.activity_main);

        mButton = (Button)findViewById(R.id.button1);

        mButton.setOnClickListener(new View.OnClickListener() {

            @Override

            public void onClick(View v) {

                AlertDialog.Builder dialog = new AlertDialog.Builder(MainActivity.this);

                //对话框标题设置

                dialog.setTitle("这个是标题");

                //对话框内容设置

                dialog.setMessage("这个是内容");

                //对话框设置不可以用Back键退出

                dialog.setCancelable(false);

               // dialog.clone()

                /*

                三种Button

                Positive Button  正面按键

                Negative Button  负面按键

                Neutral Button   中性按键

                 */

                dialog.setPositiveButton("确定", new DialogInterface.OnClickListener() {

                    @Override

                    public void onClick(DialogInterface dialog, int which) {

                        //关闭对话框

                        dialog.dismiss();

                    }

                });

                dialog.setNegativeButton("取消", new DialogInterface.OnClickListener() {

                    @Override

                    public void onClick(DialogInterface dialog, int which) {

                        //关闭对话框

                        dialog.dismiss();

                    }

                });

                dialog.setNeutralButton("忽略", new DialogInterface.OnClickListener() {

                    @Override

                    public void onClick(DialogInterface dialog, int which) {

                        dialog.dismiss();

       :             }

                });

                //不要忘记了给对话框添加显示。

                dialog.show();

            }

        });

    }

}
运行效果:
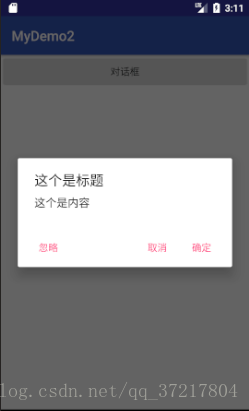
以上就是直接在代码上实现对话框,但是这样实现对话框有一个缺点,那就是真心不好看,在实际项目中对话框与项目的主题不配套,所以我们就需要自定义实现对话框布局了:
1.我们首先需要写一个在对话框后点击效果的背景布局图片:
<?xml version="1.0" encoding="utf-8"?>
<selector xmlns:android="http://schemas.android.com/apk/res/android">
<item
android:state_pressed="false">
<color android:color="@color/colorWhite"/>
</item>
<item
android:state_pressed="true">
<color android:color="@color/colorWhiteGray"/>
</item>
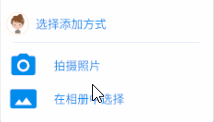
</selector>2.然后需要写一个用于对话框的布局:
<?xml version="1.0" encoding="utf-8"?>

<LinearLayout xmlns:android="http://schemas.android.com/apk/res/android"

    android:orientation="vertical"

    android:layout_width="match_parent"

    android:layout_height="wrap_content">

    <LinearLayout

        android:orientation="vertical"

        android:layout_width="match_parent"

        android:layout_height="wrap_content"

        android:padding="10dp">

    <LinearLayout

        android:orientation="horizontal"

        android:layout_width="match_parent"

        android:layout_height="wrap_content"

        android:layout_marginTop="10dp">

        <ImageView

            android:layout_width="wrap_content"

            android:layout_height="wrap_content"

            android:src="@drawable/ic_woman_default"/>

         <TextView

             android:layout_width="match_parent"

             android:layout_height="wrap_content"

             android:text="选择添加方式"

             android:textSize="@dimen/BigTextSize"

             android:textColor="@color/colorBlue"

             android:layout_gravity="center"

             android:layout_marginLeft="10dp"/>

    </LinearLayout>

    <LinearLayout

        android:layout_width="match_parent"

        android:layout_height="1px"

        android:background="@color/colorBlue"

        android:layout_margin="10dp">

    </LinearLayout>

     <LinearLayout

         android:id="@+id/PersonalDataModification_Dialog_CameraButton"

         android:orientation="horizontal"

         android:layout_width="match_parent"

         android:layout_height="wrap_content"

         android:background="@drawable/button_background_white_change_gray">

         <ImageView

             android:layout_width="wrap_content"

             android:layout_height="wrap_content"

             android:src="@mipmap/ic_camera"/>

         <TextView

             android:layout_width="wrap_content"

             android:layout_height="wrap_content"

             android:text="拍摄照片"

             android:textSize="@dimen/BigTextSize"

             android:textColor="@color/colorBlue"

             android:layout_gravity="center"

             android:layout_marginLeft="20dp"

             />

     </LinearLayout>

        <LinearLayout

            android:id="@+id/PersonalDataModification_Dialog_GalleryButton"

            android:orientation="horizontal"

            android:layout_width="match_parent"

            android:layout_height="wrap_content"

            android:background="@drawable/button_background_white_change_gray">

            <ImageView

                android:layout_width="wrap_content"

                android:layout_height="wrap_content"

                android:src="@mipmap/ic_gallery"/>

            <TextView

                android:layout_width="wrap_content"

                android:layout_height="wrap_content"

                android:text="在相册中选择"

                android:textColor="@color/colorBlue"

                android:textSize="@dimen/BigTextSize"

                android:layout_gravity="center"

                android:layout_marginLeft="20dp"/>

        </LinearLayout>

    </LinearLayout>

</LinearLayout>
效果图:

3.下面是实现对话框的Java代码部分:
   public void dialogueBox(){

        AlertDialog.Builder dialog = new AlertDialog.Builder(PersonalDataModification.this);

        View view = LayoutInflater.from(this.getBaseContext()).inflate(R.layout.dialog_layout,null,false);

        dialog.setView(view);

        mDialog_CameraButton = (LinearLayout)view.findViewById(R.id.PersonalDataModification_Dialog_CameraButton);

        mDialog_GalleryButton = (LinearLayout)view.findViewById(R.id.PersonalDataModification_Dialog_GalleryButton);

        mDialog_CameraButton.setOnClickListener(new View.OnClickListener() {

            @Override

            public void onClick(View v) {

                Toast.makeText(PersonalDataModification.this,"点了进入相机",Toast.LENGTH_SHORT).show();

            }

        });

        mDialog_GalleryButton.setOnClickListener(new View.OnClickListener() {

            @Override

            public void onClick(View v) {

                Toast.makeText(PersonalDataModification.this,"点了进入相册",Toast.LENGTH_SHORT).show();

            }

        });

        dialog.show();

    }
将上面的方法添加到一个点击事件中,就可以实现对话框了。下面我们来看看运行效果:
android 开发 实现一个自定义布局的AlertDialog对话框的更多相关文章
- android 开发 写一个RecyclerView布局的聊天室,并且添加RecyclerView的点击事件
实现思维顺序: 1.首先我们需要准备2张.9的png图片(一张图片为左边聊天泡泡,一个图片为右边的聊天泡泡),可以使用draw9patch.bat工具制作,任何图片导入到drawable中. 2.需要 ...
- android开发 写一个自定义形状的按键
步骤: 1.在drawable 文件夹中创建一个xml布局文件. 2.修改布局文件 3.在需要使用背景的按键中导入布局. 创建布局文件: 修改布局文件: <?xml version=" ...
- android 开发 实现一个带图片Image的ListView
注意:这种实现方法不是实现ListView的最优方法,只是希望通过练习了解ListView的实现原理 思维路线: 1.创建drawable文件夹将要使用的图片导入进去 2.写一个类,用于存放图片ID数 ...
- android 开发 实现一个app的引导页面,使用ViewPager组件(此引导的最后一页的Button会直接写在最后一页布局里,跟随布局滑进滑出)
基本ViewPager组件使用方式与我之前写的https://blog.csdn.net/qq_37217804/article/details/80332634 这篇博客一致. 下面我们将重点详细解 ...
- 2016 校招, Android 开发,一个本科应届的坎坷求职之路(转)
转载出处:http://www.nowcoder.com/discuss/3244?type=2&order=0&pos=1&page=1 和大多数的面经不同,我不是大牛,手头 ...
- [Android Pro] Android开发实践:自定义ViewGroup的onLayout()分析
reference to : http://www.linuxidc.com/Linux/2014-12/110165.htm 前一篇文章主要讲了自定义View为什么要重载onMeasure()方法( ...
- .Net程序猿玩转Android开发---(3)登陆页面布局
这一节我们来看看登陆页面如何布局.对于刚接触到Android开发的童鞋来说.Android的布局感觉比較棘手.须要结合各种属性进行设置,接下来我们由点入面来 了解安卓中页面如何布局,登陆页面非常eas ...
- android 开发 实现一个进入相机拍照后裁剪图片或者进入相册选中裁剪图片的功能
实现思维路径: 以进入相机拍照的思维路线为例子: 1.进入app 2.判断之前是否保存头像,如果有就显示历史图像 (下面代码中在getOldAvatar();方法中执行这个逻辑) 3.点击更换图像的B ...
- android开发 RecyclerView 瀑布列表布局
1.写一个内容的自定义小布局: <?xml version="1.0" encoding="utf-8"?> <LinearLayout xm ...
随机推荐
- Application Request Route实现IIS Server Farms集群负载
首先你装一个web 平台安装程序:https://www.microsoft.com/zh-CN/download/details.aspx?id=6164 安装完之后会出现打开界面,iis中也可找到 ...
- IDEA中使用springBoot+gradle构建多模块项目
https://blog.csdn.net/forMelo/article/details/78995875
- python 计算校验和
校验和是经常使用的,这里简单的列了一个针对按字节计算累加和的代码片段.其实,这种累加和的计算,将字节翻译为无符号整数和带符号整数,结果是一样的. 使用python计算校验和时记住做截断就可以了. 这里 ...
- Sql Server Report Service 的部署问题(Reporting Service 2014為什麼不需要IIS就可以運行)
http://www.cnblogs.com/syfblog/p/4651621.html Sql Server Report Service 的部署问题 近期在研究SSRS部署问题,因为以前也用到过 ...
- Maven Gradle 区别
Maven面临的挑战 软件行业新旧交替的速度之快往往令人咂舌,不用多少时间,你就会发现曾经大红大紫的技术已经成为了昨日黄花,当然,Maven也不会例外.虽然目前它基本上是Java构建的事实标准,但我们 ...
- codeblocks “can't find compiler executable in yourconfigured search ……”
新安装的codeblocks 16.01,安装后打开提示如下,没法用..原因是编译器并没有找对自己安装的 mingw 的安装位置. 解决办法:如下图点击 Auto-detect 之后,会看到位置信息变 ...
- java锁在等待唤醒机制中作用
等待的线程放在线程池wait().notify().notifyall()都使用在同步中,因为要对持有监视器(锁)的线程操作.所以要使用在同步中,因为只有同步才具有锁. 为什么这些操作的线程的方法要定 ...
- 黄聪:PHP发送邮件出现Connection: opening to ssl://的解决办法
PHP.ini文件开启下面2个功能: extension=php_sockets.dll extension=php_openssl.dll
- ssh config配置
使用ssh config文件可以简化ssh连接输入参数,直接从config读取 (1)建立config文件 config文件位置在~/.ssh/config 如果不存在,可以创建一个 (2)confi ...
- 【IIS错误 - HTTP 错误 500.19】HTTP 错误 500.19- Internal Server Error 错误解决方法(一)
刚在本机部署了一个WebService测试,浏览的时候出现了“HTTP 错误 500.19 - Internal Server Error ”错误,如下图: 经过检查发现是由于先安装vs2008后安装 ...