【UNIAPP】接入导航系统完整版
// 查询附近/搜索关键词 <template>
<view> <!--地图容器-->
<map id="myMap" :markers="markers" style="width:100%;height:350px;" :longitude="longitude" :latitude="latitude" scale='16'>
</map> <!-- 输入框 -->
<view class="cu-form-group">
<view class="title">查询地址</view>
<input placeholder="请输入查询地址关键词" name="input" v-model="keyword"></input>
</view> <!-- 搜索 -->
<view class="padding flex flex-direction">
<button class="cu-btn bg-blue margin-tb-sm lg" @click="Search">查询</button>
</view> <!-- 列表 -->
<view class="cu-list menu sm-border card-menu">
<!-- 每行列表 -->
<view class="cu-item" v-for="(value,key) in listData" @click="beat_it(value.lat,value.lng)">
<view class="content padding-tb-sm">
<view>
<image src="../../static/导航.png" style="width: 25px;height: 25px;"></image>
</text>{{ value.title}}
</view>
<view class="text-gray text-sm">
<text class="text-gray" style="margin-left: 4px;">地址:{{ value.address }}</text>
</view>
</view>
<view class="action" @click="check_distance(value.lat,value.lng)">
<image src="../../static/导航执行.png" style="width: 30px;height: 30px;float: right;margin-top: 1px;"></image>
</view>
</view>
<!-- 每行列表 -->
</view> <!-- 模态框 -->
<view>
<u-modal v-model="show" :content="content" show-confirm-button="true" show-cancel-button="true" confirm-text="查看路线"
@confirm="confirm"></u-modal>
</u-modal>
</view> </view>
</template> <script>
// 引入SDK核心类,js文件根据自己业务,位置可自行放置
// var QQMapWX = require('../../js_sdk/wxmp-qqmap/qqmap-wx-jssdk.js');
import QQMapWX from '../../js_sdk/wxmp-qqmap/qqmap-wx-jssdk.js';
export default { data() {
return {
qqmapsdk: "",
longitude: "",
latitude: "",
keyword: "",
distance: "",
listData: [],
show: false,
content: "",
markers: "",
setData: [] }
},
methods: { /* 跳转路线规划 */
confirm() {
uni.navigateTo({
url: '/pages/naviegation/naviegation'
})
}, /* 地图移动点击地址位置 */
beat_it(lat, lon) {
this.latitude = lat
this.longitude = lon
// 储存session
uni.setStorageSync('latitude_end', lat.toString())
uni.setStorageSync('longitude_end', lon.toString())
this.markers = [{
id: 0,
latitude: lat,
longitude: lon,
width: 30,
height: 30,
iconPath: "../../static/naviegation/地图地点.png",
callout: { //可根据需求是否展示经纬度
content: "当前位置",
color: '#FF3300',
display: 'ALWAYS',
fontSize: "20",
},
}, ] }, /* 搜索 */
Search() {
const that = this;
that.listData = []
console.log("Search")
that.qqmapsdk.search({
keyword: that.keyword,
success: function(res) {
// console.log(res)
/* 遍历渲染 */
if (res.status == 0) {
res.data.some((item, i) => { that.listData.push({
id: item.id,
title: item.title,
category: item.category,
address: item.address,
tel: item.tel,
lat: item.location.lat,
lng: item.location.lng
})
})
} },
fail: function(res) {
console.log(res);
},
complete: function(res) {
console.log(res);
}
});
}, /* 位置授权 */
getAuthorizeInfo() {
const that = this;
uni.authorize({
scope: 'scope.userLocation',
success() { // 允许授权
that.getLocationInfo();
},
fail() { // 拒绝授权
that.openConfirm();
console.log("你拒绝了授权,无法获得周边信息")
}
})
}, // 获取地理位置
getLocationInfo() {
const that = this;
uni.getLocation({
type: 'wgs84',
success(res) {
that.latitude = res.latitude
that.longitude = res.longitude
uni.setStorageSync('latitude', res.latitude.toString())
uni.setStorageSync('longitude', res.longitude.toString())
// console.log("地址位置", res);
that.markers = [{
id: 0,
latitude: res.latitude,
longitude: res.longitude,
width: 30,
height: 30,
iconPath: "../../static/naviegation/地图地点.png",
callout: { //可根据需求是否展示经纬度
content: "当前位置",
color: '#FF3300',
display: 'ALWAYS',
fontSize: "20",
},
}, ]
}
});
}, // 再次获取授权
// 当用户第一次拒绝后再次请求授权
openConfirm() {
uni.showModal({
title: '请求授权当前位置',
content: '需要获取您的地理位置,请确认授权',
success: (res) => {
if (res.confirm) {
uni.openSetting(); // 打开地图权限设置
} else if (res.cancel) {
uni.showToast({
title: '你拒绝了授权,无法获得周边信息',
icon: 'none',
duration: 1000
})
}
}
});
}, /* 模态框打开后 计算距离 */
check_distance(lat, lng) {
var _this = this;
//调用距离计算接口
_this.qqmapsdk.calculateDistance({
//mode: 'driving',//可选值:'driving'(驾车)、'walking'(步行),不填默认:'walking',可不填
//from参数不填默认当前地址
//获取表单提交的经纬度并设置from和to参数(示例为string格式)
// from: e.detail.value.start || '', //若起点有数据则采用起点坐标,若为空默认当前地址
// to: e.detail.value.dest, //终点坐标
from: '',
to: lat.toString() + "," + lng.toString(),
success: function(res) { //成功后的回调
// console.log(res);
var res = res.result;
var dis = [];
for (var i = 0; i < res.elements.length; i++) {
dis.push(res.elements[i].distance); //将返回数据存入dis数组,
} _this.distance = dis[0]
// console.log("check_distance", _this.distance)
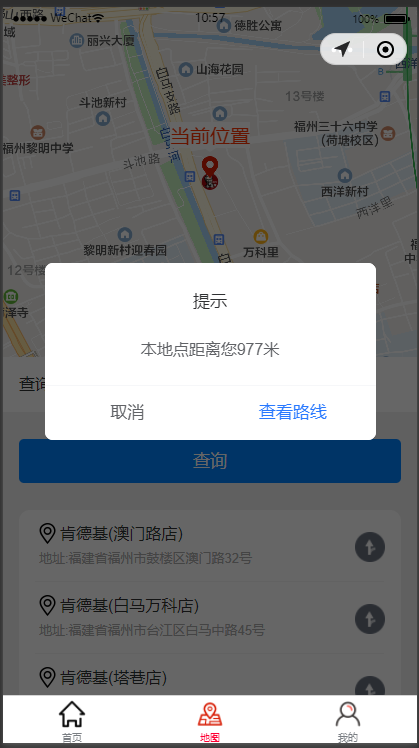
_this.content = "本地点距离您" + _this.distance + "米"
_this.show = true },
fail: function(error) {
console.error(error);
},
complete: function(res) {
console.log(res);
}
});
} }, onLoad() {
console.log("onLoad")
this.qqmapsdk = new QQMapWX({
key: 'U key'
});
this.getAuthorizeInfo();
// this.Search()
}, onPullDownRefresh() { }, onReachBottom() { }, }
</script> <style lang="scss" scoped> </style>
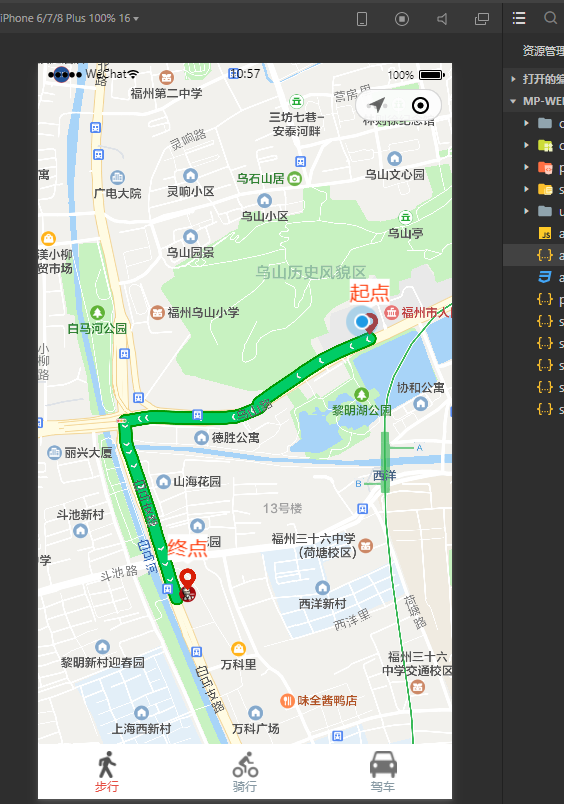
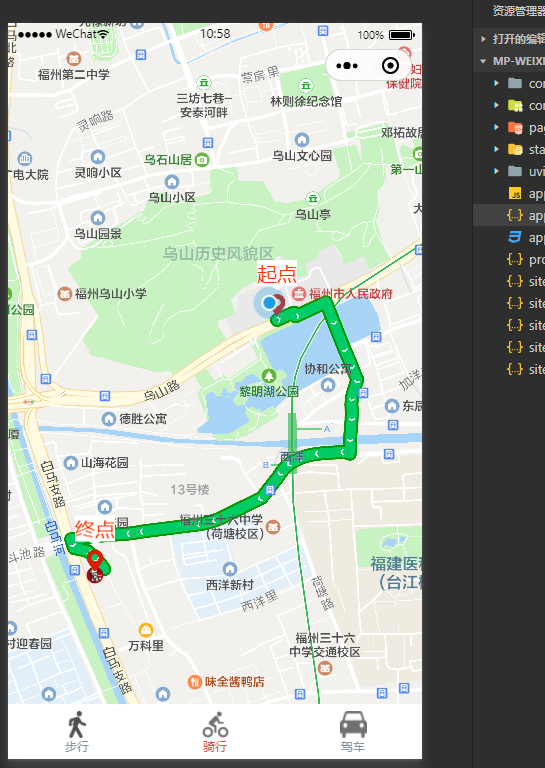
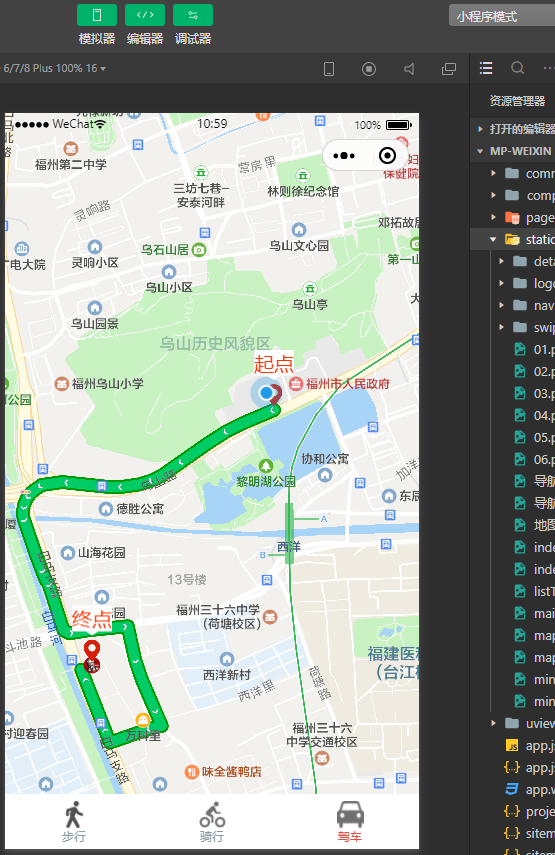
// 导航路线页面/分类步行/骑行/驾车

<template>

    <view>

        <!-- 返回上一页 -->

        <image src="../../static/返回.png" @click="back" style="width: 25px;height: 25px;

        position: absolute;z-index: 99;margin-top: 52rpx;margin-left: 20rpx;"></image>

        <!-- 地图 -->

        <map id="myMap" style="width: 100%; height: 800px" :longitude="longitude" :latitude="latitude" scale='16' :markers="markers"

         :polyline="polyline" show-location>

        </map>

        <!-- 底部 -->

        <view class="box" style="position: absolute;bottom: 0px;width: 100%;">

            <view class="cu-bar tabbar bg-white">

                <view class="action" @click="walking">

                    <view class="cuIcon-cu-image">

                        <image src="../../static/naviegation/步行.png"></image>

                    </view>

                    <view :class="{'text-red':walkingisActive,'text-grey':walkingisError}">步行</view>

                </view>

                <view class="action" @click="bicycling">

                    <view class="cuIcon-cu-image" >

                        <image src="../../static/naviegation/骑行.png"></image>

                    </view>

                    <view :class="{'text-red':bicyclingisActive,'text-grey':bicyclingisError}">骑行</view>

                </view>

                <view class="action"  @click="driving">

                    <view class="cuIcon-cu-image">

                        <image src="../../static/naviegation/驾车.png"></image>

                    </view>

                    <view :class="{'text-red':drivingisActive,'text-grey':drivingisError}">驾车</view>

                </view>

            </view>

        </view>

    </view>

</template>

<script>

    // 引入SDK核心类,js文件根据自己业务,位置可自行放置

    // var QQMapWX = require('../../js_sdk/wxmp-qqmap/qqmap-wx-jssdk.js');

    import QQMapWX from '../../js_sdk/wxmp-qqmap/qqmap-wx-jssdk.js';

    export default {

        data() {

            return {

                longitude: "",

                latitude: "",

                longitude_end: "",

                latitude_end: "",

                mode:"walking",

                polyline: "",

                qqmapsdk: "",

                markers: [],

                /* 图标 */

                walkingisActive:true,

                walkingisError:false,

                bicyclingisActive:false,

                bicyclingisError:true,

                drivingisActive:false,

                drivingisError:true,

            }

        },

        onLoad() {

            // console.log("onLoad")

            this.qqmapsdk = new QQMapWX({

                key: 'U key'

            });

            this.latitude_end = uni.getStorageSync('latitude_end')

            this.longitude_end = uni.getStorageSync('longitude_end')

            this.latitude = uni.getStorageSync('latitude')

            this.longitude = uni.getStorageSync('longitude')

            this.getAuthorizeInfo();

            this.daohang()

        },

        methods: {

            /* 返回 */

            back(){

                console.log("back")

                uni.navigateBack({

                })

            },

            /* 路线类型 */

            walking(){

                this.mode = "walking";

                this.daohang();

            },

            bicycling(){

                this.mode = "bicycling";

                this.daohang();

                this.walkingisActive=false;

                this.walkingisError=true;

                this.bicyclingisActive=true;

                this.bicyclingisError=false;

                this.drivingisActive=false;

                this.drivingisError=true;

            },

            driving(){

                this.mode = "driving";

                this.daohang();

                this.walkingisActive=false;

                this.walkingisError=true;

                this.bicyclingisActive=false;

                this.bicyclingisError=true;

                this.drivingisActive=true;

                this.drivingisError=false;

            },

            /* 位置授权 */

            getAuthorizeInfo() {

                const that = this;

                uni.authorize({

                    scope: 'scope.userLocation',

                    success() { // 允许授权

                        that.getLocationInfo();

                    },

                    fail() { // 拒绝授权

                        that.openConfirm();

                        console.log("你拒绝了授权,无法获得周边信息")

                    }

                })

            },

            // 获取地理位置

            getLocationInfo() {

                const that = this;

                uni.getLocation({

                    type: 'wgs84',

                    success(res) {

                        that.latitude = res.latitude

                        that.longitude = res.longitude

                        // console.log("地址位置", res);

                    }

                });

            },

            // 再次获取授权

            // 当用户第一次拒绝后再次请求授权

            openConfirm() {

                uni.showModal({

                    title: '请求授权当前位置',

                    content: '需要获取您的地理位置,请确认授权',

                    success: (res) => {

                        if (res.confirm) {

                            uni.openSetting(); // 打开地图权限设置

                        } else if (res.cancel) {

                            uni.showToast({

                                title: '你拒绝了授权,无法获得周边信息',

                                icon: 'none',

                                duration: 1000

                            })

                        }

                    }

                });

            },

            /* 路线规划 */

            daohang() {

                const that = this;

                // console.log("目标位置",uni.getStorageSync('latitude_end') + "," + uni.getStorageSync('longitude_end'))

                // console.log("起点位置",that.latitude.toString() + "," + that.longitude.toString())

                //调用距离计算接口

                that.qqmapsdk.direction({

                    mode: that.mode, //可选值:'driving'(驾车)、'walking'(步行)、'bicycling'(骑行),不填默认:'driving',可不填

                    //from参数不填默认当前地址

                    from: that.latitude.toString() + "," + that.longitude.toString(),

                    to: uni.getStorageSync('latitude_end') + "," + uni.getStorageSync('longitude_end'),

                    success: function(res) {

                        var ret = res;

                        var coors = ret.result.routes[0].polyline,

                            pl = [];

                        //坐标解压(返回的点串坐标,通过前向差分进行压缩)

                        var kr = 1000000;

                        for (var i = 2; i < coors.length; i++) {

                            coors[i] = Number(coors[i - 2]) + Number(coors[i]) / kr;

                        }

                        //将解压后的坐标放入点串数组pl中

                        for (var i = 0; i < coors.length; i += 2) {

                            pl.push({

                                latitude: coors[i],

                                longitude: coors[i + 1]

                            })

                        }

                        // console.log(pl)

                        // 设置polyline属性,将路线显示出来,将解压坐标第一个数据作为起点

                        that.latitude = pl[0].latitude,

                            that.longitude = pl[0].longitude,

                            that.polyline = [{

                                points: pl,

                                color: "#00CC66", //线条的颜色

                                borderColor:"#009900",

                                width: 10, //宽度

                                arrowLine: true, //是否带箭头

                                borderWidth: 2 ,//线的边框宽度,还有很多参数,请看文档

                            }]

                        that.markers = [{

                                id: 0,

                                latitude: that.latitude,

                                longitude: that.longitude,

                                width: 30,

                                height: 30,

                                iconPath:"../../static/naviegation/地图地点.png",

                                callout: { //可根据需求是否展示经纬度

                                    content: "起点",

                                    color: '#FF3300',

                                    display: 'ALWAYS',

                                    fontSize: "20",

                                },

                            }, {

                                id: 1,

                                latitude: that.latitude_end,

                                longitude: that.longitude_end,

                                width: 30,

                                height: 30,

                                iconPath:"../../static/naviegation/地图地点.png",

                                callout: { //可根据需求是否展示经纬度

                                    content: "终点",

                                    color: '#FF3300',

                                    display: 'ALWAYS',

                                    fontSize: "20",

                                },

                            },

                        ]

                    },

                    fail: function(error) {

                        console.error(error);

                    },

                    complete: function(res) {

                        console.log(res);

                    }

                });

            }

        },

    }

</script>

<style>

</style>
效果图:

【UNIAPP】接入导航系统完整版的更多相关文章
- 如何安全的将VMware vCenter Server使用的SQL Server Express数据库平滑升级到完整版
背景: 由于建设初期使用的vSphere vCenter for Windows版,其中安装自动化过程中会使用SQL Server Express的免费版数据库进行基础环境构建.而此时随着业务量的增加 ...
- Android版的菜谱客户端应用源码完整版
Android版的菜谱客户端应用源码完整版,这个文章是从安卓教程网转载过来的,不是本人的原创,希望能够帮到大家的学习吧. <ignore_js_op> 152936qc7jdnv6vo0c ...
- sed实例精解--例说sed完整版
原文地址:sed实例精解--例说sed完整版 作者:xiaozhenggang 最近在学习shell,怕学了后面忘了前面的就把学习和实验的过程记录下来了.这里是关于sed的,前面有三四篇分开的,现在都 ...
- flexbox-CSS3弹性盒模型flexbox完整版教程
原文链接:http://caibaojian.com/flexbox-guide.html flexbox-CSS3弹性盒模型flexbox完整版教程 A-A+ 前端博客•2014-05-08•前端开 ...
- 转贴 IT外企那点儿事完整版
转贴 IT外企那点儿事完整版 第一章:外企也就那么回儿事(http://www.cnblogs.com/forfuture1978/archive/2010/04/30/1725341.html) 1 ...
- C#.Net 上传图片,限制图片大小,检查类型完整版
C#.Net 上传图片,限制图片大小,检查类型完整版 源代码: 处理图片类,如检查图片大小,按宽度比例缩小图片 public class CImageLibrary{ public enum Va ...
- office2016 软件全集 官方下载免费完整版(含破解文件)不含垃圾软件 win10完美激活
office2016官方下载免费完整版是新一代办公软件,office2016官方下载免费完整版已经分享到下面,office2016官方下载免费完整版包括了Word.Excel.PowerPoint.O ...
- 老王Python培训视频教程(价值500元)【基础进阶项目篇 – 完整版】
老王Python培训视频教程(价值500元)[基础进阶项目篇 – 完整版] 教学大纲python基础篇1-25课时1.虚拟机安装ubuntu开发环境,第一个程序:hello python! (配置开发 ...
- thinkPHP3.2.3完整版 在sae上面的部署
第一步: thinkPHP3.2.3完整版,目录结构如下 第二步:在新浪sae上面创建一个新应用 第三步:用svn down,下来会有两个文件:index.php.config.ya ...
随机推荐
- 关于ABAP和JSON互相转换
关于ABAP数据结构和JSON格式转换,需要用到标准的类/UI2/CL_JSON一下两个方法, DESERIALIZE是把JSON格式转换成ABAP数据结构,SERIALIZE是把ABAP数据结构转换 ...
- 用Python写个开心消消乐小游戏
本文的文字及图片来源于网络,仅供学习.交流使用,不具有任何商业用途,如有问题请及时联系我们以作处理 提到开心消消乐这款小游戏,相信大家都不陌生,其曾在 2015 年获得过玩家最喜爱的移动单机游戏奖,受 ...
- Python常用内置对象
1.在python中处理的一切都是对象. 2.内置对象可直接使用,如数字.字符串.列表.del等. 3.非内置对象需要导入模块才能使用,如正弦函数sin(x),随机数产生函数random()等.
- python初学者-使用for循环做一个九九乘法表
for i in range(1, 10): for j in range(1, i + 1): print(j, '*', i, '=', i * j, end=" ") #en ...
- Java通过IO流输出文件目录
//通过IO流输出文件目录,不同级的目录之间用*间隔 1 package com.fjnu.io; 2 3 import java.io.File; 4 5 public class dicOut { ...
- CODING 静态网站服务升级,快速、稳定、高拓展!
CODING 静态网站拥有强大的页面托管服务,目前已有数万开发者.设计师.产品经理.团队与企业使用 CODING 静态网站托管了他(她)们的个人网站.博客.企业与产品官网.在线文档等.CODING 静 ...
- [leetcode] Add to List 74. Search a 2D Matrix
/** * Created by lvhao on 2017/8/1. * Write an efficient algorithm that searches for a value in an m ...
- 使用sqlmap
实验环境要求: 1.安装win7或win10的笔记本或PC电脑一台,硬盘100GB,内存8GB 2.安装VMware Workstation 14以上 总体目标:基于centos7搭建dvwa web ...
- js相关语法知识
alert(); 页面弹窗 <input plactholder="请输入密码"/>(隐藏字体效果)js对数据类型不敏感,与Java相似1.js变量定义符:var2.j ...
- 自动化运维工具-Ansible之1-基础
自动化运维工具-Ansible之1-基础 目录 自动化运维工具-Ansible之1-基础 Ansible 基本概述 定义 特点 架构 工作原理 任务执行模式 命令执行过程 Ansible 安装 Ans ...