android之使用GridView+仿微信图片上传功能
前言:如果转载文章请声明转载自:https://i.cnblogs.com/EditPosts.aspx?postid=7419021 。另外针对有些网站转载本人的文章结果源码链接不对的问题,本人在此附上源码地址:http://download.csdn.net/download/m0_38125535/9951649。如果您是在其它技术网站看到的这篇文章,发现链接网页显示的是404,请按照本人上面留下的地址下载源码,因为CSDN不知怎么回事无法设置0积分下载,所以只能设置最低1积分,给各位带来的不便请见谅。另外这个方法中存在一个bug,具体bug以及bug的解决方案请参考下面评论区本人的说明。
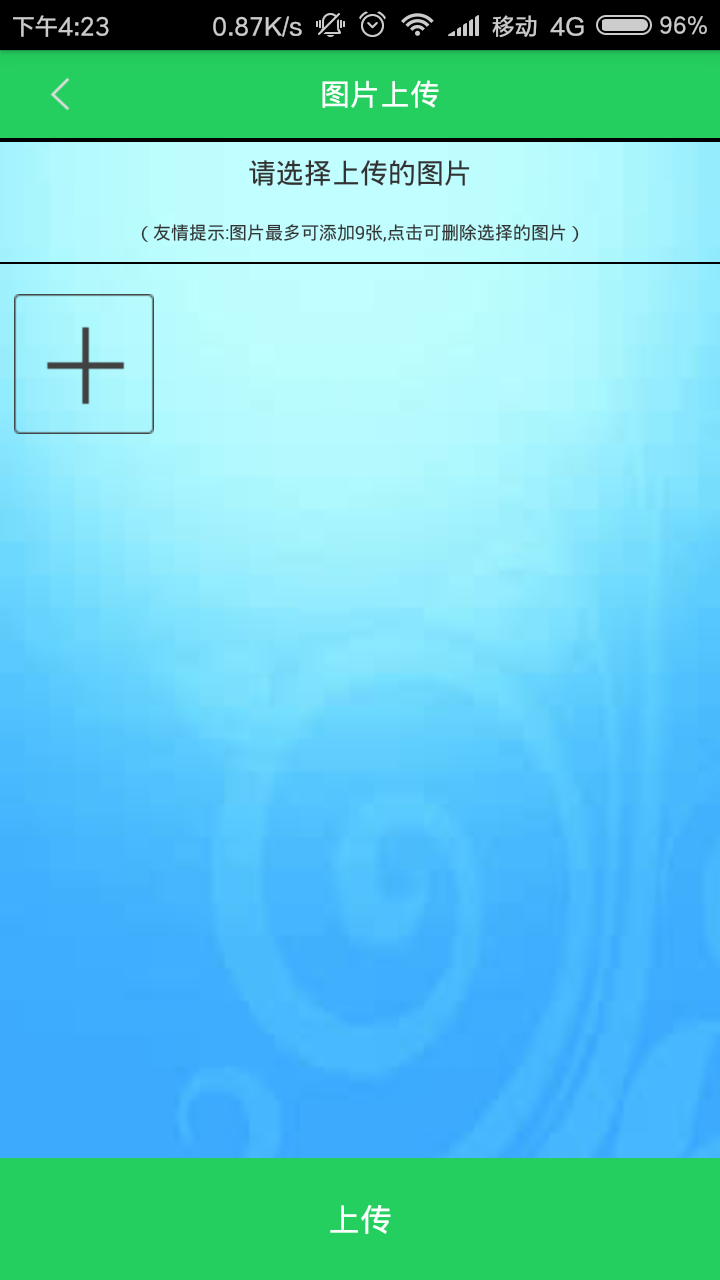
由于工作要求最近在使用GridView完成图片的批量上传功能,我的例子当中包含仿微信图片上传、拍照、本地选择、相片裁剪等功能,如果有需要的朋友可以看一下,希望我的实际经验能对您有所帮助。
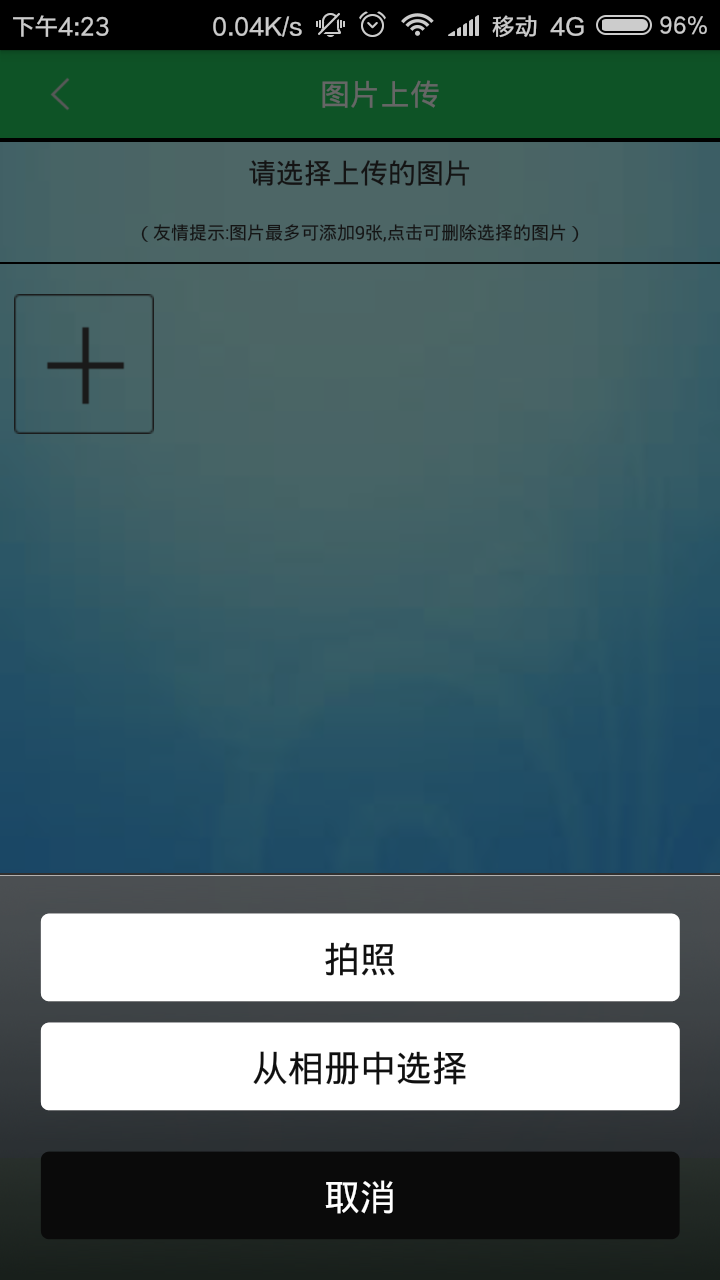
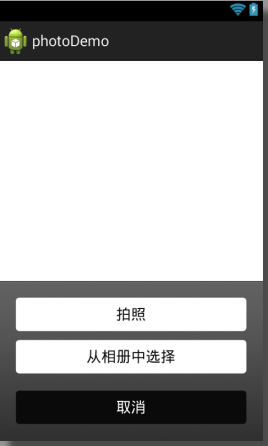
直接上图,下面的图片就是点击“加号”后弹出的对话框,通过对话框可以根据自己需求进行相片选择。


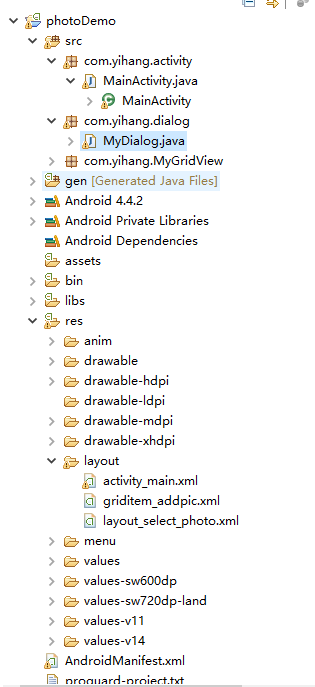
项目结构:

下面直接上代码。
整体的布局文件activity_main.xml
 <LinearLayout xmlns:android="http://schemas.android.com/apk/res/android"

     xmlns:tools="http://schemas.android.com/tools"

     android:layout_width="match_parent"

     android:layout_height="match_parent"

     android:background="@drawable/index"

     android:orientation="vertical" >

     <LinearLayout

         android:layout_width="match_parent"

         android:layout_height="44dp"

         android:background="#24cf5f"

         android:orientation="horizontal" >

         <ImageView

             android:id="@+id/back"

             android:layout_width="match_parent"

             android:layout_height="20dp"

             android:layout_gravity="center"

             android:layout_weight="5"

             android:src="@drawable/back" />

         <TextView

             android:layout_width="fill_parent"

             android:layout_height="44dp"

             android:layout_weight="1"

             android:gravity="center"

             android:paddingRight="40dp"

             android:text="图片上传"

             android:textColor="#FFFFFF"

             android:textSize="30px" />

     </LinearLayout>

     <LinearLayout

         android:layout_width="match_parent"

         android:layout_height="1dp"

         android:background="#000000" />

     <ScrollView

         android:layout_width="match_parent"

         android:layout_height="match_parent"

         android:layout_weight="1" >

         <LinearLayout

             android:layout_width="match_parent"

             android:layout_height="match_parent"

             android:orientation="vertical" >

             <LinearLayout

                 android:layout_width="match_parent"

                 android:layout_height="1dp"

                 android:background="#000000" />

             <LinearLayout

                 android:layout_width="match_parent"

                 android:layout_height="60dp"

                 android:layout_weight="1"

                 android:orientation="vertical" >

                 <TextView

                     android:layout_width="match_parent"

                     android:layout_height="match_parent"

                     android:layout_weight="1"

                     android:gravity="center"

                     android:text="请选择上传的图片" />

                 <TextView

                     android:layout_width="match_parent"

                     android:layout_height="match_parent"

                     android:layout_weight="1"

                     android:gravity="center"

                     android:text="(友情提示:图片最多可添加9张,点击可删除选择的图片)"

                     android:textSize="18px" />

             </LinearLayout>

             <LinearLayout

                 android:layout_width="match_parent"

                 android:layout_height="1dp"

                 android:background="#000000" />

             <LinearLayout

                 android:layout_width="match_parent"

                 android:layout_height="match_parent"

                 android:layout_weight="1" >

                 <com.yihang.MyGridView.MyGridView

                     android:id="@+id/gridView"

                     android:layout_width="match_parent"

                     android:layout_height="wrap_content"

                     android:layout_margin="5dp"

                     android:layout_weight="111"

                     android:columnWidth="90dp"

                     android:gravity="center"

                     android:horizontalSpacing="5dp"

                     android:numColumns="4"

                     android:stretchMode="columnWidth"

                     android:verticalSpacing="5dp" />

             </LinearLayout>

         </LinearLayout>

     </ScrollView>

     <Button

         android:id="@+id/bt_submit"

         android:layout_width="match_parent"

         android:layout_height="match_parent"

         android:layout_gravity="bottom"

         android:layout_weight="5.2"

         android:background="#24cf5f"

         android:text="上传"

         android:textColor="#FFFFFF"

         android:textSize="16sp" />

 </LinearLayout>
activity:MainActivity
package com.yihang.activity;

import java.io.ByteArrayOutputStream;

import java.io.File;

import java.util.ArrayList;

import java.util.HashMap;

import android.app.Activity;

import android.app.AlertDialog;

import android.app.AlertDialog.Builder;

import android.content.DialogInterface;

import android.content.Intent;

import android.content.pm.ActivityInfo;

import android.graphics.Bitmap;

import android.graphics.BitmapFactory;

import android.net.Uri;

import android.os.Bundle;

import android.os.Environment;

import android.provider.MediaStore;

import android.text.TextUtils;

import android.view.LayoutInflater;

import android.view.View;

import android.view.Window;

import android.view.WindowManager;

import android.widget.AdapterView;

import android.widget.AdapterView.OnItemClickListener;

import android.widget.GridView;

import android.widget.ImageView;

import android.widget.SimpleAdapter;

import android.widget.SimpleAdapter.ViewBinder;

import android.widget.Toast;

import com.yihang.dialog.MyDialog;

import com.yihang.dialog.MyDialog.OnButtonClickListener;

import com.yihang.photodemo.R;

public class MainActivity extends Activity implements

OnButtonClickListener, OnItemClickListener{

    private MyDialog dialog;// 图片选择对话框

    public static final int NONE = 0;

    public static final int PHOTOHRAPH = 1;// 拍照

    public static final int PHOTOZOOM = 2; // 缩放

    public static final int PHOTORESOULT = 3;// 结果

    public static final String IMAGE_UNSPECIFIED = "image/*";

    private GridView gridView; // 网格显示缩略图

    private final int IMAGE_OPEN = 4; // 打开图片标记

    private String pathImage; // 选择图片路径

    private Bitmap bmp; // 导入临时图片

    private ArrayList<HashMap<String, Object>> imageItem;

    private SimpleAdapter simpleAdapter; // 适配器

    @Override

    protected void onCreate(Bundle savedInstanceState) {

        super.onCreate(savedInstanceState);

        requestWindowFeature(Window.FEATURE_NO_TITLE);

        /*

         * 防止键盘挡住输入框 不希望遮挡设置activity属性 android:windowSoftInputMode="adjustPan"

         * 希望动态调整高度 android:windowSoftInputMode="adjustResize"

         */

        getWindow().setSoftInputMode(

                WindowManager.LayoutParams.SOFT_INPUT_ADJUST_PAN);

        // 锁定屏幕

        setRequestedOrientation(ActivityInfo.SCREEN_ORIENTATION_PORTRAIT);

        setContentView(R.layout.activity_main);

        init();

        initData();

    }

    private void init() {

        gridView = (GridView) findViewById(R.id.gridView);

        gridView.setOnItemClickListener(this);

        dialog = new MyDialog(this);

        dialog.setOnButtonClickListener(this);

        // activity中调用其他activity中组件的方法

        LayoutInflater layout = this.getLayoutInflater();

        View view = layout.inflate(R.layout.layout_select_photo, null);

    }

    private void initData() {

        /*

         * 载入默认图片添加图片加号

         */

        bmp = BitmapFactory.decodeResource(getResources(),

                R.drawable.gridview_addpic); // 加号

        imageItem = new ArrayList<HashMap<String, Object>>();

        HashMap<String, Object> map = new HashMap<String, Object>();

        map.put("itemImage", bmp);

        imageItem.add(map);

        simpleAdapter = new SimpleAdapter(this, imageItem,

                R.layout.griditem_addpic, new String[] { "itemImage" },

                new int[] { R.id.imageView1 });

        simpleAdapter.setViewBinder(new ViewBinder() {

            @Override

            public boolean setViewValue(View view, Object data,

                    String textRepresentation) {

                // TODO Auto-generated method stub

                if (view instanceof ImageView && data instanceof Bitmap) {

                    ImageView i = (ImageView) view;

                    i.setImageBitmap((Bitmap) data);

                    return true;

                }

                return false;

            }

        });

        gridView.setAdapter(simpleAdapter);

    }

    @Override

    public void camera() {

        // TODO Auto-generated method stub

        Intent intent = new Intent(MediaStore.ACTION_IMAGE_CAPTURE);

        intent.putExtra(MediaStore.EXTRA_OUTPUT, Uri.fromFile(new File(

                Environment.getExternalStorageDirectory(), "temp.jpg")));

        startActivityForResult(intent, PHOTOHRAPH);

    }

    @Override

    public void gallery() {

        // TODO Auto-generated method stub

        Intent intent = new Intent(Intent.ACTION_PICK,

                android.provider.MediaStore.Images.Media.EXTERNAL_CONTENT_URI);

        startActivityForResult(intent, IMAGE_OPEN);

    }

    @Override

    public void cancel() {

        // TODO Auto-generated method stub

        dialog.cancel();

    }

    @Override

    protected void onActivityResult(int requestCode, int resultCode, Intent data) {

        // TODO Auto-generated method stub

        super.onActivityResult(requestCode, resultCode, data);

        if (resultCode == NONE)

            return;

        // 拍照

        if (requestCode == PHOTOHRAPH) {

            // 设置文件保存路径这里放在跟目录下

            File picture = new File(Environment.getExternalStorageDirectory()

                    + "/temp.jpg");

            startPhotoZoom(Uri.fromFile(picture));

        }

        if (data == null)

            return;

        // 处理结果

        if (requestCode == PHOTORESOULT) {

            Bundle extras = data.getExtras();

            if (extras != null) {

                Bitmap photo = extras.getParcelable("data");

                ByteArrayOutputStream stream = new ByteArrayOutputStream();

                photo.compress(Bitmap.CompressFormat.JPEG, 75, stream);// (0-100)压缩文件

                // 将图片放入gridview中

                HashMap<String, Object> map = new HashMap<String, Object>();

                map.put("itemImage", photo);

                imageItem.add(map);

                simpleAdapter = new SimpleAdapter(this, imageItem,

                        R.layout.griditem_addpic, new String[] { "itemImage" },

                        new int[] { R.id.imageView1 });

                simpleAdapter.setViewBinder(new ViewBinder() {

                    @Override

                    public boolean setViewValue(View view, Object data,

                            String textRepresentation) {

                        // TODO Auto-generated method stub

                        if (view instanceof ImageView && data instanceof Bitmap) {

                            ImageView i = (ImageView) view;

                            i.setImageBitmap((Bitmap) data);

                            return true;

                        }

                        return false;

                    }

                });

                gridView.setAdapter(simpleAdapter);

                simpleAdapter.notifyDataSetChanged();

                dialog.dismiss();

            }

        }

        // 打开图片

        if (resultCode == RESULT_OK && requestCode == IMAGE_OPEN) {

            startPhotoZoom(data.getData());

        }

        super.onActivityResult(requestCode, resultCode, data);

    }

    @Override

    protected void onResume() {

        // TODO Auto-generated method stub

        super.onResume();

        if (!TextUtils.isEmpty(pathImage)) {

            Bitmap addbmp = BitmapFactory.decodeFile(pathImage);

            HashMap<String, Object> map = new HashMap<String, Object>();

            map.put("itemImage", addbmp);

            imageItem.add(map);

            simpleAdapter = new SimpleAdapter(this, imageItem,

                    R.layout.griditem_addpic, new String[] { "itemImage" },

                    new int[] { R.id.imageView1 });

            simpleAdapter.setViewBinder(new ViewBinder() {

                @Override

                public boolean setViewValue(View view, Object data,

                        String textRepresentation) {

                    // TODO Auto-generated method stub

                    if (view instanceof ImageView && data instanceof Bitmap) {

                        ImageView i = (ImageView) view;

                        i.setImageBitmap((Bitmap) data);

                        return true;

                    }

                    return false;

                }

            });

            gridView.setAdapter(simpleAdapter);

            simpleAdapter.notifyDataSetChanged();

            // 刷新后释放防止手机休眠后自动添加

            pathImage = null;

            dialog.dismiss();

        }

    }

    @Override

    public void onItemClick(AdapterView<?> parent, View v, int position, long id) {

        // TODO Auto-generated method stub

        if (imageItem.size() == 10) { // 第一张为默认图片

            Toast.makeText(MainActivity.this, "图片数9张已满",

                    Toast.LENGTH_SHORT).show();

        } else if (position == 0) { // 点击图片位置为+ 0对应0张图片

            // 选择图片

            dialog.show();

            // 通过onResume()刷新数据

        } else {

            dialog(position);

        }

    }

    /*

     * Dialog对话框提示用户删除操作 position为删除图片位置

     */

    protected void dialog(final int position) {

        AlertDialog.Builder builder = new Builder(MainActivity.this);

        builder.setMessage("确认移除已添加图片吗?");

        builder.setTitle("提示");

        builder.setPositiveButton("确认", new DialogInterface.OnClickListener() {

            @Override

            public void onClick(DialogInterface dialog, int which) {

                dialog.dismiss();

                imageItem.remove(position);

                simpleAdapter.notifyDataSetChanged();

            }

        });

        builder.setNegativeButton("取消", new DialogInterface.OnClickListener() {

            @Override

            public void onClick(DialogInterface dialog, int which) {

                dialog.dismiss();

            }

        });

        builder.create().show();

    }

    public void startPhotoZoom(Uri uri) {

        Intent intent = new Intent("com.android.camera.action.CROP");

        intent.setDataAndType(uri, IMAGE_UNSPECIFIED);

        intent.putExtra("crop", "true");

        // aspectX aspectY 是宽高的比例

        intent.putExtra("aspectX", 1);

        intent.putExtra("aspectY", 1);

        // outputX outputY 是裁剪图片宽高

        intent.putExtra("outputX", 64);

        intent.putExtra("outputY", 64);

        intent.putExtra("return-data", true);

        startActivityForResult(intent, PHOTORESOULT);

    }

}
弹出的对话框(仿照微信来完成):MyDialog
 package com.yihang.dialog;

 import com.yihang.photodemo.R;

 import android.app.Dialog;

 import android.content.Context;

 import android.view.Gravity;

 import android.view.View;

 import android.view.ViewGroup;

 import android.view.Window;

 import android.view.View.OnClickListener;

 /**

  * 对话框实现类

  * @author admin

  *

  */

 public class MyDialog extends Dialog implements OnClickListener {

     public MyDialog(Context context) {

         super(context,R.style.myDialog);

         //初始化布局

                 setContentView(R.layout.layout_select_photo);

                 Window dialogWindow = getWindow();

                 dialogWindow.setLayout(ViewGroup.LayoutParams.FILL_PARENT, ViewGroup.LayoutParams.WRAP_CONTENT);

                 dialogWindow.setGravity(Gravity.BOTTOM);

                 setCanceledOnTouchOutside(true);

                 findViewById(R.id.btn_camera).setOnClickListener(this);

                 findViewById(R.id.btn_gallery).setOnClickListener(this);

                 findViewById(R.id.btn_cancel).setOnClickListener(this);

     }

     @Override

     public void onClick(View v) {

         // TODO Auto-generated method stub

         switch (v.getId()) {

         case R.id.btn_camera:

             onButtonClickListener.camera();

             break;

         case R.id.btn_gallery:

             onButtonClickListener.gallery();

             break;

         case R.id.btn_cancel:

             onButtonClickListener.cancel();

             break;

         default:

             break;

         }

     }

     /**

      * 按钮的监听器

      * @author Orathee

      * @date 2014年3月20日 下午4:28:39

      */

     public interface OnButtonClickListener{

         void camera();

         void gallery();

         void cancel();

     }

     private OnButtonClickListener onButtonClickListener;

     public OnButtonClickListener getOnButtonClickListener() {

         return onButtonClickListener;

     }

     public void setOnButtonClickListener(OnButtonClickListener onButtonClickListener) {

         this.onButtonClickListener = onButtonClickListener;

     }

 }
对话框的布局文件:layout_select_photo.xml
<LinearLayout xmlns:android="http://schemas.android.com/apk/res/android"

    android:layout_width="fill_parent"

    android:layout_height="fill_parent"

    android:gravity="bottom">

    <LinearLayout

        android:layout_width="fill_parent"

        android:layout_height="wrap_content"

        android:orientation="vertical"

        android:background="@drawable/btn_style_alert_dialog_background"

        android:padding="20dp">

            <TextView

                android:id="@+id/btn_camera"

                android:layout_width="fill_parent"

                android:layout_height="wrap_content"

                android:textSize="18sp"

                android:background="@drawable/btn_style_alert_dialog_button"

                android:textColor="#0f0f0f"

                android:text="拍照"

                android:shadowDx="0.5"

                android:shadowDy="0.5"

                android:shadowRadius="0.5"

                android:shadowColor="#ffffff"

                android:layout_marginBottom="10dp"

                android:padding="10dp"

                android:gravity="center"/>

            <TextView

                android:id="@+id/btn_gallery"

                android:layout_width="fill_parent"

                android:layout_height="wrap_content"

                android:textSize="18sp"

                android:background="@drawable/btn_style_alert_dialog_button"

                android:textColor="#0f0f0f"

                android:text="从相册中选择"

                android:shadowDx="0.5"

                android:shadowDy="0.5"

                android:shadowRadius="0.5"

                android:shadowColor="#ffffff"

                android:layout_marginBottom="10dp"

                android:padding="10dp"

                android:gravity="center"/>

            <TextView

                android:id="@+id/btn_cancel"

                android:layout_width="fill_parent"

                android:layout_height="wrap_content"

                android:background="@drawable/btn_style_alert_dialog_cancel"

                android:textColor="#ffffff"

                android:textSize="18sp"

                android:text="取消"

                android:shadowDx="0.5"

                android:shadowDy="0.5"

                android:shadowRadius="0.5"

                android:shadowColor="#000000"

                android:layout_marginTop="10dp"

                android:padding="10dp"

                android:gravity="center"/>

    </LinearLayout>

</LinearLayout>
自定义的GridView:
 package com.yihang.MyGridView;

 import android.content.Context;

 import android.util.AttributeSet;

 import android.widget.GridView;

 public class MyGridView extends GridView {

     public MyGridView(Context context, AttributeSet attrs) {

         super(context, attrs);

         // TODO Auto-generated constructor stub

     }

     public MyGridView(Context context) {

         super(context);

     }

     public MyGridView(Context context, AttributeSet attrs, int defStyle) {

         super(context);

     }

     @Override

     protected void onMeasure(int widthMeasureSpec, int heightMeasureSpec) {

         // TODO Auto-generated method stub

         int expandSpec = MeasureSpec.makeMeasureSpec(Integer.MAX_VALUE >> 2,

                 MeasureSpec.AT_MOST);

         super.onMeasure(widthMeasureSpec, expandSpec);

     }

 }
源代码下载地址:http://download.csdn.net/download/m0_38125535/9951649
android之使用GridView+仿微信图片上传功能的更多相关文章
- Android开发之使用GridView+仿微信图片上传功能(附源代码)
前言:如果转载文章请声明转载自:https://i.cnblogs.com/EditPosts.aspx?postid=7419021 .另外针对有些网站转载本人的文章结果源码链接不对的问题,本人在 ...
- Android 使用GridView+仿微信图片上传功能(附源代码)
由于工作要求最近在使用GridView完成图片的批量上传功能,我的例子当中包含仿微信图片上传.拍照.本地选择.相片裁剪等功能,如果有需要的朋友可以看一下,希望我的实际经验能对您有所帮助. 直接上图,下 ...
- Android仿微信图片上传,可以选择多张图片,缩放预览,拍照上传等
仿照微信,朋友圈分享图片功能 .可以进行图片的多张选择,拍照添加图片,以及进行图片的预览,预览时可以进行缩放,并且可以删除选中状态的图片 .很不错的源码,大家有需要可以下载看看 . 微信 微信 微信 ...
- jssdk微信图片上传功能
/*wx.config({ debug: false, appId: data.appid, timestamp: data.timestamp, nonceStr: data.nonceStr, s ...
- 微信图片上传,遇到一个神奇的jgp
微信图片上传,获取图片base64遇到一个神奇的 jgp var imgFn = function (event) { event.preventDefault(); var id = '#'+$ ...
- Android自己定义动态布局 — 多图片上传
Android自己定义动态布局 - 多图片上传 本文介绍Android中动态布局加入图片,多图片上传. 项目中效果图: watermark/2/text/aHR0cDovL2Jsb2cuY3Nkbi5 ...
- 前端丨如何使用 tcb-js-sdk 实现图片上传功能
前言 tcb-js-sdk 让开发者可以在网页端使用 JavaScript 代码服务访问云开发的服务,以轻松构建自己的公众号页面或者独立的网站等 Web 服务.本文将以实现图片上传功能为例,介绍 tc ...
- thinkphp达到UploadFile.class.php图片上传功能
片上传在站点里是非经常常使用的功能.ThinkPHP里也有自带的图片上传类(UploadFile.class.php) 和图片模型类(Image.class.php).方便于我们去实现图片上传功能,以 ...
- Spring+SpringMVC+MyBatis+easyUI整合优化篇(七)图片上传功能
日常啰嗦 前一篇文章<Spring+SpringMVC+MyBatis+easyUI整合优化篇(六)easyUI与富文本编辑器UEditor整合>讲了富文本编辑器UEditor的整合与使用 ...
随机推荐
- 快速学习springMVC框架原理
一.通过导图的方法快速去理解springmvc的原理 二.架构流程. 1. 用户发送请求至前端控制器DispatcherServlet 2. DispatcherServlet收到请求调用Handle ...
- eclipse 常用快捷键 及 windows快捷键
Eclipse常用快捷键 打开Eclipse快捷键的快捷键 Ctrl+Shift+L 快捷键 描述 原英文描述 Ctrl+Shift+P 定位到光标所在处的括号的另一半括号的位置 Go to Matc ...
- JavaWeb 后端 <七> 之 mvc3层架构
- wifi扩展设置
一.主路由器设置 网络参数 LAN口设置查到 MAC地址,用于设置扩展路由器 Bridge功能设置时 AP1的地址 2.无线基本设置,桥的 SSID BSSID 为扩展 3.无线安全设置 二.扩展路由 ...
- Oracle中的游标的原理和使用详解
游标的简介 逐行处理查询结果,以编程的方式访问数据. 游标的类型: 1,隐式游标:在 PL/SQL 程序中执行DML SQL 语句时自动创建隐式游标,名字固定叫sql. 2,显式游标:显式游标用于处理 ...
- 真实记录我入门学习Linux系统的经历
我本身来说并不是计算机专业的学生,因此今天来谈及这个话题,对大家来说,有了更多的客观公正性.对我而言,linux给我最大的财富,并不是编程能力提高了多少,而是视野的开阔.心态的转变和自学能力的提高.我 ...
- Ubuntu安装桌面环境
1.安装Ubuntu默认的Gnome桌面: sudo apt-get install ubuntu-desktop 2.不安装默认组件,例如Evolution和OpenOffice: sudo apt ...
- FreeRTOS——队列管理
1. 队列主要用于任务与任务.中断与任务之间的消息传递. 2. 创建队列时,请注意队列中数据单元的长度. 3. 通常情况,队列被作为FIFO(先进先出)使用,即数据从队列尾写入,从队列首读.当然,数据 ...
- tensorflow elu函数应用
1.elu函数 图像: 2.tensorflow elu应用 import tensorflow as tf input=tf.constant([0,-1,2,-3],dtype=tf.float3 ...
- HTML5 开发APP
近期在做app,现在项目进行了一段时间,我打算把自己的经验写出来,给自己总结一下也给会用小伙伴看一下.本人前端一枚.我们所以能选的技术就是CSS,HTML,JS了,经过准备我决定用HBuilder 准 ...
