angular-utils-ui-breadcrumbs使用心得
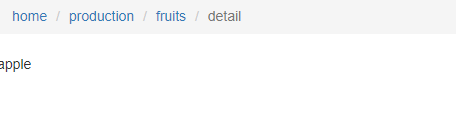
angular-utils-ui-breadcrumbs是一个用来自动生成面包屑导航栏的一个插件,需要依赖angular、UIRouter和bootstrap3.css。生成的界面截图如下,点击相应的面包屑会跳转到相应的路由,点击相应的路由也会自动生成相应的面包屑:
安装:npm install angular-utils-ui-breadcrumbs
github:https://github.com/michaelbromley/angularUtils/tree/master/src/directives/uiBreadcrumbs
模块依赖:
var app = angular.module('myapp', ['ui.router.state.events','angularUtils.directives.uiBreadcrumbs']);
这里使用了ui.router.state.events模块,因为该uiBreadcrumbs依赖于$stateChangeSuccess事件,而uiRouter在1.x版本之后推荐使用Transition钩子,为了兼容原来的版本,将不被推荐的state events事件封装到了stateEvent.js文件中,该文件在UIRouter包中,所以我们需要引入该文件,angularUtils.directives.uiBreadcrumbs模块已经依赖了ui.router模块,我们不需要在这里重复引入。
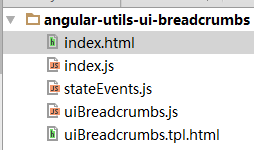
文件目录结构如下:
<!--index.html-->

<!DOCTYPE html>

<html lang="en" ng-app="myapp" ng-strict-di>

<head>

    <meta charset="UTF-8">

    <title>angular-utils-ui-breadcrumbs</title>

    <link href="https://cdn.bootcss.com/bootstrap/3.3.7/css/bootstrap.min.css" rel="stylesheet">

</head>

<body>

<ui-breadcrumbs displayname-property="data.displayName" abstract-proxy-property="data.proxy" template-url="./uiBreadcrumbs.tpl.html"></ui-breadcrumbs>

<ui-view name="home"></ui-view>

</body>

<script src="https://cdn.bootcss.com/angular.js/1.6.0/angular.min.js"></script>

<script src="https://cdn.bootcss.com/angular-ui-router/1.0.3/angular-ui-router.min.js"></script>

<script src="stateEvents.js"></script>

<script src="uiBreadcrumbs.js"></script>

<script src="index.js"></script>

</html>
//index.js

var app = angular.module('myapp', ['ui.router.state.events','angularUtils.directives.uiBreadcrumbs']);

app.config(['$stateProvider', '$urlRouterProvider', ($stateProvider, $urlRouterProvider) =>{

    $urlRouterProvider.otherwise('/home/production');

    $stateProvider

        .state('home', {

            abstract: true,

            url: '/home',

            data: {

              proxy: 'home.info'

            },

            views: {

                'home@': {

                    template: '<div ui-view="content"></div>'

                }

            }

        })

        .state('home.info', {

            url: '/info',

            data: {

                displayName: 'home'

            },

            views: {

                'content@home': {

                    template: '<a ui-sref="^.production">production</a>'

                }

            }

        })

        .state('home.production', {

            url: '/production',

            data: {

              displayName: 'production'

            },

            views: {

                'content@home': {

                    template: '<a ui-sref=".fruits">fruits</a>'

                }

            }

        })

        .state('home.production.fruits', {

            url: '/fruits',

            data: {

                displayName: 'fruits'

            },

            views: {

                'content@home': {

                    template: `<ul>

                        <li><a ui-sref=".detail({type: 'apple'})">apple</a></li>

                        <li><a ui-sref=".detail({type: 'banane'})">banane</a></li>

                        <li><a ui-sref=".detail({type: 'pear'})">pear</a></li>

                    </ul>`

                }

            }

        })

        .state('home.production.fruits.detail', {

            url: '/:type',

            data: {

                displayName: 'detail'

            },

            views: {

                'content@home': {

                    template: '<div>{{$resolve.fruit}}</div>'

                }

            },

            resolve: {

                fruit: ['$stateParams', $stateParams =>{

                    return $stateParams.type

                }]

            }

        })

}]);
下面详细说明一下该插件的使用方法:
<ui-breadcrumbs displayname-property="data.displayName"

                [template-url=""]

                [abstract-proxy-property=""]>

</ui-breadcrumbs>
dispalyname-property:(必须的),该属性指向了你声明路由时候的state配置对象的某个属性,该属性的值就是在该路由下面包屑会展示的值,如果没有指定,将会展示state的name属性。
template-url: (可选)指定uiBreadcrumbs.tpl.html的路径,该文件是ui-breadcrumbs指令的模版,如果不指定,将默认使用以下目录,以下是源码的内容:
   var moduleName = 'angularUtils.directives.uiBreadcrumbs';

    var templateUrl = 'directives/uiBreadcrumbs/uiBreadcrumbs.tpl.html';

    /**

     * Module

     */

    var module;

    try {

        module = angular.module(moduleName);

    } catch(err) {

        // named module does not exist, so create one

        module = angular.module(moduleName, ['ui.router']);

    }
abstract-proxy-property: (可选),当使用abstract state的时候,我们是不能够transition到该状态的。因此我们就不能够展示该状态的面包屑,因为当点击一个abstract state将会导致一个异常,所以为了解决这种情况,我们可以让abstract-proxy-property指向一个state config属性,该属性的值是某个state.name,即某个路由,当需要显示abstract state的面包屑的时候,将会寻找该state.name来代替该abstract state,如以上例子,我们指定了home.info这个状态。
angular-utils-ui-breadcrumbs使用心得的更多相关文章
- 开始学习Angular Mobile UI
介绍 Mobile AngularUI 可以让你使用Twitter Booostrap和Angular JS来开发混合移动App和桌面应用程序. 下面是是一些贯穿整个项目的步骤,我强烈的建议你去继续阅 ...
- 阿里云 Angular 2 UI框架 NG-ZORRO介绍
说明: Angular2出来后,一直想找个基于Angular2的前端后台管理框架,但一直没有找到比较适合的.前段时间在Angular官网资源无意之间看到NG-ZORRO,NG-ZORRO由阿里计算平台 ...
- Angular 2 to Angular 4 with Angular Material UI Components
Download Source - 955.2 KB Content Part 1: Angular2 Setup in Visual Studio 2017, Basic CRUD applicat ...
- Angular第三方UI组件库------ionic
一.Angular UI组件库 ------------ionic 1. 官网:https://ionicframework.com 文档:https://ionicframework.com/d ...
- angular中ui calendar的一些使用心得
ui calendar是封装fullcalendar的一款angular指令插件 官方地址:http://angular-ui.github.io/ui-calendar/ fullcalendar ...
- 容器化分布式日志组件ExceptionLess的Angular前端UI
写在前面 随着微服务架构的流行,日志也需要由专门的分布式日志组件来完成这个工作,我们项目使用的是 ExceptionLess 这个组件,它是前后端分离的:这篇文章我们就来实践容器化 Exception ...
- angular路由——ui.route
angular路由 使用案例 <!DOCTYPE html> <html lang="en"> <head> <meta charset= ...
- Domino Angular 前端UI开发
因为如今前端的要求越来越专业化,不少企业已经有前端的专业职位了.当然我们dominio软件企业.有些也在特意招一些前端的project师. 比方如今流程的多平台(之前我的有教程).就必需要有专业的UI ...
- angular 的ui.router 定义不同的state 对应相同的url
Angular UI Router: Different states with same URL? The landing page of my app has two states: home-p ...
- Angular Mobile UI API文档
这个是angular-mobile-ui的主要模块 应用这个模块你也将同时获取到mobile-angular-ui.core和mobile-angular-ui.components的特性 他不在需要 ...
随机推荐
- 短视频图像处理 OpenGL ES 实践
2017年,短视频正以其丰富的内容表现力和时间碎片化的特点,快速崛起,而短视频最具可玩性之处就在支持人脸识别的动态贴图和各种不同效果的美颜.滤镜等.那短视频动态贴纸.滤镜.美颜等功能究竟是如何实现的呢 ...
- Linux 安装 mysql 并配置
1.下载 下载地址:http://dev.mysql.com/downloads/mysql/5.6.html#downloads 下载版本:我这里选择的5.6.33,通用版,linux下64位 也可 ...
- 杂谈--DML触发器学习
触发器按类型分为三类: 1. DML 触发器,在数据变更时触发: 2. DDL 触发器,在修改数据库级别或实例级别对象时触发: 3. Login 触发器,在用户登录时触发: 最常见的是DML触发器,D ...
- AngularJS -- Bootstrap(启动器)(转载)
AngularJS -- Bootstrap(启动器) 点击查看AngularJS系列目录 转载请注明出处:http://www.cnblogs.com/leosx/ Bootstrap(初始化) ...
- Mybatis #{ } 和 ${ } 区别
动态 SQL 是 Mybatis 的强大特性之一,也是它优于其他 ORM 框架的一个重要原因.Mybatis 在对 sql 语句进行预编译之前,会对 sql 进行动态解析,解析为一个 BoundSql ...
- Hadoop 一: NCDC 数据准备
Hadoop 本文介绍Hadoop- The Definitive Guide一书中的NCDC数据准备,为后面的学习构建大数据环境; 环境 3节点 Hadoop 2.7.3 集群; java vers ...
- 实战系列之 Node.js 玩转 Java
这些年以来,Node.js的兴起,JavaScript已经从当年的“世界最被误解的语言”变成了“世界最流行的语言”.且其发展之势,从语言本身的进化,库和包的增长,工具支持的完善,star项目和领域解决 ...
- 用java编写一个微博登陆页面
上次也写了一个微博登陆页面,不过功能还不够完善.今天重新完善了一些功能,分享出来给大家. 基本功能如下: (1)具有类似新浪微博的用户注册图形界面. (2)使用用户名或手机号注册,注册时需要提供新密码 ...
- 翻译 | 关键CSS和Webpack: 减少阻塞渲染的CSS的自动化解决方案
原文地址: Critical CSS and Webpack: Automatically Minimize Render-Blocking CSS 原文作者: Anthony Gore 译者: 蜗牛 ...
- Web API 路由 [二] Attribute Routing
1) 启用.在App_Start - WebApiConfig.cs下 //在Register函数添加如下代码: config.MapHttpAttributeRoutes(); 2) 使用.Cont ...