Shiro(三):Spring-boot如何集成Shiro(下)
上一篇文章介绍了shiro在spring-boot中通过filter实现authentication流程(通过设置filterMaps也可以达到authorization的目的);这篇文章主要介绍spring通过AOP的方式实现shiro的authorization的流程。
ShiroAnnotationProcessorAutoConfiguration
shiro-spring-boot-web-starter除了自身在META-INF中定义了ShiroWebAutoConfiguration和ShiroWebFilterConfiguration外,还在pom文件中引用了shiro-spring-boot-stater。而后者在自己的META-INF文件中又定义了三个配置类:
ShiroAutoConfiguration:主要将shiro中重要的组件声明成bean。大部分配置被ShiroWebAutoConfiguration中的bean取代。ShiroBeanAutoConfiguration:主要设置了EventBus(便于监听各种事件)和LifecycleBeanPostProcessor(生命周期管理,对象的初始化和销毁)。ShiroAnnotationProcessorAutoConfiguration:顾名思义,shiro注解处理相关的bean都在这个类中配置。
@SuppressWarnings("SpringFacetCodeInspection")

@Configuration

@ConditionalOnProperty(name = "shiro.annotations.enabled", matchIfMissing = true)

public class ShiroAnnotationProcessorAutoConfiguration extends AbstractShiroAnnotationProcessorConfiguration {

    //负责创建代理类的对象

    @Bean

    @DependsOn("lifecycleBeanPostProcessor")

    @ConditionalOnMissingBean

    @Override

    public DefaultAdvisorAutoProxyCreator defaultAdvisorAutoProxyCreator() {

        return super.defaultAdvisorAutoProxyCreator();

    }

    //声明了Adviosr,Advisor声明了Pointcut和Advice,即规定了在哪些地方做哪些事

    @Bean

    @ConditionalOnMissingBean

    @Override

    public AuthorizationAttributeSourceAdvisor authorizationAttributeSourceAdvisor(SecurityManager securityManager) {

        return super.authorizationAttributeSourceAdvisor(securityManager);

    }

}
所以shiro通过声明了Advisor,以AOP的方式在执行某些方法前先进行权限校验。
DefaultAdvisorAutoProxyCreator和创建代理的流程
DefaultAdvisorAutoProxyCreator是spring框架提供的用来创建代理的类。可以通过这个类理清spring创建代理的流程。先了解DefaultAdvisorAutoProxyCreator的类继承关系。图中删除了部分继承关系,只保留了最主要的内容:
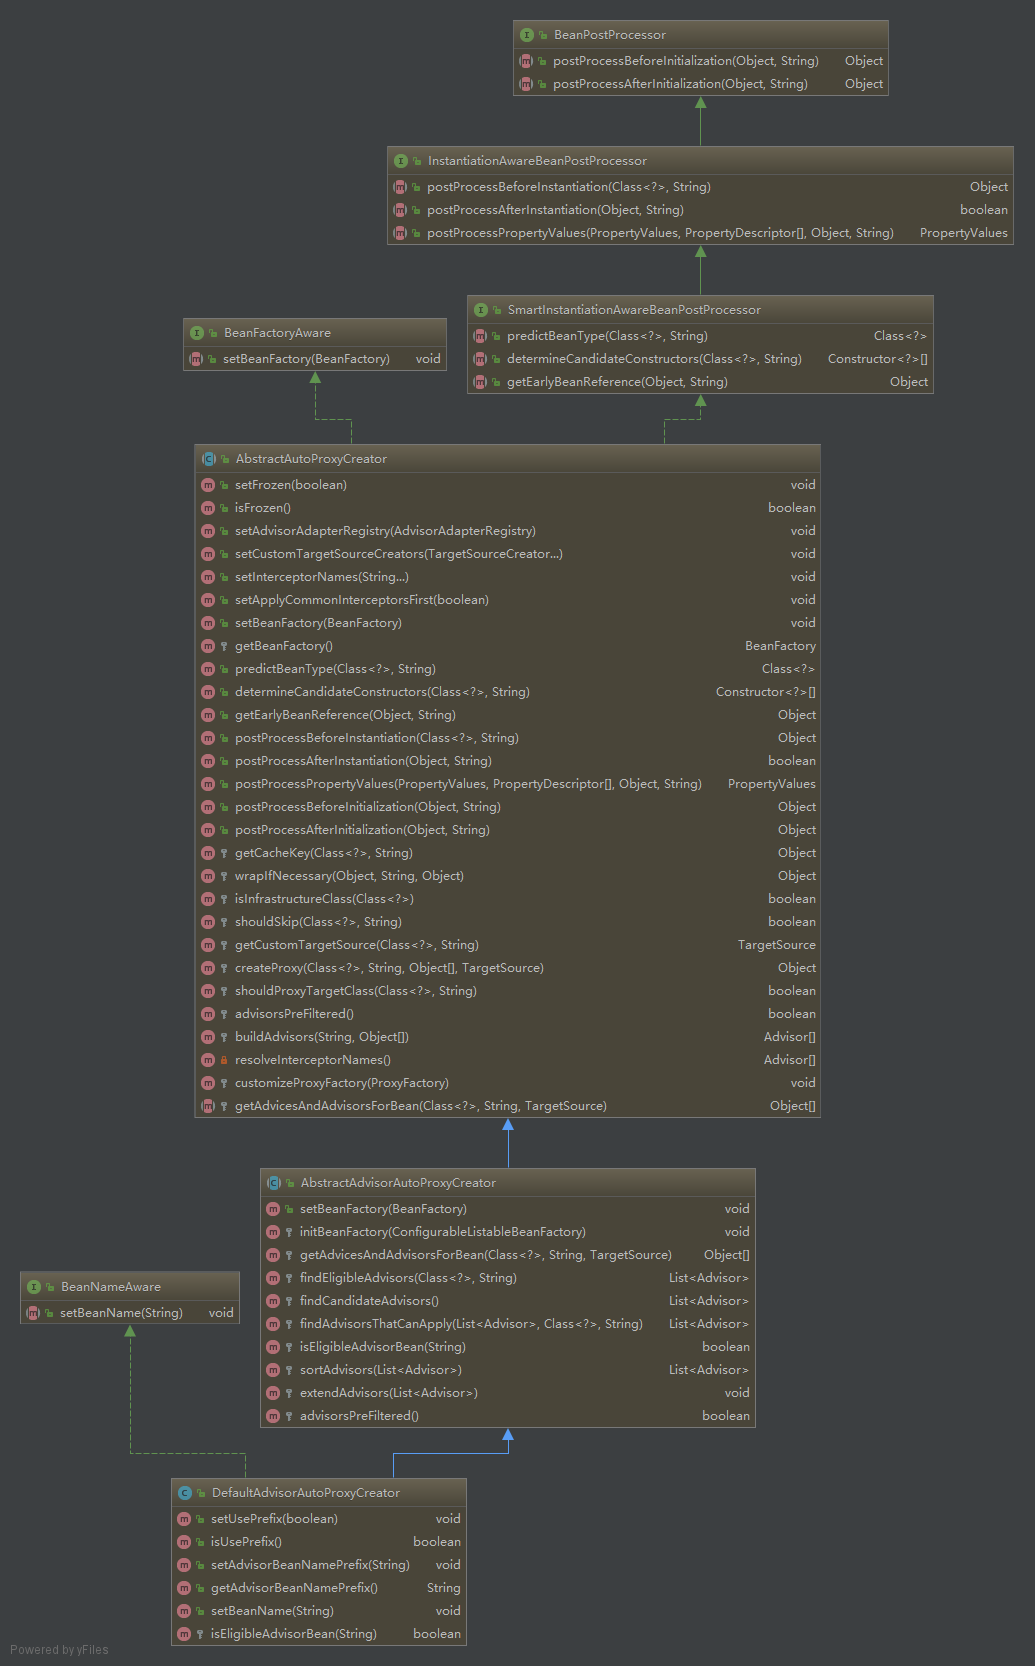
从接口的继承关系中可以看到,该类的处理可能处于类的实例化前后(Instantiation)和初始化前后(Initialization)。
下面的分析将以Bean的创建流程为顺序。
- Bean实例化前:
实例化前的操作主要是在postProcessBeforeInstantiation()中。
	//实例化前置处理(该方法会在bean实例化前调用,且如果该方法返回不会空,则不会在创建bean的实例)

	@Override

	public Object postProcessBeforeInstantiation(Class<?> beanClass, String beanName) throws BeansException {

		Object cacheKey = getCacheKey(beanClass, beanName);

		//

		if (beanName == null || !this.targetSourcedBeans.contains(beanName)) {

			//是否已经被代理过

			if (this.advisedBeans.containsKey(cacheKey)) {

				return null;

			}

			//AOP相关的系统类 和 需要跳过的类(交由子类根据具体需求拓展) 不需要代理

			if (isInfrastructureClass(beanClass) || shouldSkip(beanClass, beanName)) {

				this.advisedBeans.put(cacheKey, Boolean.FALSE);

				return null;

			}

		}

		//如果定义了符合该Bean的TargetSource,那么使用TargetSource为该Bean创建代理

		//TargetSource可以让用户自定义代理的过程

		if (beanName != null) {

			TargetSource targetSource = getCustomTargetSource(beanClass, beanName);

			if (targetSource != null) {

				this.targetSourcedBeans.add(beanName);

				Object[] specificInterceptors = getAdvicesAndAdvisorsForBean(beanClass, beanName, targetSource);

				Object proxy = createProxy(beanClass, beanName, specificInterceptors, targetSource);

				this.proxyTypes.put(cacheKey, proxy.getClass());

				return proxy;

			}

		}

		return null;

	}
- 创建Bean实例:
如果在postProcessBeanBeforeInstantication中已经创建了Bean的代理对象,则会跳过createBean的过程。 - 实例化后置处理
postProcessAfterInstantication():
该方法返回boolean型的值,决定是否继续执行是剩下的InstantationAwareBeanPostProcessor。 - 初始化前置处理
postProcessBeforeInitialization():这里不对bean做任务处理直接返回。
@Override

	public Object postProcessBeforeInitialization(Object bean, String beanName) {

		return bean;

	}
- bean初始化,这个阶段可能会设置bean的属性
- 初始化后置处理
postProcessAfterInitialization()。这一步是spring创建代理的过程。
@Override

	public Object postProcessAfterInitialization(Object bean, String beanName) throws BeansException {

		if (bean != null) {

			//获取缓存的key

			Object cacheKey = getCacheKey(bean.getClass(), beanName);

			//获取是否在之前已经对其代理过

			if (!this.earlyProxyReferences.contains(cacheKey)) {

				//如果需要代理,则对其进行包装

				return wrapIfNecessary(bean, beanName, cacheKey);

			}

		}

		return bean;

	}
其中的wrapIfNecessary就是为bean创建代理的过程。先判断该bean是否需要创建代理,如果需要则创建代理封装该bean。
protected Object wrapIfNecessary(Object bean, String beanName, Object cacheKey) {

		//判断是否已经由TargetSource产生过代理

		if (beanName != null && this.targetSourcedBeans.contains(beanName)) {

			return bean;

		}

		//判断是否已经解析过该bean,且结果是不需要代理

		if (Boolean.FALSE.equals(this.advisedBeans.get(cacheKey))) {

			return bean;

		}

		//判断是否是AOP相关类 或是 不需要代理的类

		if (isInfrastructureClass(bean.getClass()) || shouldSkip(bean.getClass(), beanName)) {

			this.advisedBeans.put(cacheKey, Boolean.FALSE);

			return bean;

		}

		//获取该Bean相关的Advice

		Object[] specificInterceptors = getAdvicesAndAdvisorsForBean(bean.getClass(), beanName, null);

		//如果不等于空,则说明需要代理

		if (specificInterceptors != DO_NOT_PROXY) {

			this.advisedBeans.put(cacheKey, Boolean.TRUE);

			//创建代理

			Object proxy = createProxy(

					bean.getClass(), beanName, specificInterceptors, new SingletonTargetSource(bean));

			this.proxyTypes.put(cacheKey, proxy.getClass());

			return proxy;

		}

		this.advisedBeans.put(cacheKey, Boolean.FALSE);

		return bean;

	}
决定这个bean是否要代理的一个重要过程是getAdvicesAndAdvisorsForBean()。这个方法会返回需要应用在该bean上的advice或是advisor。如果返回为空,则说明不需要代理。这个方法的具体实现是在AbstractAdvisorAutoProxyCreator。
//获取可以应用在该bean上的advise或advisor

	@Override

	protected Object[] getAdvicesAndAdvisorsForBean(Class<?> beanClass, String beanName, TargetSource targetSource) {

		//具体查找方法交给findEligibleAdvisors实现

		List<Advisor> advisors = findEligibleAdvisors(beanClass, beanName);

		//如果没找到,则返回特定对象 表示不需要代理

		if (advisors.isEmpty()) {

			return DO_NOT_PROXY;

		}

		//否则转成数组返回

		return advisors.toArray();

	}

	//查询核实的advisor方法

	protected List<Advisor> findEligibleAdvisors(Class<?> beanClass, String beanName) {

		//找出所有的advisor做候选

		List<Advisor> candidateAdvisors = findCandidateAdvisors();

		//再在候选的advisor筛选出适用的

		List<Advisor> eligibleAdvisors = findAdvisorsThatCanApply(candidateAdvisors, beanClass, beanName);

		//拓展Advisor

		extendAdvisors(eligibleAdvisors);

		//排序

		if (!eligibleAdvisors.isEmpty()) {

			eligibleAdvisors = sortAdvisors(eligibleAdvisors);

		}

		return eligibleAdvisors;

	}

	//查找候选advisor的方法委托给BeanFactoryAdvisorRetrievalHelper

	protected List<Advisor> findCandidateAdvisors() {

		return this.advisorRetrievalHelper.findAdvisorBeans();

	}

	//获取适用的Advisor,主要委托给AopUtil

	protected List<Advisor> findAdvisorsThatCanApply(

			List<Advisor> candidateAdvisors, Class<?> beanClass, String beanName) {

		ProxyCreationContext.setCurrentProxiedBeanName(beanName);

		try {

			return AopUtils.findAdvisorsThatCanApply(candidateAdvisors, beanClass);

		}

		finally {

			ProxyCreationContext.setCurrentProxiedBeanName(null);

		}

	}

	/**

	 * Return whether the Advisor bean with the given name is eligible

	 * for proxying in the first place.

	 * @param beanName the name of the Advisor bean

	 * @return whether the bean is eligible

	 */

	protected boolean isEligibleAdvisorBean(String beanName) {

		return true;

	}

	//对Advisor排序

	protected List<Advisor> sortAdvisors(List<Advisor> advisors) {

		AnnotationAwareOrderComparator.sort(advisors);

		return advisors;

	}
BeanFactoryAdvisorRetrievalHelper.findAdvisorBeans()大概过程就是先通过在beanFactory中查询类型为Advisor.class或其子类的的bean的name。然后根据beanName,再从beanFactory中根据beanName获取对应的Advisor的bean。
public List<Advisor> findAdvisorBeans() {

		// 如果已经缓存过,则直接使用缓存的结果

		String[] advisorNames = this.cachedAdvisorBeanNames;

		//没缓存 则在BeanFactory中搜索一次

		if (advisorNames == null) {

			// Do not initialize FactoryBeans here: We need to leave all regular beans

			// uninitialized to let the auto-proxy creator apply to them!

			//根据Advisor类型查询

			//这里只是获取bean的name,并未进行实例化

			advisorNames = BeanFactoryUtils.beanNamesForTypeIncludingAncestors(

					this.beanFactory, Advisor.class, true, false);

			this.cachedAdvisorBeanNames = advisorNames;

		}

		if (advisorNames.length == 0) {

			return new ArrayList<Advisor>();

		}

		List<Advisor> advisors = new ArrayList<Advisor>();

		//根据beanName获取对应的Advisor的bean

		for (String name : advisorNames) {

			if (isEligibleBean(name)) {

				if (this.beanFactory.isCurrentlyInCreation(name)) {

					if (logger.isDebugEnabled()) {

						logger.debug("Skipping currently created advisor '" + name + "'");

					}

				}

				else {

					try {

					   //实例化advisor的bean	advisors.add(this.beanFactory.getBean(name, Advisor.class));

					}

					catch (BeanCreationException ex) {

						Throwable rootCause = ex.getMostSpecificCause();

						if (rootCause instanceof BeanCurrentlyInCreationException) {

							BeanCreationException bce = (BeanCreationException) rootCause;

							if (this.beanFactory.isCurrentlyInCreation(bce.getBeanName())) {

								if (logger.isDebugEnabled()) {

									logger.debug("Skipping advisor '" + name +

											"' with dependency on currently created bean: " + ex.getMessage());

								}

								// Ignore: indicates a reference back to the bean we're trying to advise.

								// We want to find advisors other than the currently created bean itself.

								continue;

							}

						}

						throw ex;

					}

				}

			}

		}

		return advisors;

	}
再来看决定Advisors是否适用的过程:AopUtils.findAdvisorsThatCanApply()。
public static List<Advisor> findAdvisorsThatCanApply(List<Advisor> candidateAdvisors, Class<?> clazz) {

		if (candidateAdvisors.isEmpty()) {

			return candidateAdvisors;

		}

		List<Advisor> eligibleAdvisors = new LinkedList<Advisor>();

		for (Advisor candidate : candidateAdvisors) {

			if (candidate instanceof IntroductionAdvisor && canApply(candidate, clazz)) {

				eligibleAdvisors.add(candidate);

			}

		}

		boolean hasIntroductions = !eligibleAdvisors.isEmpty();

		for (Advisor candidate : candidateAdvisors) {

			if (candidate instanceof IntroductionAdvisor) {

				// already processed

				continue;

			}

			if (canApply(candidate, clazz, hasIntroductions)) {

				eligibleAdvisors.add(candidate);

			}

		}

		return eligibleAdvisors;

	}
主要是将Advisor根据不同的类型分成两类:IntroducationAdvisor和PointcutAdvisor。两种Advisor因为类型不同,所以判断方式也不一样。IntroductionAdvisor因为是类级别的拦截,它描述的”切点“是针对类,所以是通过ClassFilter来判断。而PointcutAdvisor可以针对方法,通过Pointcut描述切点。这点可以从canApply()中看出。
public static boolean canApply(Advisor advisor, Class<?> targetClass, boolean hasIntroductions) {

		if (advisor instanceof IntroductionAdvisor) {

		//IntroductionAdvisor直接通过classFilter匹配

			return ((IntroductionAdvisor) advisor).getClassFilter().matches(targetClass);

		}

		else if (advisor instanceof PointcutAdvisor) {

		//PointcutAdvisor则是通过pointcut,在调用canApply的重载方法实现

			PointcutAdvisor pca = (PointcutAdvisor) advisor;

			return canApply(pca.getPointcut(), targetClass, hasIntroductions);

		}

		else {

			// It doesn't have a pointcut so we assume it applies.

			return true;

		}

	}
找到Advisor之后,剩下的就是创建代理的过程。回到wrapIfNecessary,创建代理的过程在createProxy()中。
	//创建代理对象

	protected Object createProxy(

			Class<?> beanClass, String beanName, Object[] specificInterceptors, TargetSource targetSource) {

		if (this.beanFactory instanceof ConfigurableListableBeanFactory) {

			AutoProxyUtils.exposeTargetClass((ConfigurableListableBeanFactory) this.beanFactory, beanName, beanClass);

		}

		//创建代理工厂类,并且拷贝需要的配置

		ProxyFactory proxyFactory = new ProxyFactory();

		proxyFactory.copyFrom(this);

		if (!proxyFactory.isProxyTargetClass()) {

			if (shouldProxyTargetClass(beanClass, beanName)) {

				proxyFactory.setProxyTargetClass(true);

			}

			else {

				evaluateProxyInterfaces(beanClass, proxyFactory);

			}

		}

		//将拦截器封装成advisor

		Advisor[] advisors = buildAdvisors(beanName, specificInterceptors);

		//设置拦截器和TargetSource

		proxyFactory.addAdvisors(advisors);

		proxyFactory.setTargetSource(targetSource);

		//留给子类根据需要拓展

		customizeProxyFactory(proxyFactory);

		proxyFactory.setFrozen(this.freezeProxy);

		if (advisorsPreFiltered()) {

			proxyFactory.setPreFiltered(true);

		}

		//创建代理对象

		return proxyFactory.getProxy(getProxyClassLoader());

	}
上述方法中主要是创建了ProxyFactory对象,并设置属性,在通过ProxyFactory对象创建代理对象。
最后返回的代理对象便取代了原始的bean对象保存在spring容器中待取用。
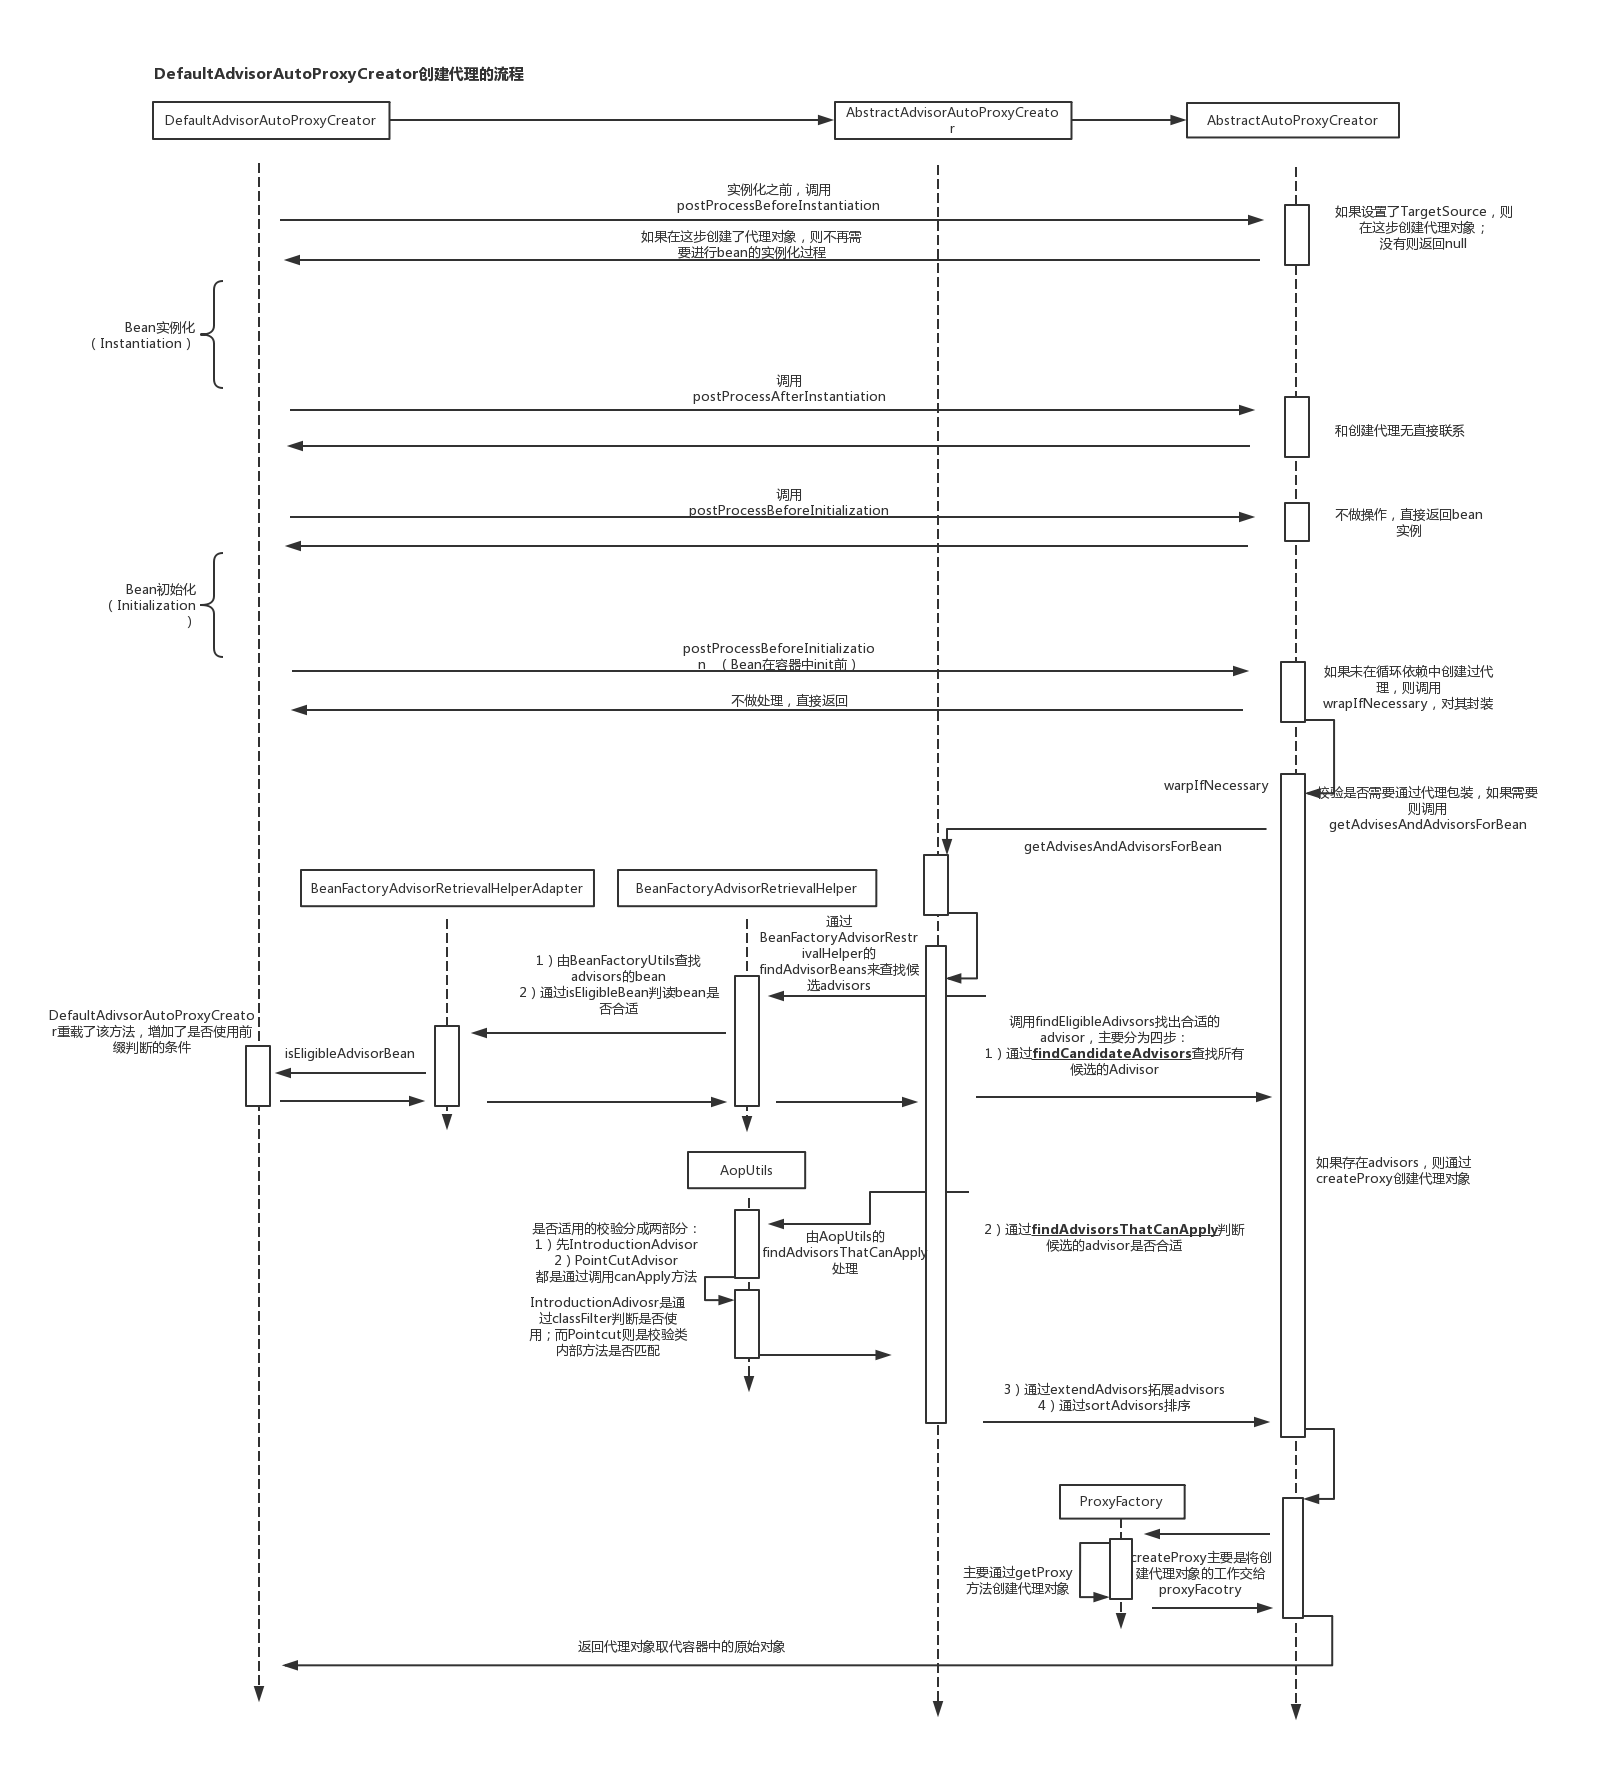
如果对上述流程图还有不清楚的地方,可以参考我画的流程图。
shiro生命的Advisor:AuthorizationAttributeSourceAdvisor
通过上述流程我们了解了spring如何根据advisor创建代理。现在我们要了解的是shiro的advisor:AuthorizationAttributeSourceAdvisor。
类的关系图:
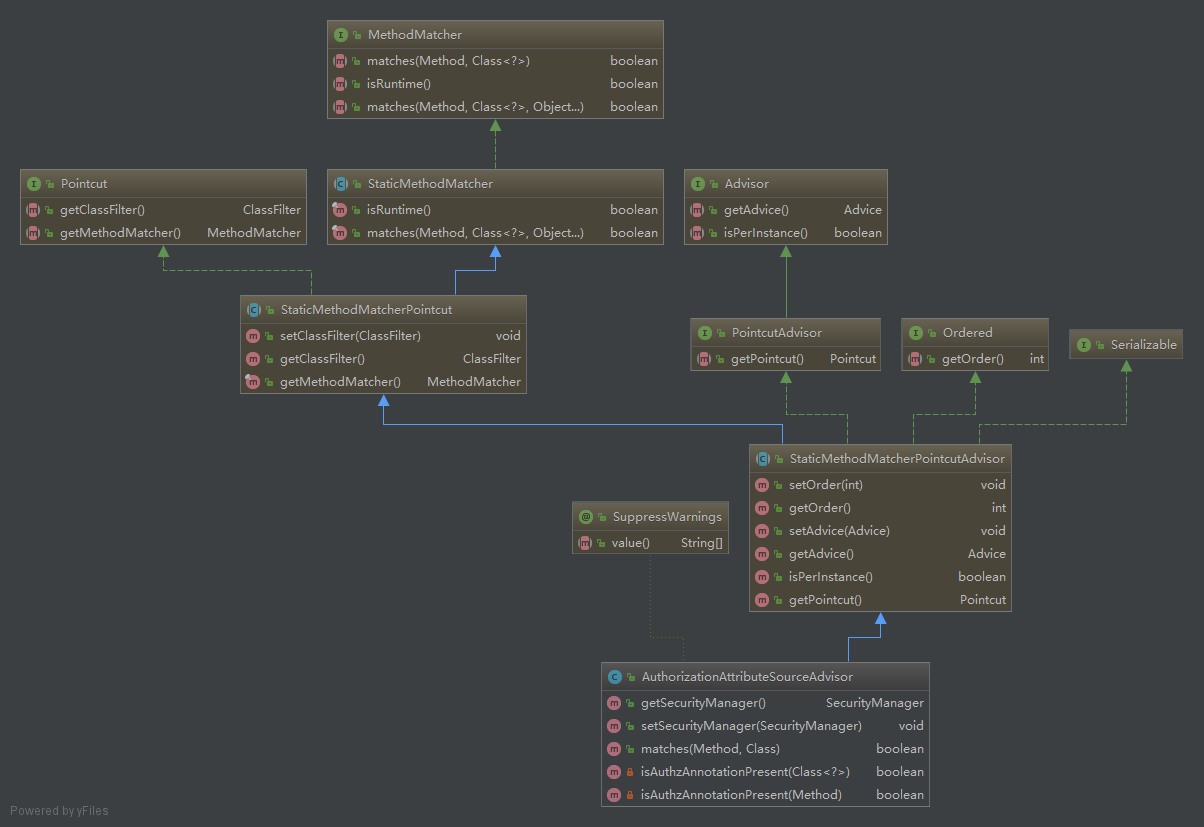
从图中我们可以了解到AuthorizationAttributeSourceAdvisor是一个PointcutAdvisor。如果看代码的话你会发现Pointcut设置的ClassFilter是TureClassFilter,也就是说它对任何类判断都会是通过,只校验方法是否正确。因此AuthorizationAttributeSourceAdvisor中最重要的方法就是matches:
@SuppressWarnings({"unchecked"})

public class AuthorizationAttributeSourceAdvisor extends StaticMethodMatcherPointcutAdvisor {

    private static final Logger log = LoggerFactory.getLogger(AuthorizationAttributeSourceAdvisor.class);

    private static final Class<? extends Annotation>[] AUTHZ_ANNOTATION_CLASSES =

            new Class[] {

                    RequiresPermissions.class, RequiresRoles.class,

                    RequiresUser.class, RequiresGuest.class, RequiresAuthentication.class

            };

    protected SecurityManager securityManager = null;

    /**

     * Create a new AuthorizationAttributeSourceAdvisor.

     */

    public AuthorizationAttributeSourceAdvisor() {

        //设置通知

        setAdvice(new AopAllianceAnnotationsAuthorizingMethodInterceptor());

    }

    public SecurityManager getSecurityManager() {

        return securityManager;

    }

    //设置SecurityManager

    public void setSecurityManager(org.apache.shiro.mgt.SecurityManager securityManager) {

        this.securityManager = securityManager;

    }

    public boolean matches(Method method, Class targetClass) {

        Method m = method;

        if ( isAuthzAnnotationPresent(m) ) {

            return true;

        }

        //The 'method' parameter could be from an interface that doesn't have the annotation.

        //Check to see if the implementation has it.

        if ( targetClass != null) {

            try {

                m = targetClass.getMethod(m.getName(), m.getParameterTypes());

                //判断方法或是类上是否有shiro关注的注解

                return isAuthzAnnotationPresent(m) || isAuthzAnnotationPresent(targetClass);

            } catch (NoSuchMethodException ignored) {

                //default return value is false.  If we can't find the method, then obviously

                //there is no annotation, so just use the default return value.

            }

        }

        return false;

    }

    private boolean isAuthzAnnotationPresent(Class<?> targetClazz) {

        for( Class<? extends Annotation> annClass : AUTHZ_ANNOTATION_CLASSES ) {

            Annotation a = AnnotationUtils.findAnnotation(targetClazz, annClass);

            if ( a != null ) {

                return true;

            }

        }

        return false;

    }

    private boolean isAuthzAnnotationPresent(Method method) {

        for( Class<? extends Annotation> annClass : AUTHZ_ANNOTATION_CLASSES ) {

            Annotation a = AnnotationUtils.findAnnotation(method, annClass);

            if ( a != null ) {

                return true;

            }

        }

        return false;

    }

}
除了Advisor的matches方法外,还需要关注到的是Advisor设置的advise对象:AopAllianceAnnotationsAuthorizingMethodInterceptor。
个人的理解是AopAllianceAnnotattionsAuthorizingMethodInterceptor是将shiro框架中的MethodInterceptor和aopalliance框架中的MethodInterceptor做了适配,让shiro的处理过程转变成aopalliance的MethodIntercetor的处理过程。而后者是我们所熟悉的spring的拦截器。
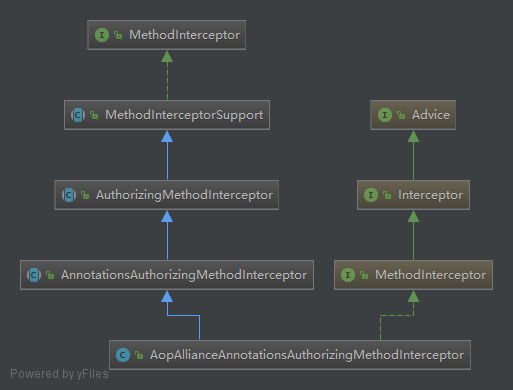
上图可以看到同时实现了两个MethodInterceptor接口。
AopAllianceAnnotationsAuthorizingMethodInterceptor代码相对简单。
public class AopAllianceAnnotationsAuthorizingMethodInterceptor

        extends AnnotationsAuthorizingMethodInterceptor implements MethodInterceptor {

    public AopAllianceAnnotationsAuthorizingMethodInterceptor() {

        List<AuthorizingAnnotationMethodInterceptor> interceptors =

                new ArrayList<AuthorizingAnnotationMethodInterceptor>(5);

        //配置shiro拦截器

        AnnotationResolver resolver = new SpringAnnotationResolver();

        //we can re-use the same resolver instance - it does not retain state:

        interceptors.add(new RoleAnnotationMethodInterceptor(resolver));

        interceptors.add(new PermissionAnnotationMethodInterceptor(resolver));

        interceptors.add(new AuthenticatedAnnotationMethodInterceptor(resolver));

        interceptors.add(new UserAnnotationMethodInterceptor(resolver));

        interceptors.add(new GuestAnnotationMethodInterceptor(resolver));

        setMethodInterceptors(interceptors);

    }

    /**

     * Creates a {@link MethodInvocation MethodInvocation} that wraps an

     * {@link org.aopalliance.intercept.MethodInvocation org.aopalliance.intercept.MethodInvocation} instance,

     * enabling Shiro Annotations in <a href="http://aopalliance.sourceforge.net/">AOP Alliance</a> environments

     * (Spring, etc).

     *

     * @param implSpecificMethodInvocation AOP Alliance {@link org.aopalliance.intercept.MethodInvocation MethodInvocation}

     * @return a Shiro {@link MethodInvocation MethodInvocation} instance that wraps the AOP Alliance instance.

     */

    protected org.apache.shiro.aop.MethodInvocation createMethodInvocation(Object implSpecificMethodInvocation) {

        final MethodInvocation mi = (MethodInvocation) implSpecificMethodInvocation;

        return new org.apache.shiro.aop.MethodInvocation() {

            public Method getMethod() {

                return mi.getMethod();

            }

            public Object[] getArguments() {

                return mi.getArguments();

            }

            public String toString() {

                return "Method invocation [" + mi.getMethod() + "]";

            }

            public Object proceed() throws Throwable {

                return mi.proceed();

            }

            public Object getThis() {

                return mi.getThis();

            }

        };

    }

    /**

     * Simply casts the method argument to an

     * {@link org.aopalliance.intercept.MethodInvocation org.aopalliance.intercept.MethodInvocation} and then

     * calls <code>methodInvocation.{@link org.aopalliance.intercept.MethodInvocation#proceed proceed}()</code>

     *

     * @param aopAllianceMethodInvocation the {@link org.aopalliance.intercept.MethodInvocation org.aopalliance.intercept.MethodInvocation}

     * @return the {@link org.aopalliance.intercept.MethodInvocation#proceed() org.aopalliance.intercept.MethodInvocation.proceed()} method call result.

     * @throws Throwable if the underlying AOP Alliance <code>proceed()</code> call throws a <code>Throwable</code>.

     */

    protected Object continueInvocation(Object aopAllianceMethodInvocation) throws Throwable {

        MethodInvocation mi = (MethodInvocation) aopAllianceMethodInvocation;

        return mi.proceed();

    }

    //通过spring中的拦截器机制发起拦截,并将处理转换成shiro的拦截器处理过程,是一个适配的过程

    public Object invoke(MethodInvocation methodInvocation) throws Throwable {

        //将spring的MethodInvocation转换成shiro的MethodInvocation对象

        org.apache.shiro.aop.MethodInvocation mi = createMethodInvocation(methodInvocation);

        //调用AuthorizingMethodInterceptor的invoke方法

        return super.invoke(mi);

    }

}
AuthorizingMethodInterceptor的invoke则会调用asserAuthorized方法。
public abstract class AuthorizingMethodInterceptor extends MethodInterceptorSupport {

    //拦截器方法被调用

    public Object invoke(MethodInvocation methodInvocation) throws Throwable {

        assertAuthorized(methodInvocation);

        return methodInvocation.proceed();

    }

    //授权判断,交给子类实现

    protected abstract void assertAuthorized(MethodInvocation methodInvocation) throws AuthorizationException;

}
AnnotationAuthorizingMethodInterceptor方法实现了assertAuthorized方法,遍历其配置的AuthorizingAnnotationMethodInterceptor对象,如果匹配则进行验证。
public abstract class AnnotationsAuthorizingMethodInterceptor extends AuthorizingMethodInterceptor {

    /**

     * The method interceptors to execute for the annotated method.

     */

    protected Collection<AuthorizingAnnotationMethodInterceptor> methodInterceptors;

    public AnnotationsAuthorizingMethodInterceptor() {

    //配置默认的权限认证拦截器

        methodInterceptors = new ArrayList<AuthorizingAnnotationMethodInterceptor>(5);

        methodInterceptors.add(new RoleAnnotationMethodInterceptor());

        methodInterceptors.add(new PermissionAnnotationMethodInterceptor());

        methodInterceptors.add(new AuthenticatedAnnotationMethodInterceptor());

        methodInterceptors.add(new UserAnnotationMethodInterceptor());

        methodInterceptors.add(new GuestAnnotationMethodInterceptor());

    }

    public Collection<AuthorizingAnnotationMethodInterceptor> getMethodInterceptors() {

        return methodInterceptors;

    }

    public void setMethodInterceptors(Collection<AuthorizingAnnotationMethodInterceptor> methodInterceptors) {

        this.methodInterceptors = methodInterceptors;

    }

    //遍历所有权限认证拦截器,如果拦截器支持,则使用拦截器认证

    protected void assertAuthorized(MethodInvocation methodInvocation) throws AuthorizationException {

        //default implementation just ensures no deny votes are cast:

        Collection<AuthorizingAnnotationMethodInterceptor> aamis = getMethodInterceptors();

        if (aamis != null && !aamis.isEmpty()) {

            for (AuthorizingAnnotationMethodInterceptor aami : aamis) {

                if (aami.supports(methodInvocation)) {

                    aami.assertAuthorized(methodInvocation);

                }

            }

        }

    }

}
而权限认证拦截器则是将具体认证过程委托给内部的Handler对象处理。因此拦截器处理的过程大致如下:
AopAllianceAnnotationAuthorizingMethodInterceptor的invoke方法被调用- 调用
assertAuthorized() - 获取内部配置的认证拦截器,逐个调用
assertAuthorized方法 - 内部认证拦截器将认证委托给内部的
AuthorizingAnnotationHandler处理 - 以
RoleAnnotationHandler为例,它会在自己的assertAuthorized方法中校验Subject对象的Role和@RequiredRole中要求的是否一致,不一致则会抛出异常,拦截器不在往下走,因为也无法进入到被拦截的方法里。
总结
Shiro权限认证的过程是通过AOP动态代理实现的。相当于在Spring中配置了一个用于权限认证的拦截器,拦截拥有指定注解(@RequiresAuthentication,@RequiresUser,@RequiresGuest,@RequiresRoles,@RequiresPermissions)的方法。
Shiro(三):Spring-boot如何集成Shiro(下)的更多相关文章
- shiro 和 spring boot 的集成
1 添加依赖 使用 shiro-spring-boot-web-starter 在 spring boot 中集成 shiro 只需要再添加一个依赖 <dependency> <gr ...
- Spring Boot 中集成 Shiro
https://blog.csdn.net/taojin12/article/details/88343990
- 细说shiro之五:在spring框架中集成shiro
官网:https://shiro.apache.org/ 1. 下载在Maven项目中的依赖配置如下: <!-- shiro配置 --> <dependency> <gr ...
- spring boot(十四)shiro登录认证与权限管理
这篇文章我们来学习如何使用Spring Boot集成Apache Shiro.安全应该是互联网公司的一道生命线,几乎任何的公司都会涉及到这方面的需求.在Java领域一般有Spring Security ...
- spring boot不要放在tomcat下启动,因为自身就带了集成tomcat
spring boot不要放在tomcat下启动,因为自身就带了集成tomcat
- Spring Boot:集成Druid数据源
综合概述 数据库连接池负责分配.管理和释放数据库连接,它允许应用程序重复使用一个现有的数据库连接,而不是再重新建立一个:释放空闲时间超过最大空闲时间的数据库连接来避免因为没有释放数据库连接而引起的数据 ...
- Spring Boot快速集成kaptcha生成验证码
Kaptcha是一个非常实用的验证码生成工具,可以通过配置生成多样化的验证码,以图片的形式显示,从而无法进行复制粘贴:下面将详细介绍下Spring Boot快速集成kaptcha生成验证码的过程. 本 ...
- [转帖]spring boot项目集成jacoco
小试牛刀:spring boot项目集成jacoco 2019-03-28 20:14:36 zyq23333 阅读数 509 版权声明:本文为博主原创文章,遵循CC 4.0 BY-SA版权协议, ...
- Java | Spring Boot Swagger2 集成REST ful API 生成接口文档
Spring Boot Swagger2 集成REST ful API 生成接口文档 原文 简介 由于Spring Boot 的特性,用来开发 REST ful 变得非常容易,并且结合 Swagg ...
- Spring Boot Redis 集成配置(转)
Spring Boot Redis 集成配置 .embody{ padding:10px 10px 10px; margin:0 -20px; border-bottom:solid 1px #ede ...
随机推荐
- 天天写order by,你知道Mysql底层执行原理吗?
前言 文章首发于微信公众号[码猿技术专栏]. 在实际的开发中一定会碰到根据某个字段进行排序后来显示结果的需求,但是你真的理解order by在 Mysql 底层是如何执行的吗? 假设你要查询城市是苏州 ...
- Ubuntu 安装配置Dosbox
1.安装dosbox sudo apt-get install dosbox 方法一: 2.挂载虚拟空间到dosbox的c盘 在linux终端输入dosbox,进入dosbox后输入 mount c ...
- Linux 压缩备份篇(一 压缩与解压缩)
.Z compress程序压缩的档案 .bz2 bzip2程序压缩的档案 .gz gzip程序压缩的档案 .t ...
- Typora+PicGo+GitHub实现md自带图床效果
1 GitHub创建作为图床的仓库 1.1 在GitHub中创建一个仓库 注意仓库要是public的,不然上传的图片还是无法使用的.如果不知道怎么创建仓库,可以百度一下. 1.2 在GitHub生成一 ...
- Spring Cloud 系列之 Consul 注册中心(一)
Netflix Eureka 2.X https://github.com/Netflix/eureka/wiki 官方宣告停止开发,但其实对国内的用户影响甚小,一方面国内大都使用的是 Eureka ...
- 127.0.0.1和localhost区别
- Mac配置hosts文件
说明:工作里面有时候会遇到内网办公的环境,需要对使用的IP和地址进行配置到hosts文件内,所以记录一下: 1,Windows配置hosts Windows里面直接打开文件夹,可进行找到system/ ...
- AJ学IOS(39)UI之核心动画之CABasicAnimation(基础动画)
AJ分享,必须精品 一.CABasicAnimation简介 CAPropertyAnimation的子类 属性解析: fromValue:keyPath相应属性的初始值 toValue:keyPat ...
- Adaptert Listview 优化
这次是关于Listview的优化的,之前一直采用愚蠢的方式来使用listview,出现的情况就是数据多的话下拉的时候会出现卡顿的情况,内存占用多.所以学习了关于listview的优化,并且这也是普遍使 ...
- 记录:如何使用ASP.NET Core和EnityFramework Core实现服务和数据分离
前情提要: 现有一个网站框架,包括主体项目WebApp一个,包含 IIdentityUser 接口的基架项目 A.用于处理用户身份验证的服务 AuthenticationService 位于命名空间B ...