Tensorflow学习教程------模型参数和网络结构保存且载入,输入一张手写数字图片判断是几
首先是模型参数和网络结构的保存
- #coding:utf-8
- import tensorflow as tf
- from tensorflow.examples.tutorials.mnist import input_data
- mnist = input_data.read_data_sets('MNIST_data',one_hot=True)
- #每个批次的大小
- batch_size = 100
- n_batch = mnist.train._num_examples // batch_size
- #定义两个placeholder
- x = tf.placeholder(tf.float32, [None,784],name='x-input' ) #模型输入的地方加名字
- y = tf.placeholder(tf.float32,[None,10])
- keep_prob = tf.placeholder(tf.float32,name='keepProb')
- def weight_variable(shape):
- initial = tf.truncated_normal(shape,stddev=0.1) #生成一个截断的正态分布
- return tf.Variable(initial)
- def bias_variable(shape):
- initial = tf.constant(0.1,shape = shape)
- return tf.Variable(initial)
- #卷基层
- def conv2d(x,W):
- return tf.nn.conv2d(x,W,strides=[1,1,1,1],padding='SAME')
- #池化层
- def max_pool_2x2(x):
- return tf.nn.max_pool(x,ksize=[1,2,2,1],strides=[1,2,2,1],padding='SAME')
- #改变x的格式转为4D的向量[batch,in_height,in_width,in_channels]
- x_image = tf.reshape(x, [-1,28,28,1])
- #初始化第一个卷基层的权值和偏置
- W_conv1 = weight_variable([5,5,1,32]) #5*5的采样窗口 32个卷积核从一个平面抽取特征 32个卷积核是自定义的
- b_conv1 = bias_variable([32]) #每个卷积核一个偏置值
- #把x_image和权值向量进行卷积,再加上偏置值,然后应用于relu激活函数
- h_conv1 = tf.nn.relu(conv2d(x_image,W_conv1)+b_conv1)
- h_pool1 = max_pool_2x2(h_conv1) #进行max-pooling
- #初始化第二个卷基层的权值和偏置
- W_conv2 = weight_variable([5,5,32,64]) # 5*5的采样窗口 64个卷积核从32个平面抽取特征 由于前一层操作得到了32个特征图
- b_conv2 = bias_variable([64]) #每一个卷积核一个偏置值
- #把h_pool1和权值向量进行卷积 再加上偏置值 然后应用于relu激活函数
- h_conv2 = tf.nn.relu(conv2d(h_pool1,W_conv2) + b_conv2)
- h_pool2 = max_pool_2x2(h_conv2) #进行max-pooling
- #28x28的图片第一次卷积后还是28x28 第一次池化后变为14x14
- #第二次卷积后 变为14x14 第二次池化后变为7x7
- #通过上面操作后得到64张7x7的平面
- #初始化第一个全连接层的权值
- W_fc1 = weight_variable([7*7*64,1024])#上一层有7*7*64个神经元,全连接层有1024个神经元
- b_fc1 = bias_variable([1024]) #1024个节点
- #把第二个池化层的输出扁平化为一维
- h_pool2_flat = tf.reshape(h_pool2,[-1,7*7*64])
- #求第一个全连接层的输出
- h_fc1 = tf.nn.relu(tf.matmul(h_pool2_flat,W_fc1)+b_fc1)
- #keep_prob用来表示神经元的输出概率
- h_fc1_drop = tf.nn.dropout(h_fc1,keep_prob)
- #初始化第二个全连接层
- W_fc2 = weight_variable([1024,10])
- b_fc2 = bias_variable([10])
- #计算输出
- prediction = tf.nn.softmax(tf.matmul(h_fc1_drop,W_fc2)+b_fc2, name='output') #模型输出的地方加名字
- #交叉熵代价函数
- cross_entropy = tf.reduce_mean(tf.nn.softmax_cross_entropy_with_logits(labels=y,logits=prediction))
- #使用AdamOptimizer进行优化
- train_step = tf.train.AdamOptimizer(1e-4).minimize(cross_entropy)
- #结果存放在一个布尔列表中
- correct_prediction = tf.equal(tf.argmax(prediction,1),tf.argmax(y,1)) #argmax返回一维张量中最大的值所在的位置
- #求准确率
- accuracy = tf.reduce_mean(tf.cast(correct_prediction,tf.float32))
- with tf.Session() as sess:
- sess.run(tf.global_variables_initializer())
- for epoch in range(10):
- for batch in range(n_batch):
- batch_xs,batch_ys = mnist.train.next_batch(batch_size)
- sess.run(train_step,feed_dict={x:batch_xs,y:batch_ys,keep_prob:0.7})
- acc = sess.run(accuracy,feed_dict={x:mnist.test.images,y:mnist.test.labels,keep_prob:1.0})
- print ("Iter "+ str(epoch) + ", Testing Accuracy= " + str(acc))
- #保存模型参数与网络结构
- output_graph_def = tf.graph_util.convert_variables_to_constants(sess,sess.graph_def,output_node_names=['output'])
- #保存模型到目录下的model文件夹中
- with tf.gfile.FastGFile('/home/bayes/mymodel.pb',mode='wb') as f:
- f.write(output_graph_def.SerializeToString())
结果
- Iter 0, Testing Accuracy= 0.8616
- Iter 1, Testing Accuracy= 0.9663
- Iter 2, Testing Accuracy= 0.9776
- Iter 3, Testing Accuracy= 0.9815
- Iter 4, Testing Accuracy= 0.985
- Iter 5, Testing Accuracy= 0.9863
- Iter 6, Testing Accuracy= 0.9871
- Iter 7, Testing Accuracy= 0.9895
- Iter 8, Testing Accuracy= 0.9878
- Iter 9, Testing Accuracy= 0.9894
- Converted 8 variables to const ops.
载入模型参数与网络结构,并且预测图片
- #coding:utf-8
- import tensorflow as tf
- from tensorflow.examples.tutorials.mnist import input_data
- from PIL import Image,ImageFilter
- mnist = input_data.read_data_sets('MNIST_data',one_hot=True)
- #定义一个placeholder
- y = tf.placeholder(tf.float32,[None,10])
- def imageprepare(argv): # 该函数读一张图片,处理后返回一个数组,进到网络中预测
- im = Image.open(argv).convert('L')
- width = float(im.size[0])
- height = float(im.size[1])
- newImage = Image.new('L', (28, 28), (255)) # creates white canvas of 28x28 pixels
- if width > height: # check which dimension is bigger
- # Width is bigger. Width becomes 20 pixels.
- nheight = int(round((20.0 / width * height), 0)) # resize height according to ratio width
- if nheight == 0: # rare case but minimum is 1 pixel
- nheight = 1
- # resize and sharpen
- img = im.resize((20, nheight), Image.ANTIALIAS).filter(ImageFilter.SHARPEN)
- wtop = int(round(((28 - nheight) / 2), 0)) # caculate horizontal pozition
- newImage.paste(img, (4, wtop)) # paste resized image on white canvas
- else:
- # Height is bigger. Heigth becomes 20 pixels.
- nwidth = int(round((20.0 / height * width), 0)) # resize width according to ratio height
- if (nwidth == 0): # rare case but minimum is 1 pixel
- nwidth = 1
- # resize and sharpen
- img = im.resize((nwidth, 20), Image.ANTIALIAS).filter(ImageFilter.SHARPEN)
- wleft = int(round(((28 - nwidth) / 2), 0)) # caculate vertical pozition
- newImage.paste(img, (wleft, 4)) # paste resized image on white canvas
- # newImage.save("sample.png")
- tv = list(newImage.getdata()) # get pixel values
- # normalize pixels to 0 and 1. 0 is pure white, 1 is pure black.
- tva = [(255 - x) * 1.0 / 255.0 for x in tv]
- return tva
- #载入模型
- with tf.gfile.FastGFile('/home/bayes/mymodel.pb','rb' ) as f:
- graph_def = tf.GraphDef()
- graph_def.ParseFromString(f.read())
- tf.import_graph_def(graph_def,name='')
- with tf.Session() as sess:
- output = sess.graph.get_tensor_by_name('output:0')
- #结果存放在一个布尔列表中
- correct_prediction = tf.equal(tf.argmax(y,1),tf.argmax(output,1)) #argmax返回一维张量中最大的值所在的位置
- #求准确率
- accuracy = tf.reduce_mean(tf.cast(correct_prediction,tf.float32))
- #训练的时候加了dropout,载入模型进行预测或者计算准确率的时候一定记得也加入dropout
- print (sess.run(accuracy,feed_dict={'x-input:0':mnist.test.images, y:mnist.test.labels,'keepProb:0':1.0}))
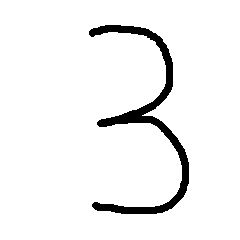
- array = imageprepare('/home/bayes/logs/3.jpg')
- prediction = tf.argmax(output,1)
- finalClass = sess.run(prediction,feed_dict={'x-input:0':[array],'keepProb:0':1.0})
- print('The digits in this image is:%d' % finalClass)
手写数字图片3
结果
- I tensorflow/core/common_runtime/gpu/gpu_device.cc:906] DMA: 0
- I tensorflow/core/common_runtime/gpu/gpu_device.cc:916] 0: Y
- I tensorflow/core/common_runtime/gpu/gpu_device.cc:975] Creating TensorFlow device (/gpu:0) -> (device: 0, name: GeForce GTX 1080 Ti, pci bus id: 0000:03:00.0)
- 0.9894
- The digits in this image is:3
Tensorflow学习教程------模型参数和网络结构保存且载入,输入一张手写数字图片判断是几的更多相关文章
- tensorflow学习之(十)使用卷积神经网络(CNN)分类手写数字0-9
#卷积神经网络cnn import tensorflow as tf from tensorflow.examples.tutorials.mnist import input_data #数据包,如 ...
- 一文全解:利用谷歌深度学习框架Tensorflow识别手写数字图片(初学者篇)
笔记整理者:王小草 笔记整理时间2017年2月24日 原文地址 http://blog.csdn.net/sinat_33761963/article/details/56837466?fps=1&a ...
- 吴裕雄 python 神经网络——TensorFlow 卷积神经网络手写数字图片识别
import os import tensorflow as tf from tensorflow.examples.tutorials.mnist import input_data INPUT_N ...
- MindSpore手写数字识别初体验,深度学习也没那么神秘嘛
摘要:想了解深度学习却又无从下手,不如从手写数字识别模型训练开始吧! 深度学习作为机器学习分支之一,应用日益广泛.语音识别.自动机器翻译.即时视觉翻译.刷脸支付.人脸考勤--不知不觉,深度学习已经渗入 ...
- SVM学习笔记(二)----手写数字识别
引言 上一篇博客整理了一下SVM分类算法的基本理论问题,它分类的基本思想是利用最大间隔进行分类,处理非线性问题是通过核函数将特征向量映射到高维空间,从而变成线性可分的,但是运算却是在低维空间运行的.考 ...
- Tensorflow学习教程------利用卷积神经网络对mnist数据集进行分类_利用训练好的模型进行分类
#coding:utf-8 import tensorflow as tf from PIL import Image,ImageFilter from tensorflow.examples.tut ...
- Android+TensorFlow+CNN+MNIST 手写数字识别实现
Android+TensorFlow+CNN+MNIST 手写数字识别实现 SkySeraph 2018 Email:skyseraph00#163.com 更多精彩请直接访问SkySeraph个人站 ...
- 100天搞定机器学习|day39 Tensorflow Keras手写数字识别
提示:建议先看day36-38的内容 TensorFlow™ 是一个采用数据流图(data flow graphs),用于数值计算的开源软件库.节点(Nodes)在图中表示数学操作,图中的线(edge ...
- TensorFlow 卷积神经网络手写数字识别数据集介绍
欢迎大家关注我们的网站和系列教程:http://www.tensorflownews.com/,学习更多的机器学习.深度学习的知识! 手写数字识别 接下来将会以 MNIST 数据集为例,使用卷积层和池 ...
随机推荐
- 吴裕雄--天生自然C++语言学习笔记:C++ 日期 & 时间
C++ 标准库没有提供所谓的日期类型.C++ 继承了 C 语言用于日期和时间操作的结构和函数.为了使用日期和时间相关的函数和结构,需要在 C++ 程序中引用 <ctime> 头文件. 有四 ...
- NumPy 基于数值区间创建数组
来源:Python Numpy 教程 章节 Numpy 介绍 Numpy 安装 NumPy ndarray NumPy 数据类型 NumPy 数组创建 NumPy 基于已有数据创建数组 NumPy 基 ...
- (java) webdriver 启动firefox driver时,加载firebug的扩展
去网上下载一个firebug.xpi(对应版本, 我的ff是17,可以使用firebug-1.11.4.xpi,最好使用非firefox浏览器下载,不然提示你直接安装到firefox) @Before ...
- Node.js的启动和调试方式
通过node命令启动 node server/bin/www webstorm配置启动入口 pm2 全局安装:cnpm i pm2 -g 检查版本:pm2 -v 启动:cd 项目目录 pm2 star ...
- UVA - 1001 Say Cheese(奶酪里的老鼠)(flod)
题意:无限大的奶酪里有n(0<=n<=100)个球形的洞.你的任务是帮助小老鼠A用最短的时间到达小老鼠O所在位置.奶酪里的移动速度为10秒一个单位,但是在洞里可以瞬间移动.洞和洞可以相交. ...
- MFC 选择文件夹
WCHAR szPath[_MAX_PATH] = {}; BROWSEINFO bi; //指定父窗口,在对话框显示期间,父窗口将被禁用 bi.hwndOwner = this->GetSaf ...
- cf 730J. Bottles
搞一个背包,233 要求用的瓶数最少,那么就业瓶数为第一关键,当瓶数相当后再以a[i] #include<bits/stdc++.h> #define N 100005 #define L ...
- x++ 与 ++x的区别
相信在很多编程语言中都会遇见这个问题,这对于刚入编程的人来说可能是相当懵逼了. 老师的官方说法是:操作符在前面先进行自身运算,再进行其他运算:操作符在后面,先进行其他运算再进行自身运算. 反正我这段话 ...
- HDU_1059 多重背包问题
F - Dividing Time Limit:1000MS Memory Limit:10000KB 64bit IO Format:%I64d & %I64u Submit ...
- foreach —(遍历数组或循环中的字符,以获取信息)
namespace ConsoleApplication2{ class Program {//letter 字母 gigit 数字 symbol 符号 static void Main(string ...