Win10/UWP 让你的App使用上扫描仪
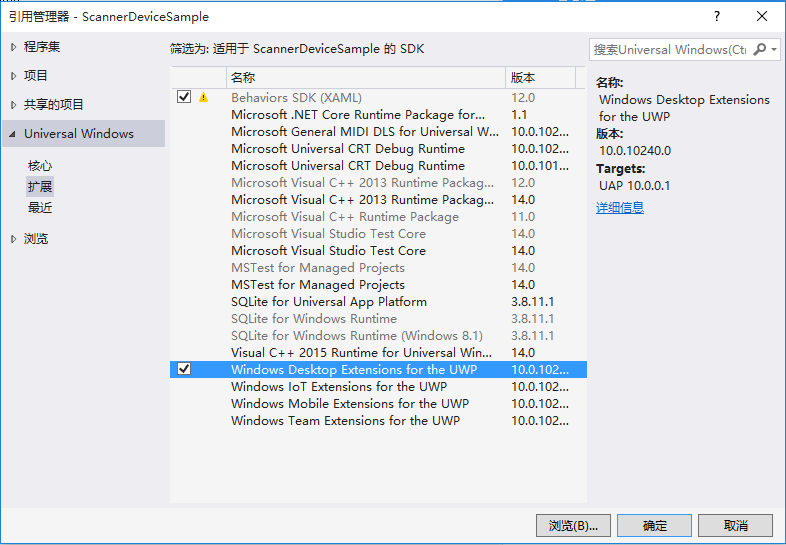
UWP的扫描仪功能现在被微软划分到了[Windows Desktop Extensions for the UWP]中,如果要使用扫描仪扫描图片到自己的App中,首先我们要添加[Windows Desktop Extensions for the UWP]的引用,这个dll中的所有类都是只能在Desktop设备上才能正常运行的。添加[Windows Desktop Extensions for the UWP]

扫描仪需要用Windows.Devices.Scanners 命名空间下的成员,有几个很重要的成员先介绍下:
ImageScanner 类
- ImageScanner.DefaultScanSource //获取为此扫描仪设备选择的默认扫描源
- ImageScanner.DeviceId //获取此扫描仪设备的 PnP 设备标识符
- ImageScanner.FlatbedConfiguration //获取并设置平板扫描单元的扫描设置,如扫描分辨率和颜色模式
- ImageScanner.FromIdAsync //创建基于扫描仪设备信息 ID 的 ImageScanner 对象的实例
- ImageScanner.ScanFilesToFolderAsync //扫描文件到文件夹 ,支持进度报告
- ImageScanner.ScanPreviewToStreamAsync //扫描文件到流
ImageScannerFlatbedConfiguration 类(这个类里面有很多属性都是和设置扫描仪有关的,主要的如下,其他就不一一列举了)
- ImageScannerFlatbedConfiguration.ColorMode //获取或设置平板扫描仪的颜色模式如黑白灰度等
- ImageScannerFlatbedConfiguration.DesiredResolution //获取或设置应用程序请求的扫描仪平板的水平和垂直扫描分辨率(以 DPI 为单位)
- ImageScannerFlatbedConfiguration.Format //获取或设置从扫描仪的平板到客户端应用程序的图像数据获取的当前文件传输格式。
- ImageScannerFlatbedConfiguration.SelectedScanRegion //获取或设置选定扫描区域的原始坐标(水平和垂直)和维度(宽度和高度)(以英寸为单位)
接下来,我们需要一台扫描仪,扫描仪装好驱动,并支持WIA 2.0 .我的是TOSHIBA 2008S
然后创建一个页面,前台代码如下:
 <Page.BottomAppBar>

         <CommandBar>

             <CommandBar.Content>

                 <Grid/>

             </CommandBar.Content>

             <AppBarButton Icon="Scan" Label="Scan Images" x:Name="Bar_ScanFiles" Click="Bar_ScanFiles_Click"/>

         </CommandBar>

     </Page.BottomAppBar>

     <Grid Background="{ThemeResource ApplicationPageBackgroundThemeBrush}" >

         <Viewbox>

             <Grid>

                 <Path Data="M0,589.122C7.23756,591.35,15.1453,592.686,23.5452,592.686L734.433,592.686C742.831,592.686,750.74,591.35,758,589.122L746.228,633.25C746.228,642.477,735.684,650,722.639,650L35.3397,650C22.3137,650,11.7945,642.477,11.7945,633.25z M410.134,418.119L541.24,418.119 635.51,532.435 363.028,532.435z M209.217,402.719C198.74,402.719,195.772,408.064,187.462,416.255L73.5126,540.241C73.5126,547.715,81.9774,553.729,92.4548,553.729L378.964,553.729 665.473,553.729C675.95,553.729,684.484,547.715,684.484,540.241L570.516,416.255C562.228,408.064,559.258,402.719,548.757,402.719L378.964,402.719z M168.384,389.421L378.964,389.421 589.591,389.421C602.638,389.421,606.277,396.102,616.622,406.219L758,560.028C758,569.288,747.43,576.795,734.433,576.795L378.964,576.795 23.5452,576.795C10.5443,576.795,0,569.288,0,560.028L141.375,406.219C151.651,396.102,155.358,389.421,168.384,389.421z M164.949,0L378.966,0 593.029,0C606.078,-5E-06,616.621,7.50893,616.621,16.7822L616.621,358.018C616.621,367.277,606.078,374.785,593.029,374.785L378.966,374.785 164.949,374.785C151.925,374.785,141.379,367.277,141.379,358.018L141.379,16.7822C141.379,7.50893,151.925,-5E-06,164.949,0z" Stretch="Uniform" Fill="#FF434343" Width="160" Height="160" Margin="0,0,0,0" RenderTransformOrigin="0.5,0.5">

                     <Path.RenderTransform>

                         <TransformGroup>

                             <TransformGroup.Children>

                                 <RotateTransform Angle="0" />

                                 <ScaleTransform ScaleX="0.5" ScaleY="0.5" />

                             </TransformGroup.Children>

                         </TransformGroup>

                     </Path.RenderTransform>

                 </Path>

             </Grid>

         </Viewbox>

         <GridView x:Name="ImgList"></GridView>

 </Grid>
后台代码如下:
 /// <summary>

       /// 开始扫描

       /// </summary>

       /// <param name="sender"></param>

       /// <param name="e"></param>

       private async void Bar_ScanFiles_Click(object sender, RoutedEventArgs e)

       {

           var scanner = await GetScanner();

           if (scanner == null) return;

           //保存至用户图片库

           //var results = await scanner.ScanFilesToFolderAsync(scanner.DefaultScanSource, KnownFolders.PicturesLibrary);

           //取消任务的Token

           cancellationToken = new CancellationTokenSource();

           //扫描中的对话框

           ContentDialog dialog = new ContentDialog();

           dialog.Title = new TextBlock { Text = "扫描中...", FontSize =  };

           dialog.Content = new Scaning() { Width = , Height =  };

           dialog.PrimaryButtonText = "取消";

           dialog.PrimaryButtonClick += (s, a) =>

           {

               cancellationToken.Cancel();

               cancellationToken.Token.Register(() =>

               {

                   dialog.Hide();

               });

           };

           dialog.ShowAsync();

           try

           {

              //获取预览 ->直接返回 Stream 不过图片质量很差

              //IRandomAccessStream stream = new InMemoryRandomAccessStream();

              //await scanner.ScanPreviewToStreamAsync(scanner.DefaultScanSource, stream).AsTask(cancellationToken.Token);

              //扫描 -> 获取到扫描完成的文件

              var files = await Scanner.ScanFilesToFolderAsync(Scanner.DefaultScanSource, KnownFolders.SavedPictures).AsTask(cancellationToken.Token);

              for (int i = ; i < files.ScannedFiles.Count; i++)

              {

                  //创建文件读取流

                  using (var fileStream = await files.ScannedFiles[i].OpenStreamForReadAsync())

                  {

                      var bitmap = new BitmapImage();

                      await bitmap.SetSourceAsync(fileStream.AsRandomAccessStream());

                      ImgList.Items.Add(new Image { Source = bitmap });

                  }

                  //用完流后删除下图片

                  await Task.Factory.StartNew(() => File.Delete(files.ScannedFiles[i].Path));

              }

           }

           catch (TaskCanceledException)

           {

               Debug.WriteLine("A task was canceled.");

           }

           catch (Exception)

           {

               Debug.WriteLine("扫描出错");

           }

           finally

           {

               dialog.Hide();

           }

       }

       /// <summary>

       /// 获取扫描仪对象

       /// </summary>

       /// <returns>ImageScanner</returns>

       private async Task<ImageScanner> GetScanner()

       {

           try

           {

               var device = await DeviceInformation.FindAllAsync(DeviceClass.ImageScanner);

               var scanner = await ImageScanner.FromIdAsync(device.FirstOrDefault().Id);

               return scanner;

           }

           catch (Exception)

           {

               await OpenScannerWithError("你可以尝试以下操作后重试:\r\n1、未发现可用的扫描仪设备\r\n2、没有安装适合的WIA2.0兼容驱动程序",

                   true, "重试", true, "取消",

                   () => { Bar_ScanFiles_Click(null, null); });

               return null;

           }

       }

       /// <summary>

       /// 弹出错误提示

       /// </summary>

       /// <param name="error">错误描述</param>

       /// <param name="hasPrimaryBtn">是否具有主按钮</param>

       /// <param name="primaryBtnText">主按钮Text</param>

       /// <param name="hasSecondaryBtn">是否具有副按钮</param>

       /// <param name="secondaryBtnText">副按钮Text</param>

       /// <param name="primaryBtnClick">主按钮点击后执行的方法</param>

       /// <param name="secondaryBtnClick">副按钮点击后执行的方法</param>

       /// <returns>null</returns>

       private async Task OpenScannerWithError(string error, bool hasPrimaryBtn = false, string primaryBtnText = null, bool hasSecondaryBtn = false, string secondaryBtnText = null, Action primaryBtnClick = null, Action secondaryBtnClick = null)

       {

           ContentDialog dialog = new ContentDialog();

           var dialogTitle = new StackPanel();

           dialogTitle.Children.Add(new TextBlock { Text = "出错啦 ( ▼-▼ )", Foreground = new SolidColorBrush(Colors.Red) });

           var dialogContent = new StackPanel() { Margin = new Thickness(, , , ) };

           dialogContent.Children.Add(new TextBlock { Text = error });

           dialog.Title = dialogTitle;

           dialog.Content = dialogContent;

           if (hasPrimaryBtn)

           {

               dialog.PrimaryButtonText = "重试";

               if (primaryBtnClick != null)

               {

                   dialog.Hide();

                   dialog.PrimaryButtonClick += (s, a) =>

                   {

                       primaryBtnClick();

                   };

               }

           }

           if (hasSecondaryBtn)

           {

               dialog.SecondaryButtonText = "取消";

               dialog.SecondaryButtonClick += (s, a) =>

               {

                   dialog.Hide();

                   if (secondaryBtnClick != null)

                   {

                       secondaryBtnClick();

                   }

               };

           }

           await dialog.ShowAsync();

       }
用到的一个UserControl –> Scaning, 是用来显示扫描中动画的,前台代码如下:
 <UserControl

     xmlns="http://schemas.microsoft.com/winfx/2006/xaml/presentation"

     xmlns:x="http://schemas.microsoft.com/winfx/2006/xaml"

     xmlns:local="using:ScannerDeviceSample.UserControls"

     xmlns:d="http://schemas.microsoft.com/expression/blend/2008"

     xmlns:mc="http://schemas.openxmlformats.org/markup-compatibility/2006"

     xmlns:Interactivity="using:Microsoft.Xaml.Interactivity" xmlns:Core="using:Microsoft.Xaml.Interactions.Core" xmlns:Media="using:Microsoft.Xaml.Interactions.Media"

     x:Class="ScannerDeviceSample.UserControls.Scaning"

     mc:Ignorable="d"

     d:DesignHeight="200"

     d:DesignWidth="200">

     <UserControl.Resources>

         <Storyboard x:Name="ScaningStoryboard" AutoReverse="True" RepeatBehavior="Forever">

             <DoubleAnimationUsingKeyFrames Storyboard.TargetProperty="(UIElement.RenderTransform).(CompositeTransform.TranslateY)" Storyboard.TargetName="recScanning">

                 <EasingDoubleKeyFrame KeyTime="0" Value="0"/>

                 <EasingDoubleKeyFrame KeyTime="0:0:2" Value="-200"/>

             </DoubleAnimationUsingKeyFrames>

         </Storyboard>

     </UserControl.Resources>

     <Interactivity:Interaction.Behaviors>

         <Core:EventTriggerBehavior EventName="Loaded">

             <Media:ControlStoryboardAction Storyboard="{StaticResource ScaningStoryboard}"/>

         </Core:EventTriggerBehavior>

     </Interactivity:Interaction.Behaviors>

     <Grid>

         <Path  Data="M2.8160041,17.083004L2.8160041,18.351004 15.944004,18.351004 15.944004,17.083004z M2.8160041,13.907004L2.8160041,15.174004 15.944004,15.174004 15.944004,13.907004z M2.8160041,10.731004L2.8160041,11.999004 15.944004,11.999004 15.944004,10.731004z M0,1.356853E-05L10.572985,1.356853E-05 10.572985,7.9669956 18.761999,7.9669956 18.761999,21.176014 0,21.176014z M11.945004,0L18.761988,6.6610196 11.945004,6.6610196z" Stretch="Uniform" Fill="Black" Width="128" Height="128" Margin="0,0,0,0" RenderTransformOrigin="0.5,0.5">

             <Path.RenderTransform>

                 <TransformGroup>

                     <RotateTransform Angle="0" />

                     <ScaleTransform ScaleX="0.8" ScaleY="1" />

                 </TransformGroup>

             </Path.RenderTransform>

         </Path>

         <Rectangle x:Name="recScanning"   Height="2" RenderTransformOrigin="0.5,0.5" VerticalAlignment="Bottom" d:LayoutOverrides="Height">

             <Rectangle.RenderTransform>

                 <CompositeTransform/>

             </Rectangle.RenderTransform>

             <Rectangle.Projection>

                 <PlaneProjection/>

             </Rectangle.Projection>

             <Rectangle.Fill>

                 <LinearGradientBrush EndPoint="0,0.5" StartPoint="1,0.5">

                     <GradientStop Color="#331CF106" Offset="0.15"/>

                     <GradientStop Color="#331CF106" Offset="0.85"/>

                     <GradientStop Color="#FF1CF106" Offset="0.5"/>

                 </LinearGradientBrush>

             </Rectangle.Fill>

         </Rectangle>

     </Grid>

 </UserControl>
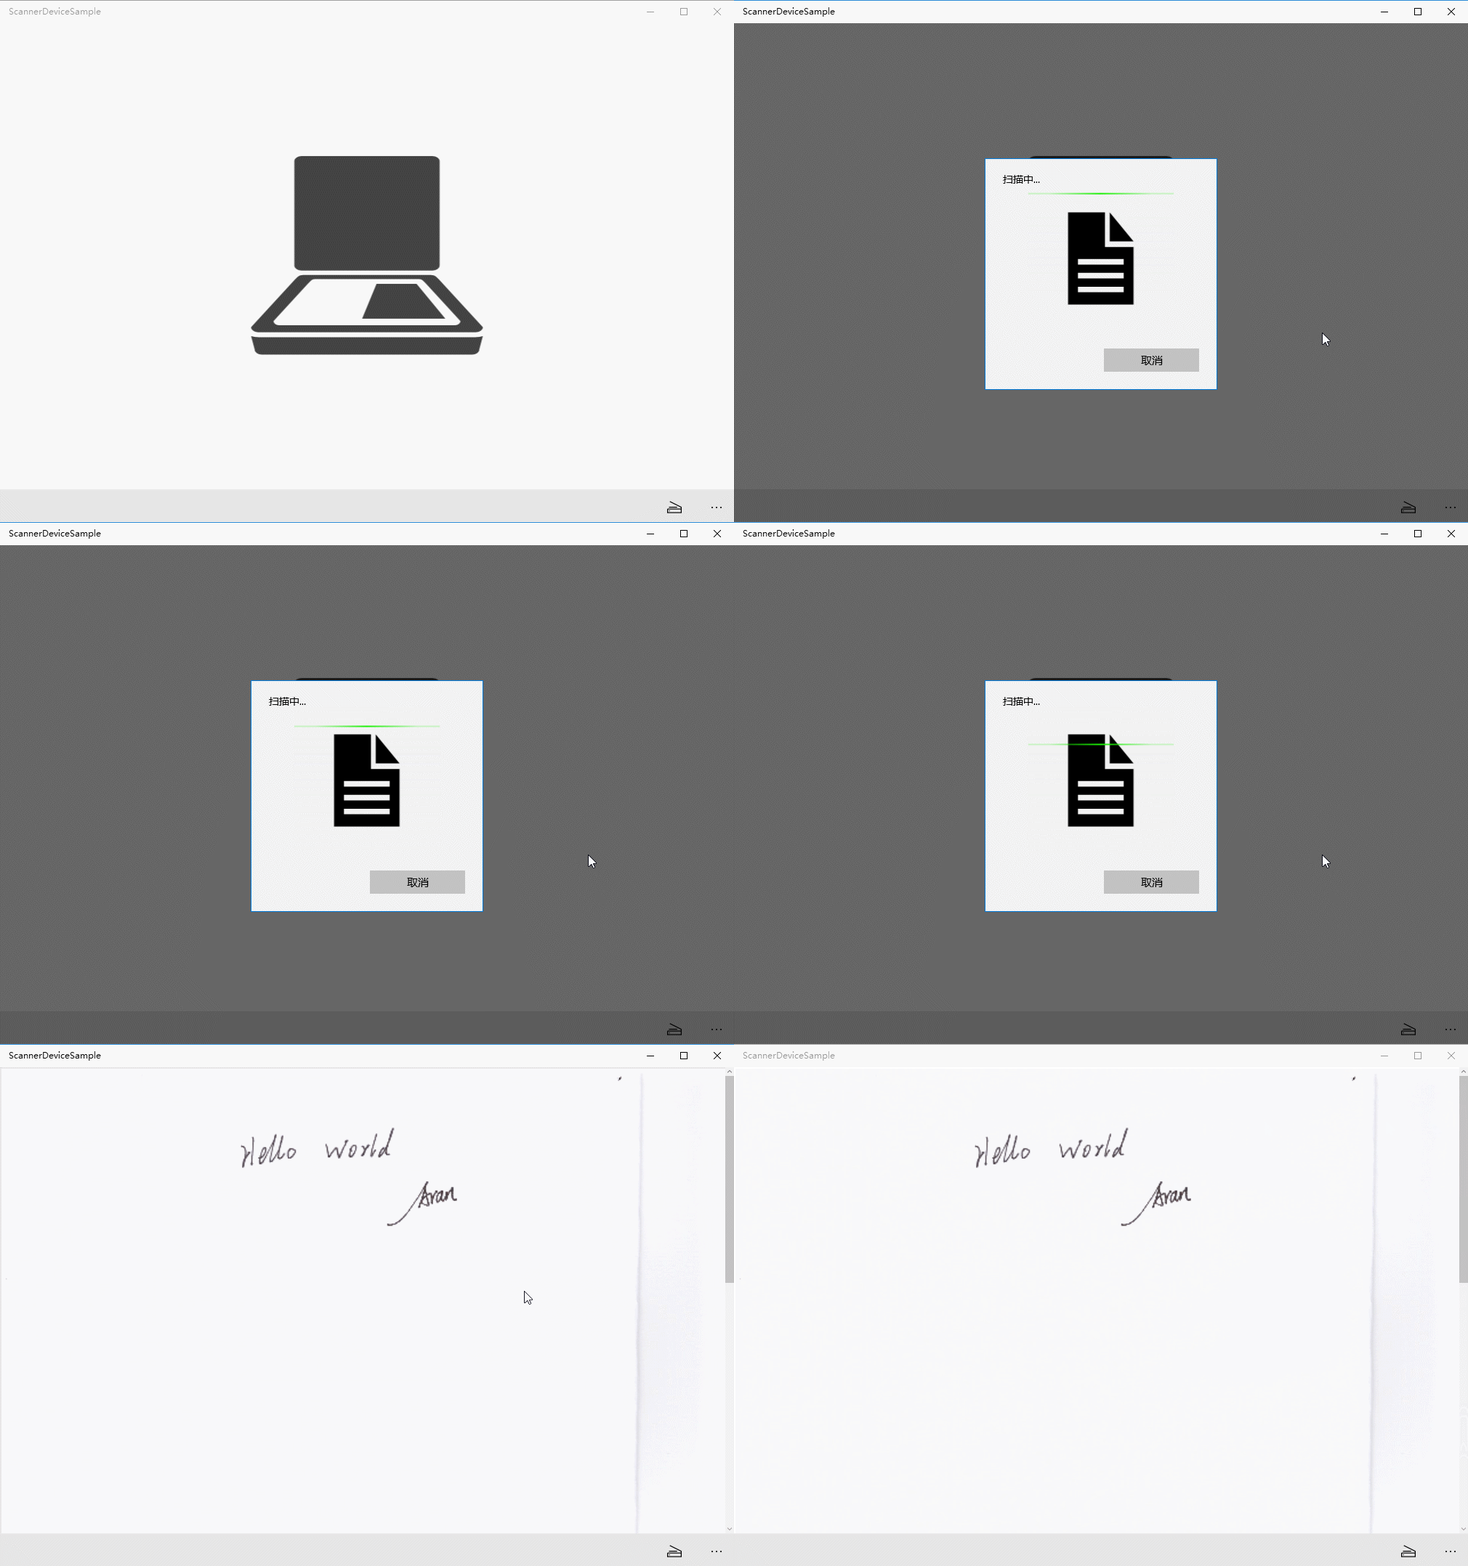
最后的效果:

推荐一个UWP开发群:53078485 大家可以进来一起学习~~
Win10/UWP 让你的App使用上扫描仪的更多相关文章
- Win10 UWP开发系列:使用VS2015 Update2+ionic开发第一个Cordova App
安装VS2015 Update2的过程是非常曲折的.还好经过不懈的努力,终于折腾成功了. 如果开发Cordova项目的话,推荐大家用一下ionic这个框架,效果还不错.对于Cordova.PhoneG ...
- Win10/UWP开发—使用Cortana语音与App后台Service交互
上篇文章中我们介绍了使用Cortana调用前台App,不熟悉的移步到:Win10/UWP开发—使用Cortana语音指令与App的前台交互,这篇我们讲讲如何使用Cortana调用App的后台任务,相比 ...
- Win10 UWP开发系列:实现Master/Detail布局
在开发XX新闻的过程中,UI部分使用了Master/Detail(大纲/细节)布局样式.Win10系统中的邮件App就是这种样式,左侧一个列表,右侧是详情页面.关于这种 样式的说明可参看MSDN文档: ...
- Win10 UWP开发实现Bing翻译
微软在WP上的发展从原来的Win7到Win8,Win8.1,到现在的Win10 UWP,什么是UWP,UWP即Windows 10 中的Universal Windows Platform简称.即Wi ...
- Win10/UWP新特性—SharedStorageAccessManager 共享文件
首先先给大家推荐一个UWP/Win10开发者群:53078485 里面有很多大婶,还有很多学习资源,欢迎大家来一起讨论Win10开发! 在UWP开发中,微软提供了一个新的特性叫做SharedStor ...
- 【Win10 UWP】QQ SDK(二):SDK的回调处理
上一讲,我们介绍了QQ SDK的使用方法,请看<[Win10 UWP]QQ SDK(一):SDK基本使用方法> 一. 回调的基本形式 从前面的介绍中我们知道,我们的应用和QQ客户端之间需要 ...
- Win10 UWP应用发布流程
简介 Win10 UWP应用作为和Win8.1 UAP应用不同的一种新应用形式,其上传至Windows应用商店的流程也有了一些改变. 这篇博文记录了我们发布一款Win10 UWP应用的基本流程,希望为 ...
- win10 uwp DataContext
本文告诉大家DataContext的多种绑法. 适合于WPF的绑定和UWP的绑定. 我告诉大家很多个方法,所有的方法都有自己的优点和缺点,可以依靠自己喜欢的用法使用.当然,可以在新手面前秀下,一个页面 ...
- 【广告】win10 uwp 水印图床 含代码
本文主要是广告我的软件. 图床可以加速大家写博客上传图片的时间,通过简化我们的操作来得到加速. 在写博客的时候,我们发现,我们需要上传一张图片,需要先打开图片,然后选择本地图片,然后上传. 但是我经常 ...
随机推荐
- 工作需求——JQ小效果分享下
一.文字索引效果展示: html布局代码 <ul class="n_areaList"> <li> <h5>当前选择区域</h5> ...
- PDF 补丁丁 0.5.0.1816 测试版发布:新界面新体验
新的测试版简化了界面,操作更直观,同时修复了旧版本的一些错误. 欢迎各位下载测试文件试用,并提出宝贵意见.
- NetworkComms V3 使用Json序列化器进行网络通信
刚才在网上闲逛,偶然看到一篇文章 C#(服务器)与Java(客户端)通过Socket传递对象 网址是:http://www.cnblogs.com/iyangyuan/archive/2012/12/ ...
- textbox button 模拟fileupload
方案一: <%@ Page Language="C#" AutoEventWireup="true" CodeBehind="test.asp ...
- CSS3 仿微信聊天小气泡
今天给大家分享一个我刚做的项目中的一个小案例, 因为我们在做一个聊天的功能,之前的聊天页面UI很丑,我就不在这里展示给大家了. 现在就教大家怎么用css3制作一个和微信聊天界面一样的页面. 首先给大家 ...
- java 调用 scala
1 scala 方法的输入输出不能有 jdk 不可识别的类型(如:Int,Float,Any 等是不行的,Unit 对应到 void 是可以的.) http://rwh.readthedocs.org ...
- Android6.0中的权限
Android6.0相比之前的Android版本有一个很大的不同点,就是动态的获取权限.之前我们需要什么权限只需要在Manifest文件中声明即可,在6.0中,又新增了运行时权限的动态检测. Andr ...
- 转: Rest简介及Spring实现
一 Roy Fielding 2000年Rest被Roy Fielding提出来的,我对Roy Fielding的印象有以下几个. 一是RoyFielding做为Http协议的起草者,在Http协议发 ...
- The requested resource is not available...
运行tomcat 提示如下错误: The requested resource () is not available的解决方案 出现这个问题,接口肯定是没问题了.问题可能有两个: 1.文件设置无法访 ...
- Visro 应用的前端模板工具介绍 -JsRender
1.什么是JsRender: JsRender是一款JavaScript模版引擎,是具有简单直观,功能强大,可扩展的,早期版本是基于JQUERY 写的,后来作者重构了,就不再依赖JQUERY了. 它的 ...
