Android菜鸟成长记8 -- 布局实践(微信界面的编写)
前面我们简单的介绍了一下android的五大布局,那么现在我们来实践一下,写一个简单的微信界面
首先,我们新建一个weixin.xml的linnerlayout布局
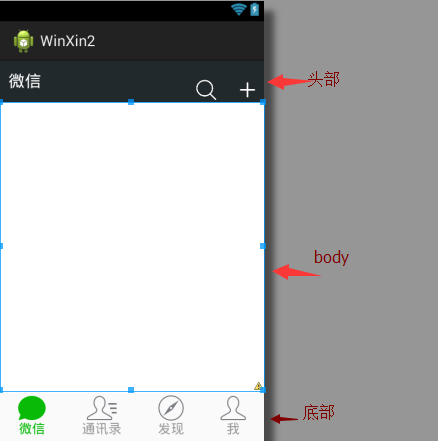
我们日常使用的微信,从简单的方面来说我可一分成三个内容,头部标签栏,中间显示信息栏,还有一个底部。那么我们就按照这个来先建一个页面
 <?xml version="1.0" encoding="utf-8"?>

 <LinearLayout xmlns:android="http://schemas.android.com/apk/res/android"

     android:layout_width="match_parent"

     android:layout_height="match_parent"

     android:orientation="vertical" >

     <!-- head -->

     <LinearLayout

         android:layout_width="match_parent"

         android:layout_height="wrap_content" >

     </LinearLayout>

     <!-- 中间 -->

     <LinearLayout

         android:layout_width="match_parent"

         android:layout_height="wrap_content"

     </LinearLayout>

     <!-- 底部 -->

     <LinearLayout

         android:layout_width="match_parent"

         android:layout_height="wrap_content" >

     </LinearLayout>

 </LinearLayout>
效果如下:
这是完成后的显示

那么要怎么实现到这个效果,
1.先创建一个标题栏的layout文件
 <?xml version="1.0" encoding="utf-8"?>

 <LinearLayout xmlns:android="http://schemas.android.com/apk/res/android"

     android:layout_width="match_parent"

     android:layout_height="50dp"

     android:orientation="horizontal"

     android:background="#21292c">

     <TextView

         android:id="@+id/textView1"

         android:layout_width="wrap_content"

         android:layout_height="wrap_content"

         android:text="@string/weixin"

         android:textColor="#ffffff"

         android:textSize="20sp"

         android:layout_gravity="center"

         android:padding="10dp"/>

     <TextView

         android:layout_width="wrap_content"

         android:layout_marginTop="20dp"

         android:layout_height="30dp"

         android:layout_weight=""

         android:gravity="bottom" />

     <LinearLayout

         android:layout_width="wrap_content"

         android:layout_height="match_parent"

         android:gravity="bottom">

         <ImageView

             android:id="@+id/imageView2"

             android:layout_width="40dp"

             android:layout_height="30dp"

             android:src="@drawable/fdj"

             android:layout_marginRight="10dp"/>

         <ImageView

             android:id="@+id/imageView1"

             android:layout_width="40dp"

             android:layout_height="30dp"

             android:src="@drawable/barbuttonicon_add" />

     </LinearLayout>

 </LinearLayout>
然后我们在创建一个底部的文件的
 <?xml version="1.0" encoding="utf-8"?>

 <LinearLayout xmlns:android="http://schemas.android.com/apk/res/android"

     android:layout_width="match_parent"

     android:layout_height="match_parent"

     android:orientation="horizontal" >

     <RadioGroup

         android:id="@+id/radioGroup1"

         android:layout_width="match_parent"

         android:layout_height="60dp"

         android:orientation="horizontal"

         android:background="@drawable/group_buton_nomal"

         android:gravity="center">

         <RadioButton

             android:id="@+id/radio0"

             android:layout_width="wrap_content"

             android:layout_height="wrap_content"

             android:checked="true"

             android:text="@string/weixin"

                style="@style/radioStyle"

                android:drawableTop="@drawable/tab_weixin"/>

         <RadioButton

             android:id="@+id/radio1"

             android:layout_width="wrap_content"

             android:layout_height="wrap_content"

             android:text="@string/addressList"

                style="@style/radioStyle"

                android:drawableTop="@drawable/tab_address"/>

         <RadioButton

             android:id="@+id/radio2"

             android:layout_width="wrap_content"

             android:layout_height="wrap_content"

             android:text="@string/find"

                style="@style/radioStyle"

                android:drawableTop="@drawable/tab_find"/>

          <RadioButton

             android:id="@+id/radio3"

             android:layout_width="wrap_content"

             android:layout_height="wrap_content"

             android:text="@string/set"

                style="@style/radioStyle"

                android:drawableTop="@drawable/tab_set"/>

     </RadioGroup>

 </LinearLayout>
底部文件采用的是单选按钮组,这里我就不过多解释了,跟HTML的单选按钮类似
上面的用到的style是自己设计的一个按钮样式,放在style.xml的文件里,具体代码如下
 <style name="radioStyle">

         <item name="android:button">@null</item>

         <item name="android:layout_weight"></item>

         <item name="android:gravity">center</item>

         <item name="android:textColor">@drawable/text_color</item>

     </style>
为了让让底部的显示效果更加的接近我们日常使用的微信,我们对按钮做了一个判断,就是使用selector(不懂的请看下一章)
代码如下:
 <?xml version="1.0" encoding="utf-8"?>

 <selector xmlns:android="http://schemas.android.com/apk/res/android" >

     <item android:state_checked="true"

         android:drawable="@drawable/tabbar_contacts_hl"></item>

     <item

         android:drawable="@drawable/tabbar_contacts"></item>

 </selector>
就是通过焦点是否在该按钮上,在的化显示有颜色的图片,不在的化显示没颜色的。对其他桑按钮同样的操作,代码一样,只是把图片换一下就OK了。
还有文字也进行了相同的操作
 <?xml version="1.0" encoding="utf-8"?>

 <selector xmlns:android="http://schemas.android.com/apk/res/android" >

     <item android:state_checked="true"

         android:drawable="@drawable/tabbar_contacts_hl"></item>

     <item

         android:drawable="@drawable/tabbar_contacts"></item>

 </selector>
好了,一切准备,就绪,我们只需要将一切和起来就可以了。我们可以在weixin.xml通过include的标签把这些包含进来
<?xml version="1.0" encoding="utf-8"?>

<LinearLayout xmlns:android="http://schemas.android.com/apk/res/android"

    android:layout_width="match_parent"

    android:layout_height="match_parent"

    android:orientation="vertical" >

    <!-- head -->

    <LinearLayout

        android:layout_width="match_parent"

        android:layout_height="wrap_content" >

        <include layout="@layout/head"/>

    </LinearLayout>

    <!-- 中间 -->

    <LinearLayout

        android:layout_width="match_parent"

        android:layout_height="wrap_content"

        android:layout_weight="">

    </LinearLayout>

    <!-- 底部 -->

    <LinearLayout

        android:layout_width="match_parent"

        android:layout_height="wrap_content" >

        <include layout="@layout/bottom"/>

    </LinearLayout>

</LinearLayout>
这样一个简单的微信界面就准备h好了
但是你运行的时候是不是觉得不对劲,跟我们的实际用的微信不一样,那是因为多了一个系统默认的标题栏,我们把他去掉就可以了。
在AndroidManifest.xml的作一下的修改即可

那样一个见到你微信布局就完成了.
Android菜鸟成长记8 -- 布局实践(微信界面的编写)的更多相关文章
- Android菜鸟成长记7 -- Android的五大布局
Android五大布局,相信android的都了解过,今天我根据自己的学习整理一下五大布局,主要介绍的是线性布局(LiearLayout),因为,其他的布局使用率不是很高. Android的五大布局 ...
- Android菜鸟成长记4-button点击事件
Button 1.button按钮的创建 一般来说,在我们新建一个Android项目的时候,会有会默认有一个activity_main.xml的文件 如果你在新建项目的时候,把Create Activ ...
- Android菜鸟成长记16 -- JSON的解析
JSON的定义 一种轻量级的数据交换格式,具有良好的可读和便于快速编写的特性.业内主流技术为其提供了完整的解决方案(有点类似于正则表达式 ,获得了当今大部分语言的支持),从而可以在不同平台间进行数据 ...
- Android菜鸟成长记14 -- AsnyTask
本篇随笔将讲解一下Android的多线程的知识,以及如何通过AsyncTask机制来实现线程之间的通信. 一.Android当中的多线程 在Android当中,当一个应用程序的组件启动的时候,并且没有 ...
- Android菜鸟成长记11 -- sqlite数据库的设计和升降级
Google为Andriod的较大的数据处理提供了SQLite,他在数据存储.管理.维护等各方面都相当出色,功能也非常的强大.SQLite具备下列特点: 1.轻量级 使用 SQLite 只需要带一个动 ...
- Android菜鸟成长记10 -- ListVew
ListView在我们学习Android的过程中是非常重要得一个部分. listview主要有两个职责 1)将数据填充到布局. 2)处理用户的选择点击等操作. 一个ListView的创建需要3个元素 ...
- Android菜鸟成长记15 -- BitMap
BitMap简介 Bitmap是Android系统中的图像处理的最重要类之一.用它可以获取图像文件信息,进行图像剪切.旋转.缩放等操作,并可以指定格式保存图像文件.本文从应用的角度,着重介绍怎么用Bi ...
- Android菜鸟成长记13 -- 初识application
二.Application 简介 Application 类是用来维护应用程序全局状态.你可以提供自己的实现,并在 AndroidManifest.xml文件的 <application> ...
- Android菜鸟成长记12 -- ORMLite的简单使用
在我们的开发中,为了提高开发效率,我们一般都会使用到框架,ormilte则是我们必不可少的数据库框架. 对于ORMLite我也是今天才刚刚接触,我们先从一个简单的项目来了解它吧. ORMLite ja ...
随机推荐
- inteview que2
1.spring的缓存,mybatis缓存a.基于注解的方式 三种注解b.mybatis分为一级session和二级缓存mapperc.采用LRU算法(近期最少使用) http://www.iteye ...
- CentOS下Apache开启Rewrite功能
1.centos的配置文件放在: /etc/httpd/conf/httpd.conf 打开文件找到: LoadModule rewrite_module modules/mod_rewrite.so ...
- QQ右下角浮动窗口
<html><head><meta http-equiv="Content-Type" content="text/html; charse ...
- PMIC RTC 寄存器
RTC_PDN1 bit 0 - 3 : Android bits bit 4 - 5 : Recovery bits (0x10: factory data reset) bit 6 : Bypas ...
- Windows 服务关闭自动重启
此方法可以用来监控Windows Service是否运行良好 1.创建批处理程序,判断服务是否启动,若未启动则启动之 @echo off Rem Look for the Print Spooler ...
- X-Cart 学习笔记 完整目录
如果有需要,可以直接联系博主,讨论学习 一.了解X-CART. 3 二.PHP环境搭建... 3 三.安装配置X-CART. 4 1.下载X-Cart并配置域名,映射地址... 4 2.配置X-Car ...
- jpeg库编译 - windows平台
一.准备: 下载最新的jpeg库源码:http://www.ijg.org/files/jpegsr9a.zip二.编译 1. 解压到指定目录 2. 打开VS2010命令行窗口(为了得到VS2010的 ...
- C# 访问https 未能创建 SSL/TLS 安全通道
C# 访问https请求被中止: 未能创建 SSL/TLS 安全通道(Could not create SSL/TLS secure channel) 一般GetResponse可以直接访问https ...
- strace 解决库依赖问题
解决库依赖问题 starce 的另一个用处是解决和动态库相关的问题.当对一个可执行文件运行ldd时,它会告诉你程序使用的动态库和找到动态库的位置.但是如果你正在使用一个比较老 的glibc版本(2.2 ...
- NOIP2008 传纸条
题目描述 小渊和小轩是好朋友也是同班同学,他们在一起总有谈不完的话题.一次素质拓展活动中,班上同学安排做成一个m行n列的矩阵,而小渊和小轩被安排在矩阵对角线的两端,因此,他们就无法直接交谈了.幸运的是 ...
